您好,登錄后才能下訂單哦!
您好,登錄后才能下訂單哦!
小編給大家分享一下如何使用Python實現二叉樹、二叉樹非遞歸遍歷及繪制,相信大部分人都還不怎么了解,因此分享這篇文章給大家參考一下,希望大家閱讀完這篇文章后大有收獲,下面讓我們一起去了解一下吧!
前言
關于二叉樹的實現與遍歷,網上已經有很多文章了,包括C, C++以及JAVA等。鑒于python做為腳本語言的簡潔性,這里寫一篇小文章用python實現二叉樹,幫助一些對數據結構不太熟悉的人快速了解下二叉樹。本文主要通過python以非遞歸形式實現二叉樹構造、前序遍歷,中序遍歷,后序遍歷,層次遍歷以及求二叉樹的深度及葉子結點數。其他非遞歸形式的遍歷,想必大多人應該都很清楚,就不再聲明。如果你用C或者C++或者其他高級語言寫過二叉樹或者閱讀過相關方面代碼,應該知道二叉樹的非遞歸遍歷避不開通過棧或者隊列實現。是的,python也一樣。但是python自帶的list功能很強大,即可以當stack 又可以當成queue。 這樣用python實現二叉樹就可以減少了對棧或者隊列的聲明及定義。
實現
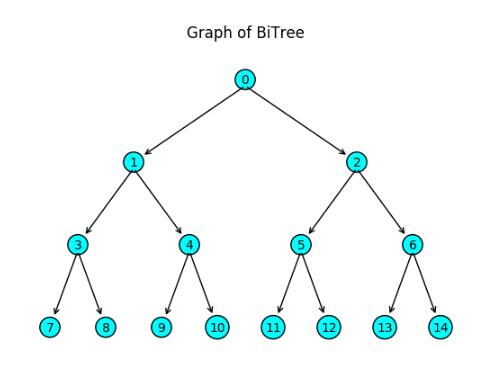
二叉樹的結點的實現
如上圖1的的二叉樹,要想實現二叉樹。首先應該先聲明一個二叉樹結點,包括它的元素及左右子結點,這個在C/C++也是一樣的。在python里, 可以通過類聲明一個結點,如下:
class BiNode(object):
 """class BiNode provide interface to set up a BiTree Node and to interact"""
 def __init__(self, element=None, left=None, right=None):
  """set up a node """
  self.element = element
  self.left = left
  self.right = right

 def get_element(self):
  """return node.element"""
  return self.element

 def dict_form(self):
  """return node as dict form"""
  dict_set = {
   "element": self.element,
   "left": self.left,
   "right": self.right,
  }
  return dict_set

 def __str__(self):
  """when print a node , print it's element"""
  return str(self.element)
上述的dict_form interface是將結點以python字典的形式呈現出來,方便后面將樹打包成字典。另外說明下由于python字典的特性,將字典當成一個樹結構來處理也是可以的。事實上,很多人是這樣做的。下圖測試展現了樹結點的實現:

二叉樹初始化
實現了二叉樹結點,接下來實現二叉樹.首先對二叉樹進行初始化,代碼如下:
class BiTree:
 """class BiTree provide interface to set up a BiTree and to interact"""
 def __init__(self, tree_node=None):
  """set up BiTree from BiNode and empty BiTree when nothing is passed"""
  self.root = tree_node`
上面代碼很簡單,就是對樹通過一個傳進來的結點進行初始化,如果參數為空則初始化為一個空樹。
順序構造二叉樹
那么我如果想通過一個列表元素按順序實現樹的構造或者通過字典進行構造呢?
先說下用一個列表元素按順序構造。
假設現在已經存在一顆二叉樹,如下圖2
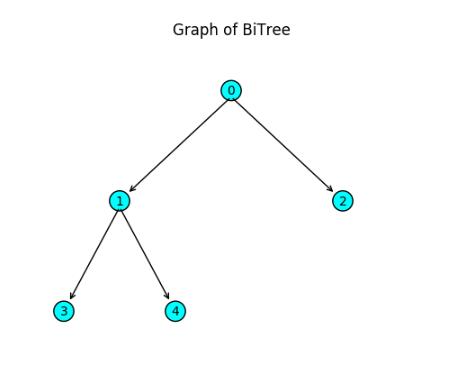
新添加的結點按順序做為結點2的左子結點(這里不考慮像二叉查找樹等的插入要求)。基本插入方法如下:
判斷根結點是否存在,如果不存在則插入根結點。否則從根結點開始,判斷左子結點是否存在,如果不存在插入, 如果左子結點存在判斷右結點,不存在插入。如果左右結點存在,再依次遍歷左右子結點的子結點,直到插入成功。
上述的方法類似于層次遍歷,體現了廣度搜索優先的思想。因此從代碼實現上,很顯然需要一個隊列對子結點進行入隊與出隊。在python上這很簡單,一個list 就實現了,代碼如下:
 def add_node_in_order(self, element):
  """add a node to existent BiTree in order"""
  node = BiNode(element)

  if self.root is None:
   self.root = node
  else:
   node_queue = list()
   node_queue.append(self.root)
   while len(node_queue):
    q_node = node_queue.pop(0)
    if q_node.left is None:
     q_node.left = node
     break
    elif q_node.right is None:
     q_node.right = node
     break
    else:
     node_queue.append(q_node.left)
     node_queue.append(q_node.right)

 def set_up_in_order(self, elements_list):
  """set up BiTree from lists of elements in order """
  for elements in elements_list:
   self.add_node_in_order(elements)
set_up_in_order()實現了通過列表對樹進行順序構造。
從字典初始化構造二叉樹
當然你會發現,用上述方法構造的二叉樹永遠都是完全二叉樹。實際情況下,我們需要初始化像圖3這樣的一棵不規則的二叉樹,怎么辦?
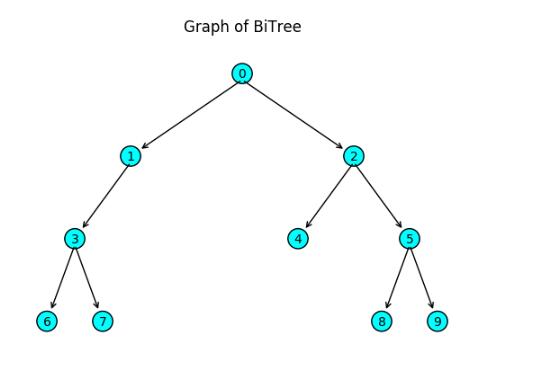
此時, 可以借住python的字典對樹進行構造,參考的node的dict_form,約定”element”的key_value是結點值,“left”,“right”的key_value也是一個字典代表左右子樹,如果為空則為None 。為方便書寫,對于一個結點除了element不能缺外, 左右子樹不存在時相應key可以缺失。同時對于葉結點,可以省略寫成相應的元素值而不用繼續構造一個字典。此時可以通過類似如下字典初始一棵二叉樹表示,如下:
dict_tree = {
 "element": 0,
 "left": {
  "element": 1,
  "left": {
   "element": 3,
   "left": 6,
   "right": 7,
  }
 },
 "right": {
  "element": 2,
  "left": 4,
  "right": {
   "element": 5,
   "left": 8,
   "right": 9,
  },
 },
}
上述字典表示的二叉樹即為圖3所示
通過字典進行初始樹,可以借用層次遍歷的思想實現樹的構造,本質上其實就是對樹進行一個非遞歸實現的拷貝,代碼實現如下:
def set_up_from_dict(self, dict_instance):
  """set up BiTree from a dict_form tree using level traverse, or call it copy """
  if not isinstance(dict_instance, dict):
   return None
  else:
   dict_queue = list()
   node_queue = list()
   node = BiNode(dict_instance["element"])
   self.root = node
   node_queue.append(node)
   dict_queue.append(dict_instance)
   while len(dict_queue):
    dict_in = dict_queue.pop(0)
    node = node_queue.pop(0)
    # in dict form, the leaf node might be irregular, like compressed to element type
    # Thus , all this case should be solved out respectively
    if isinstance(dict_in.get("left", None), (dict, int, float, str)):
     if isinstance(dict_in.get("left", None), dict):
      dict_queue.append(dict_in.get("left", None))
      left_node = BiNode(dict_in.get("left", None)["element"])
      node_queue.append(left_node)
     else:
      left_node = BiNode(dict_in.get("left", None))
     node.left = left_node

    if isinstance(dict_in.get("right", None), (dict, int, float, str)):
     if isinstance(dict_in.get("right", None), dict):
      dict_queue.append(dict_in.get("right", None))
      right_node = BiNode(dict_in.get("right", None)["element"])
      node_queue.append(right_node)
     else:
      right_node = BiNode(dict_in.get("right", None))
     node.right = right_node
將二叉樹打包成字典
往往我們也需要將一顆二叉樹用字典的形式表示出來, 其方法與從字典初始化一棵二叉樹一樣,代碼實現如下:
def pack_to_dict(self):
  """pack up BiTree to dict form using level traversal"""
  if self.root is None:
   return None
  else:
   node_queue = list()
   dict_queue = list()
   node_queue.append(self.root)
   dict_pack = self.root.dict_form()
   dict_queue.append(dict_pack)
   while len(node_queue):
    q_node = node_queue.pop(0)
    dict_get = dict_queue.pop(0)
    if q_node.left is not None:
     node_queue.append(q_node.left)
     dict_get["left"] = q_node.left.dict_form()
     dict_queue.append(dict_get["left"])
    if q_node.right is not None:
     node_queue.append(q_node.right)
     dict_get["right"] = q_node.right.dict_form()
     dict_queue.append(dict_get["right"])
  return dict_pack
求二叉樹的深度
求二叉樹的深度或者高度的非遞歸實現,本質上可以通過層次遍歷實現,方法如下:
1. 如果樹為空,返回0 。
2. 從根結點開始,將根結點拉入列。
3. 當列非空,記當前隊列元素數(上一層節點數)。將上層節點依次出隊,如果左右結點存在,依次入隊。直至上層節點出隊完成,深度加一。繼續第三步,直至隊列完全為空。
代碼實現如下:
 def get_depth(self):
  """method of getting depth of BiTree"""
  if self.root is None:
   return 0
  else:
   node_queue = list()
   node_queue.append(self.root)
   depth = 0
   while len(node_queue):
    q_len = len(node_queue)
    while q_len:
     q_node = node_queue.pop(0)
     q_len = q_len - 1
     if q_node.left is not None:
      node_queue.append(q_node.left)
     if q_node.right is not None:
      node_queue.append(q_node.right)
    depth = depth + 1
   return depth
前序遍歷
二叉樹的前序,中序,后序稱體現的是深度優先搜索的思想。
本質上它們的方法其實是一樣的。
先說前序遍歷, 方法如下:
1. 如果樹為空,返回None 。
2. 從根結點開始,如果當前結點左子樹存在,則打印結點,并將該結點入棧。讓當前結點指向左子樹,繼續步驟2直至當前結點左子樹不存在。
3. 將當結點打印出來,如果當前結點的右子樹存在,當前結點指向右子樹,繼續步驟2。否則進行步驟4.
4. 如果棧為空則遍歷結束。若非空,從棧里面pop一個節點,從當前結點指向該結點的右子樹。如果右子樹存在繼續步驟2,不存在繼續步驟4直至結束。
以圖2為例,用N代表結點。
1.N0 ,N1依次打印,并且入棧。
2. 打印N3,
3. N3右子樹不存在,N1出棧,遍歷N1右子樹N4
4. N4的左子樹不存在,打印N4。N4右子樹不存在,N0出棧,指向其右子樹N2
5. N2的左子樹不存在,打印N2,判斷右子樹及棧空結束
代碼實現如下:
def pre_traversal(self):
  """method of traversing BiTree in pre-order"""
  if self.root is None:
   return None
  else:
   node_stack = list()
   output_list = list()
   node = self.root
   while node is not None or len(node_stack):
    # if node is None which means it comes from a leaf-node' right,
    # pop the stack and get it's right node.
    # continue the circulating like this
    if node is None:
     node = node_stack.pop().right
     continue
    # save the front node and go next when left node exists
    while node.left is not None:
     node_stack.append(node)
     output_list.append(node.get_element())
     node = node.left
    output_list.append(node.get_element())
    node = node.right
  return output_list
中序遍歷
中序遍歷的思想基本與前序遍歷一樣,只是最開始結點入棧時先不打印。只打印不存在左子樹的當前結點,然后再出棧遍歷右子樹前再打印出來,代碼實現如下:
 def in_traversal(self):
  """method of traversing BiTree in in-order"""
  if self.root is None:
   return None
  else:
   node_stack = list()
   output_list = list()
   node = self.root
   while node is not None or len(node_stack):
    # if node is None which means it comes from a leaf-node' right,
    # pop the stack and get it's right node.
    # continue the circulating like this
    if node is None:
     node = node_stack.pop()
     # in in-order traversal, when pop up a node from stack , save it
     output_list.append(node.get_element())
     node = node.right
     continue
    # go-next when left node exists
    while node.left is not None:
     node_stack.append(node)
     node = node.left
    # save the the last left node
    output_list.append(node.get_element())
    node = node.right
  return output_list
后序遍歷
后序遍歷的實現思想與前序、中序一樣。有兩種實現方式。
先說第一種,同中序遍歷,只是中序時從棧中pop出一個結點打印,并訪問當前結點的右子樹。 后序必須在訪問完右子樹完在,在打印該結點。因此可先
看棧頂點是否被訪問過,如果訪問過,即已經之前已經做了其右子樹的訪問因此可出棧,并打印,繼續訪問棧頂點。如果未訪問過,則對該點的訪問標記置為訪問,訪問該點右子樹。可以發現,相對于前序與中序,后序的思想是一致的,只是需要多一個存儲空間來表示結點狀態。python代碼實現如下:
 def post_traversal1(self):
  """method of traversing BiTree in in-order"""
  if self.root is None:
   return None
  else:
   node_stack = list()
   output_list = list()
   node = self.root
   while node is not None or len(node_stack):
    # if node is None which means it comes from a leaf-node' right,
    # pop the stack and get it's right node.
    # continue the circulating like this
    if node is None:
     visited = node_stack[-1]["visited"]
     # in in-order traversal, when pop up a node from stack , save it
     if visited:
      output_list.append(node_stack[-1]["node"].get_element())
      node_stack.pop(-1)
     else:
      node_stack[-1]["visited"] = True
      node = node_stack[-1]["node"]
      node = node.right
     continue
    # go-next when left node exists
    while node.left is not None:
     node_stack.append({"node": node, "visited": False})
     node = node.left
    # save the the last left node
    output_list.append(node.get_element())
    node = node.right
  return output_list
另外,后續遍歷還有一種訪問方式。考慮到后續遍歷是先左子樹,再右子樹再到父結點, 倒過來看就是先父結點, 再右子樹再左子樹。 是不是很熟悉, 是的這種遍歷方式就是前序遍歷的鏡像試,除了改變左右子樹訪問順序連方式都沒變。 再將輸出的結果倒序輸出一遍就是后序遍歷。 同樣該方法也需要額外的空間存取輸出結果。python代碼如下:
def post_traversal2(self):
  """method of traversing BiTree in post-order"""
  if self.root is None:
   return None
  else:
   node_stack = list()
   output_list = list()
   node = self.root
   while node is not None or len(node_stack):
    # if node is None which means it comes from a leaf-node' left,
    # pop the stack and get it's left node.
    # continue the circulating like this
    if node is None:
     node = node_stack.pop().left
     continue
    while node.right is not None:
     node_stack.append(node)
     output_list.append(node.get_element())
     node = node.right
    output_list.append(node.get_element())
    node = node.left
  return output_list[::-1]
求葉子節點
求葉子節點有兩種方法,一種是廣度搜索優先,即如果當前節點存在左右子樹將左右子樹入隊。如果當前節點不存在子樹,則該節點為葉節點。繼續出隊訪問下一個節點。直至隊列為空,這個方法留給讀者去實現。
另外一種方法是,用深度搜索優先。 采用前序遍歷,當判斷到一個結點不存在左右子樹時葉子結點數加一。代碼實現如下:
 def get_leaf_num(self):
  """method of getting leaf numbers of BiTree"""
  if self.root is None:
   return 0
  else:
   node_stack = list()
   node = self.root
   leaf_numbers = 0
   # only node exists and stack is not empty that will do this circulation
   while node is not None or len(node_stack):
    if node is None:
     """node is None then pop the stack and get the node.right"""
     node = node_stack.pop().right
     continue
    while node.left is not None:
     node_stack.append(node)
     node = node.left
    # if there is not node.right, leaf_number add 1
    node = node.right
    if node is None:
     leaf_numbers += 1
   return leaf_numbers
二叉樹的可視化
到此, 除了樹的結點刪除(這個可以留給讀者去嘗試), 這里已經基本完成二叉樹的構造及遍歷接口。 但你可能真正在意的是如何繪制一顆二叉樹。 接下來,本節將會通過python matplotlib.annotate繪制一顆二叉樹。
要繪制一棵二叉樹,首先需要對樹中的任意結點給出相應相對坐標(axis_max: 1)。對于一棵已知樹, 已知深度 dd ,那么可以設初始根結點坐標為(1/2,1?12d)(1/2,1?12d). (這個設置只是為了讓根結點盡量中間往上且不觸及axis)
假設已經知道父結點的坐標(xp,yp)(xp,yp), 當前層數ll(記根節點為第0層),則從上往下畫其左右子樹的坐標表達如下:
左子樹:
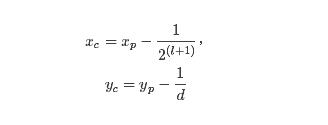
右子樹:

對應代碼實現如下:
def get_coord(coord_prt, depth_le, depth, child_type="left"): if child_type == "left": x_child = coord_prt[0] - 1 / (2 ** (depth_le + 1)) elif child_type == "right": x_child = coord_prt[0] + 1 / (2 ** (depth_le + 1)) else: raise Exception("No other child type") y_child = coord_prt[1] - 1 / depth return x_child, y_child
如果知道當前結點與父結點坐標,即可以通過plt.annotate進行結點與箭標繪制,代碼實現如下:
def plot_node(ax, node_text, center_point, parent_point):
 ax.annotate(node_text, xy=parent_point, xycoords='axes fraction', xytext=center_point, textcoords='axes fraction',
    va="bottom", ha="center", bbox=NODE_STYLE, arrowprops=ARROW_ARGS)
已知樹深度, 當前結點及當前結點所在層數,則可以通過上述計算方式計算左右子樹的結點坐標。 使用層次遍歷,即可遍歷繪制整棵樹。代碼實現如下:
 def view_in_graph(self):
  """use matplotlib.pypplot to help view the BiTree """
  if self.root is None:
   print("An Empty Tree, Nothing to plot")
  else:
   depth = self.get_depth()
   ax = node_plot.draw_init()
   coord0 = (1/2, 1 - 1/(2*depth))
   node_queue = list()
   coord_queue = list()
   node_plot.plot_node(ax, str(self.root.get_element()), coord0, coord0)
   node_queue.append(self.root)
   coord_queue.append(coord0)
   cur_level = 0
   while len(node_queue):
    q_len = len(node_queue)
    while q_len:
     q_node = node_queue.pop(0)
     coord_prt = coord_queue.pop(0)
     q_len = q_len - 1
     if q_node.left is not None:
      xc, yc = node_plot.get_coord(coord_prt, cur_level + 1, depth, "left")
      element = str(q_node.left.get_element())
      node_plot.plot_node(ax, element, (xc, yc), coord_prt)
      node_queue.append(q_node.left)
      coord_queue.append((xc, yc))
     if q_node.right is not None:
      xc, yc = node_plot.get_coord(coord_prt, cur_level + 1, depth, "right")
      element = str(q_node.right.get_element())
      node_plot.plot_node(ax, element, (xc, yc), coord_prt)
      node_queue.append(q_node.right)
      coord_queue.append((xc, yc))
    cur_level += 1
   node_plot.show()
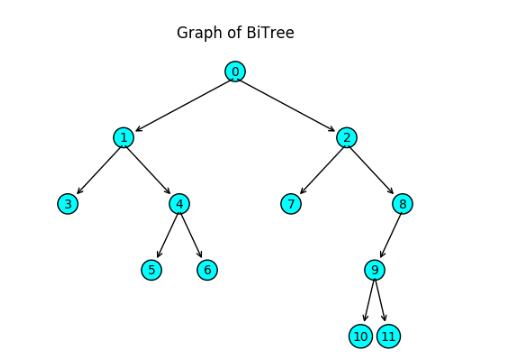
最后, 可以對如下的一顆二叉樹進行測試:
dict_tree2 = {
 "element": 0,
 "left": {
  "element": 1,
  "left": 3,
  "right": {
   "element": 4,
   "left": 5,
   "right": 6,
  },
 },
 "right": {
  "element": 2,
  "left": 7,
  "right": {
   "element": 8,
   "left": {
    "element": 9,
    "left": 10,
    "right": 11,
   },
  },
 },
}
其繪制結果如下圖4:
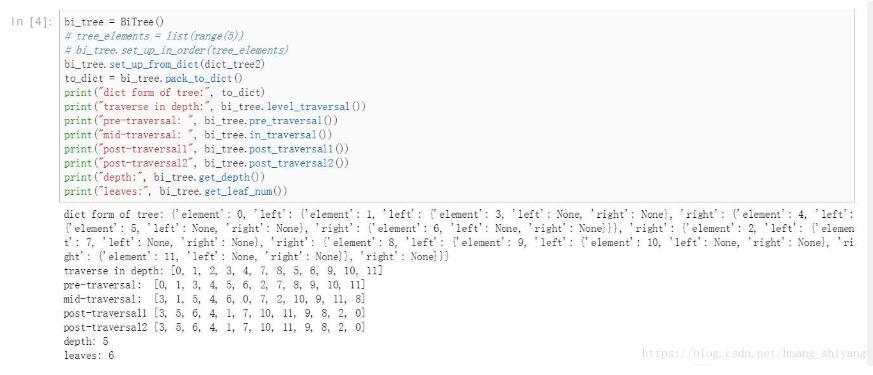
遍歷及深度葉子數 ,輸出結果如下:
以上是“如何使用Python實現二叉樹、二叉樹非遞歸遍歷及繪制”這篇文章的所有內容,感謝各位的閱讀!相信大家都有了一定的了解,希望分享的內容對大家有所幫助,如果還想學習更多知識,歡迎關注億速云行業資訊頻道!
免責聲明:本站發布的內容(圖片、視頻和文字)以原創、轉載和分享為主,文章觀點不代表本網站立場,如果涉及侵權請聯系站長郵箱:is@yisu.com進行舉報,并提供相關證據,一經查實,將立刻刪除涉嫌侵權內容。