您好,登錄后才能下訂單哦!
您好,登錄后才能下訂單哦!
這篇文章主要介紹了css層疊與z-index的使用示例,具有一定借鑒價值,感興趣的朋友可以參考下,希望大家閱讀完這篇文章之后大有收獲,下面讓小編帶著大家一起了解一下。
層疊與層疊等級
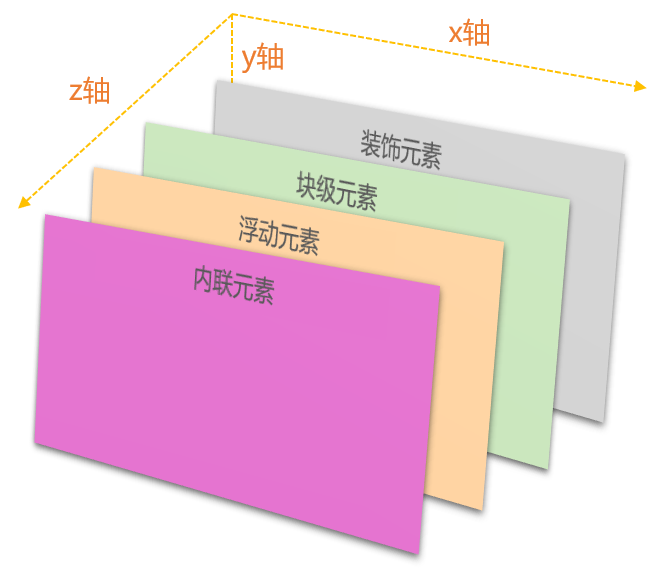
HTML 元素是一個三維的概念,除了水平和垂直方向外,還會在“z 軸”上層層疊加。
既然是疊加,就會涉及到先后順序的問題,規范中稱之為“層疊等級”。
默認情況下,圖文是網頁的核心,因此內聯元素的等級理應最高;然后是布局,其中浮動元素(脫離文檔流)的等級高于塊級元素;最低等級是設置背景、邊框等裝飾屬性的元素。
例子:
<style>
    .f {
        background-color: #ccffcc;
        border: 1px dashed #669966;
        padding: 10px;
    }

    .f div:first-of-type,
    .f div:last-of-type {
        background-color: rgba(255, 221, 221, .8);
        border: 1px dashed #990000;
        width: 200px;
        height: 70px;
        margin-left: 10px;
    }

    .f div:last-of-type {
        background-color: rgba(221, 221, 255, .8);
        border: 1px dashed #000099;
        float: left;
        margin-top: -90px;
        margin-left: 30px;
    }

    label {
        background-color: rgba(247, 236, 27, 0.8);
        border: 1px dashed #FFC107;
        padding: 5px;
    }
</style>

<div class="f">
    <label>hello</label>
    <div></div>
    <div></div>
</div>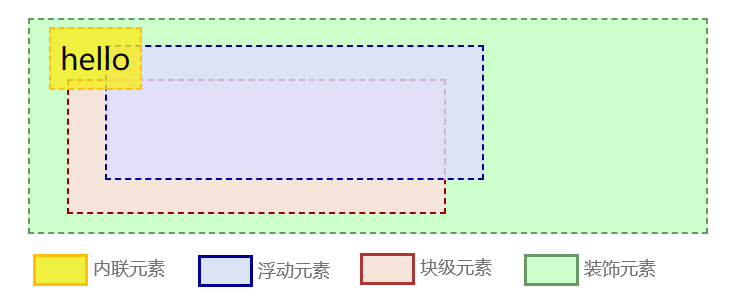
如果元素發生了層疊,層疊等級大的會覆蓋小的;如果二者層疊等級相同,根據渲染的順序,后者會覆蓋前者。
例子:
<style>
    .f {
        background-color: #ccffcc;
        border: 1px dashed #669966;
        padding: 10px;
        overflow: hidden;
    }

    .f div:first-of-type,
    .f div:last-of-type {
        background-color: rgba(255, 221, 221, .8);
        border: 1px dashed #990000;
        width: 200px;
        height: 70px;
        float: left;
    }

    .f div:last-of-type {
        background-color: rgba(221, 221, 255, .8);
        border: 1px dashed #000099;
        margin-top: -40px;
        margin-left: 30px;
    }
</style>

<div class="f">
    <div></div>
    <div></div>
</div>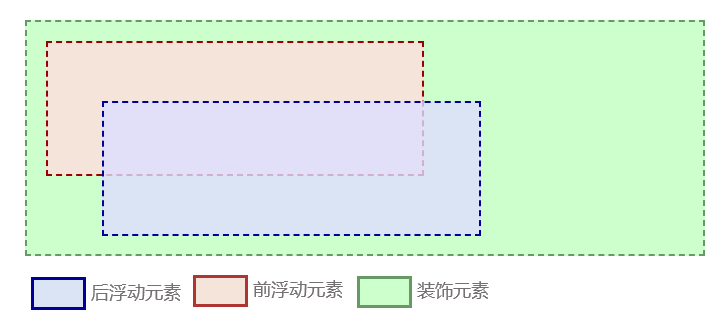
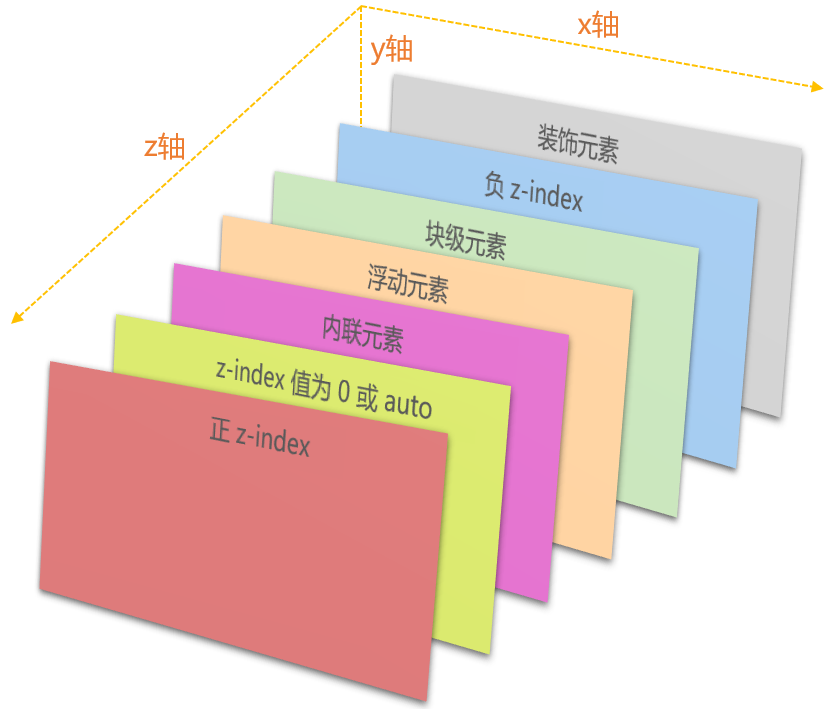
z-index 可以影響層疊等級
如果需要修改元素的層疊等級,可以在已定位的元素(1)上使用 z-index。
z-index 可以取正整數,0 或負整數;如果沒有 z-index (默認 z-index:auto )或者 z-index 手動設置為 auto,則視為 0 處理。
*(1)指 position 值為 relative、absolute 或 fixed 的元素。
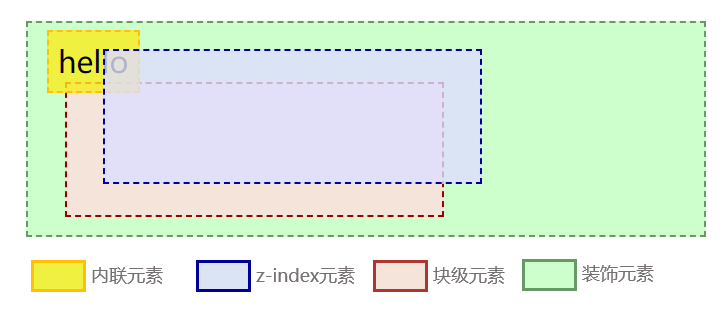
例子:
<style>
    .f {
        background-color: #ccffcc;
        border: 1px dashed #669966;
        padding: 10px;
        position: relative;
        z-index: 0;
    }

    .f div:first-of-type,
    .f div:last-of-type {
        background-color: rgba(255, 221, 221, .8);
        border: 1px dashed #990000;
        width: 200px;
        height: 70px;
        margin-left: 10px;
    }

    .f div:last-of-type {
        background-color: rgba(221, 221, 255, .8);
        border: 1px dashed #000099;
        margin-left: 30px;
        position: absolute;
        top: 14px;
        /* z-index: -1; */
    }

    label {
        background-color: rgba(247, 236, 27, 0.8);
        border: 1px dashed #FFC107;
        padding: 5px;
    }
</style>

<div class="f">
    <label>hello</label>
    <div></div>
    <div></div>
</div>
z-index 取正整數,0 或 auto 時:
z-index 取負整數時:
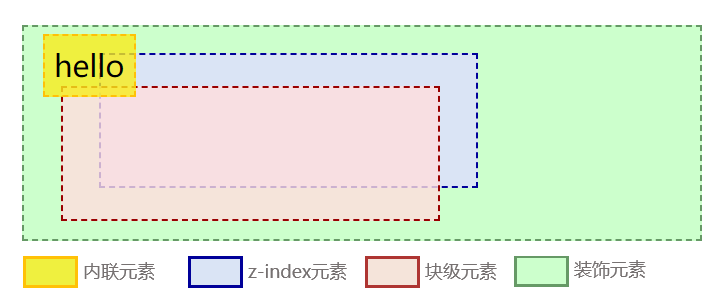
細心的人可能會發現,在例子中,我們為裝飾元素(類名 f)設置了定位屬性,并且 z-index 設置為 0。如果不這樣設置,當元素(藍色背景的測試元素) z-index 取負整數時,就會跑到裝飾元素的后面。有關于這一點,后面“z-index 取負整數值”會講到。
z-index 與層疊上下文
z-index 可以影響層疊等級,但有個前提條件非常重要,就是參與比較的元素必須在同一個層面上,規范中稱之為“層疊上下文”。“上下文”說明這是一塊封閉的區域,區域內的子元素不會影響到外部元素;而“層疊”,則意味著只要元素創建這個區域,就會在“z軸”上高于當前上下文。
層疊上下文可以通過一些 CSS 屬性創建,常見的屬性如下:
html 元素默認創建的,稱為根層疊上下文,所有元素都會置于這個層上。
position 值為 relative 或 absolute,且 z-index 值不是 auto(1)。
position 值為 fixed。
CSS3 新屬性,比如 opacity 值不是 1、 transform 值不是 none、z-index 值不是 auto 的 flex 和 grid 布局元素等等。
*(1)雖說 z-index:auto 和 z-index:0 可以看成是一樣 ,但 z-index: auto 所在的元素只是一個普通定位元素,而 z-index:0 會創建一個層疊上下文。兩者等級相同,后者將覆蓋前者。
實際工作中,很少使用 CSS3 新屬性去主動創建層疊上下文,因此,創建層疊上下文最常用的方法是,給定位元素設置 z-index 整數值。
前面介紹過,z-index 可以修改元素在當前層疊上下文中的層疊等級,現在 z-index 又有了另一層含義,即創建一個新的層疊上下文。
下面,通過例子來更好的理解層疊上下文:
例子:
<style>
    .f {
        background-color: #ccffcc;
        border: 1px dashed #669966;
        height: 80px;
        position: relative;
        margin-bottom: 10px;
    }

    .f_1>div {
        background-color: rgba(255, 221, 221, .8);
        border: 1px dashed #990000;
        width: 150px;
        height: 200px;
        position: absolute;
        top: 20px;
        left: 170px;
    }

    .f_2>div {
        background-color: rgba(221, 221, 255, .8);
        border: 1px dashed #000099;
        width: 200px;
        height: 70px;
        position: absolute;
        top: 65px;
        left: 50px;
    }
</style>

<div class="f f_1">#1
    <div>#3
    </div>
</div>
<div class="f f_2">#2
    <div>#4
    </div>
</div>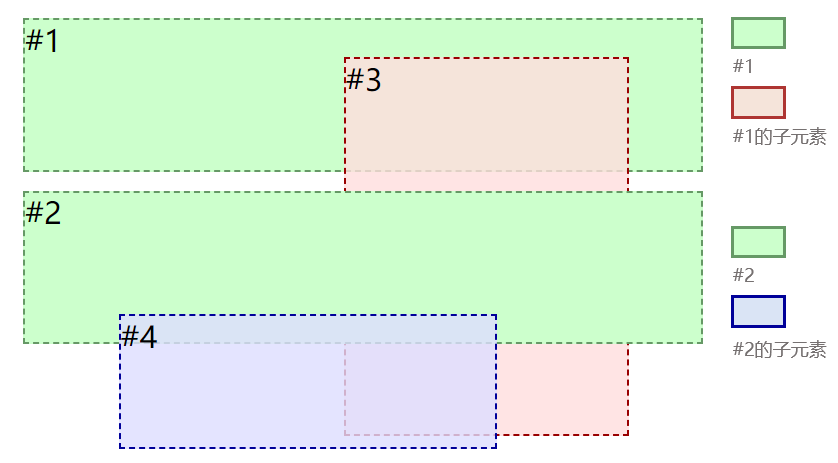
例子中,沒有元素設置 z-index 值,此時 z-index 就是默認的 auto,因此,元素按照渲染順序,后者覆蓋前者。
如果為#3、#4設置正的 z-index 值,如下:
.f_1>div {
    z-index: 1;
}

.f_2>div {
    z-index: 2;
}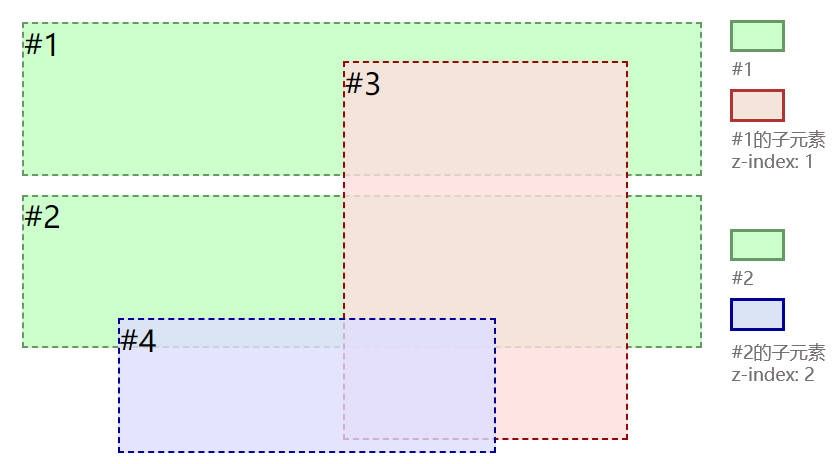
此時,父元素#1、#2并沒有設置 z-index 值,因此它們不會創建新的層疊上下文,這意味著#3、#4仍然同屬于根層疊上下文。
同一層疊上下文,層疊等級大的會覆蓋小的,所以#4在所有元素之上。
現在為#2、#3、#4設置 z-index 值,如下:
.f_1>div {
    z-index: 2;
}

.f_2 {
    z-index: 1;
}

.f_2>div {
    z-index: 9;
}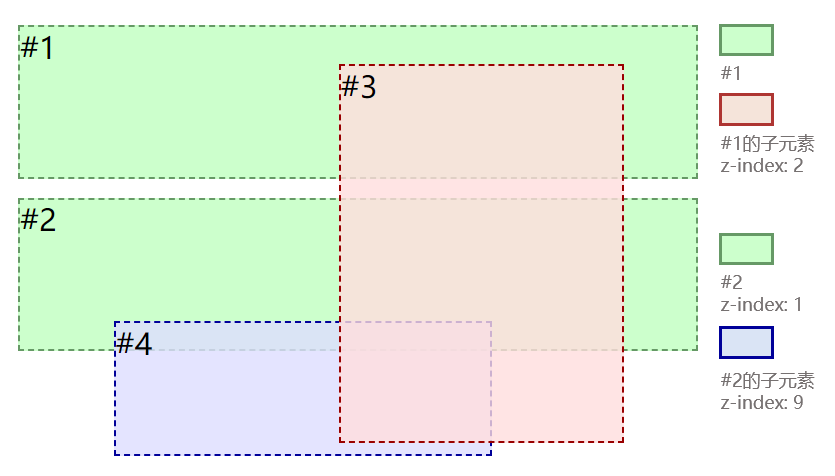
盡管#4的 z-index 值大于#3的,但由于#4屬于#2的子元素,其層疊等級完全受制于#2的等級。#2和#3同屬于根層疊上下文,且#3大于#2,因此#3在#2(及其子元素)之上。
z-index 取負整數值
常規理解 z-index 取負值,應該會跑到背景色的后面:
例子:
<style>
    .f {
        background-color: rgba(204, 255, 204, .8);
        border: 1px dashed #669966;
        padding: 10px;
    }

    .f div {
        background-color: rgba(255, 221, 221, .8);
        border: 1px dashed #990000;
        width: 200px;
        height: 70px;
        position: relative;
        top: 45px;
        z-index: -1;
    }
</style>

<div class="f">
    <div></div>
</div>
實際工作中, z-index 取負值可以實現隱藏元素的效果。但如果為父元素創建層疊上下文,子元素就會隱藏不掉:
例子:
<style>
    .f {
        background-color: rgba(204, 255, 204, .8);
        border: 1px dashed #669966;
        padding: 10px;
        position: relative;
        z-index: 0;
    }

    .f div {
        background-color: rgba(255, 221, 221, .8);
        border: 1px dashed #990000;
        width: 200px;
        height: 70px;
        position: relative;
        top: 45px;
        z-index: -1;
    }
</style>

<div class="f">
    <div></div>
</div>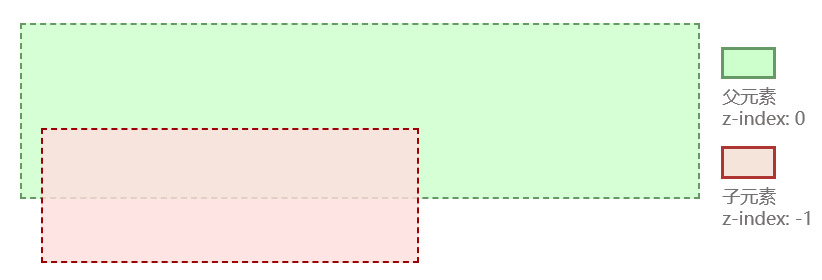
前后例子對比之后,已經很明顯的表明,不管 z-index 的負值多大,依然無法突破當前層疊上下文。
感謝你能夠認真閱讀完這篇文章,希望小編分享的“css層疊與z-index的使用示例”這篇文章對大家有幫助,同時也希望大家多多支持億速云,關注億速云行業資訊頻道,更多相關知識等著你來學習!
免責聲明:本站發布的內容(圖片、視頻和文字)以原創、轉載和分享為主,文章觀點不代表本網站立場,如果涉及侵權請聯系站長郵箱:is@yisu.com進行舉報,并提供相關證據,一經查實,將立刻刪除涉嫌侵權內容。