您好,登錄后才能下訂單哦!
您好,登錄后才能下訂單哦!
本文主要解決Vue項目使用History模式發布到服務器Nginx上刷新頁面404問題。(由于每個項目的情況都不盡相同,本方案已經完美解決本在所使用項目,具體情況可能還需要修改。)
1.項目背景分析
本人是Java后臺開發,Vue其實使用也沒有多久,只能說簡單了解。發現問題的時候其實也一頭霧水,第一思想就是百度看別人的思路。
1.1 查看項目打包后文件
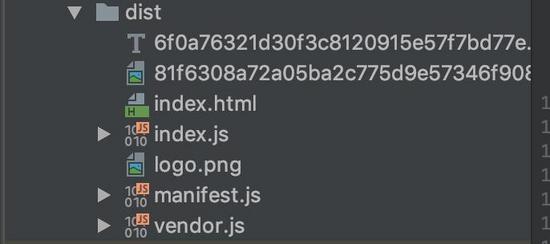
首先看看項目打包后文件內容,看看有沒有什么能突破的地方。文件目錄如下:

打眼一看可以發現,主要的可能就是這個index.html文件,內容如下:
<!DOCTYPE html>
<html lang="en">

<head>
 <meta charset="utf-8">
 <title>系統管理</title>
 <meta name="viewport" content="width=device-width, initial-scale=1, maximum-scale=1, user-scalable=no">
 <link rel="shortcut icon" type="image/x-icon" href="logo.png">
<link rel="shortcut icon" href="logo.png"></head>

<body>
 <div id="app"></div>
<script type="text/javascript" src="manifest.js?89b5083667173048a500"></script>
 <script type="text/javascript" src="vendor.js?9eae337435ee1b63d5cd"></script>
 <script type="text/javascript" src="index.js?38915745c7ed8b9143db"></script>
</body>

</html>
1.在之前百度的時候看到了一個信息,就是引入js文件使用scr的時候,如果前面帶/是絕對路徑,在思考是不是這個問題。
2.百度的時候大部分信息都是說修改Nginx配置文件。
2.問題解決
既然大致思路都有了,那么就開始嘗試去解決一下。
2.1 更改Vue打包配置文件
修改webpack.config.js文件,這個是Vue-cli打包文件配置,使其打包后讓index.html文件引用路徑為絕對路徑。webpack.config.js內容如下(每個項目打包配置均不同,這個配置僅僅是我使用的項目):
const resolve = require('path').resolve
const webpack = require('webpack')
const HtmlWebpackPlugin = require('html-webpack-plugin')
const url = require('url')
const publicPath = '/'

module.exports = (options = {}) => ({
 entry: {
  vendor: './src/vendor',
  index: './src/main.js'
 },
 output: {
  path: resolve(__dirname, 'dist'),
  filename: options.dev ? '[name].js' : '[name].js?[chunkhash]',
  chunkFilename: '[id].js?[chunkhash]',
  publicPath: options.dev ? '/assets/' : publicPath
 },
 module: {
  rules: [{
    test: /\.vue$/,
    use: ['vue-loader']
   },
   {
    test: /\.js$/,
    use: ['babel-loader'],
    exclude: /node_modules/
   },
   {
    test: /\.css$/,
    use: ['style-loader', 'css-loader', 'postcss-loader']
   },
   {
    test: /\.(png|jpg|jpeg|gif|eot|ttf|woff|woff2|svg|svgz)(\?.+)?$/,
    use: [{
     loader: 'url-loader',
     options: {
      limit: 10000
     }
    }]
   }
  ]
 },
 plugins: [
  new webpack.optimize.CommonsChunkPlugin({
   names: ['vendor', 'manifest']
  }),
  new HtmlWebpackPlugin({
   template: 'src/index.html',
   favicon: 'src/logo.png'
  })
 ],
 resolve: {
  alias: {
   '~': resolve(__dirname, 'src')
  },
  extensions: ['.js', '.vue', '.json', '.css']
 },
 devServer: {
  host: '127.0.0.1',
  port: 8010,
  proxy: {
   '/api/': {
    target: 'http://127.0.0.1:8080',
    changeOrigin: true,
    pathRewrite: {
     '^/api': ''
    }
   }
  },
  historyApiFallback: {
   index: url.parse(options.dev ? '/assets/' : publicPath).pathname
  }
 },
 devtool: options.dev ? '#eval-source-map' : '#source-map'
})
再次打包后,查看index.html,內容如下:
<!DOCTYPE html>
<html lang="en">

<head>
 <meta charset="utf-8">
 <title>系統管理</title>
 <meta name="viewport" content="width=device-width, initial-scale=1, maximum-scale=1, user-scalable=no">
 <link rel="shortcut icon" type="image/x-icon" href="logo.png">
<link rel="shortcut icon" href="/logo.png"></head>

<body>
 <div id="app"></div>
<script type="text/javascript" src="/manifest.js?f7d4b2121bc37e262877"></script><script type="text/javascript" src="/vendor.js?9eae337435ee1b63d5cd"></script><script type="text/javascript" src="/index.js?51954197166dd938b54e"></script></body>

</html>
從index.html可以看出已經變成了絕對路徑。
2.2 修改Nginx配置
修改nginx.conf配置文件,代碼如下:
worker_processes 1;

events {
  worker_connections 1024;
}

http {
  include    mime.types;
  default_type application/octet-stream;

  sendfile    on;

  keepalive_timeout 65;

  server {
   listen    80;
   server_name localhost;
   ## 指向vue打包后文件位置
   root /opt/nginx/dist/;

   ## 攔截根請求,例如http://localhost
   location / {
      try_files $uri $uri/ /index.html;
   }

   ## 攔截帶有tms-monitor的請求,例如http://localhost/tms-monitor/admin
   location ^~/tms-monitor{
      if (!-e $request_filename) {
             rewrite ^/(.*) /index.html last;
             break;
      }
   }

   #error_page  500 502 503 504 /50x.html;
   location = /50x.html {
     root  html;
   }

  }
}
3.總結
上述配置完成后,打包Vue項目,重啟Nginx再次刷新就不會在有404的現象了。(再次申明:以上只是針對本人所在的項目,不一定使用所有情況。)
以上就是本文的全部內容,希望對大家的學習有所幫助,也希望大家多多支持億速云。
免責聲明:本站發布的內容(圖片、視頻和文字)以原創、轉載和分享為主,文章觀點不代表本網站立場,如果涉及侵權請聯系站長郵箱:is@yisu.com進行舉報,并提供相關證據,一經查實,將立刻刪除涉嫌侵權內容。