您好,登錄后才能下訂單哦!
您好,登錄后才能下訂單哦!
這篇文章主要介紹“uniapp小程序自定義tabbar及初次加載閃屏問題怎么解決”的相關知識,小編通過實際案例向大家展示操作過程,操作方法簡單快捷,實用性強,希望這篇“uniapp小程序自定義tabbar及初次加載閃屏問題怎么解決”文章能幫助大家解決問題。
1.首先我們先封裝一個自定義的tabbar組件(配置信息自行根據業務更改)
<template>
  <view class="tabbar-container">
    <block>
      <view class="tabbar-item" v-for="(item, index) in tabbarList" :class="[item.centerItem ? ' center-item' : '']" @click="changeItem(item)">
        <view class="item-top"><image :src="currentItem == item.id ? item.selectIcon : item.icon"></image></view>
        <view class="item-bottom" :class="[currentItem == item.id ? 'item-active' : '']">
          <text>{{ item.text }}</text>
        </view>
      </view>
    </block>
  </view>
</template>
<script>
export default {
  props: {
    currentPage: {
      type: Number,
      default: 0
    }
  },
  data() {
    return {
      currentItem: 0,
      tabbarList: [
        {
          id: 0,
          path: '/pages/index/index',
          icon: '/static/home.png',
          selectIcon: '/static/homeSelected.png',
          text: '簡介',
          centerItem: false
        },
        {
          id: 1,
          path: '/pages/discount/discount',
          icon: '/static/gift.png',
          selectIcon: '/static/giftSelected.png',
          text: '優惠',
          centerItem: false
        },
        {
          id: 2,
          path: '/pages/code/code',
          icon: '/static/code.png',
          selectIcon: '/static/codeSelected.png',
          text: '二維碼',
          centerItem: true
        },
        {
          id: 3,
          path: '/pages/search/search',
          icon: '/static/search.png',
          selectIcon: '/static/searchSelected.png',
          text: '探索',
          centerItem: false
        },
        {
          id: 4,
          path: '/pages/mine/mine',
          icon: '/static/mine.png',
          selectIcon: '/static/mineSelected.png',
          text: '我的',
          centerItem: false
        }
      ]
    };
  },
  mounted() {
    this.currentItem = this.currentPage;
    uni.hideTabBar();
  },
  methods: {
    changeItem(item) {
      let _this = this;
      //_this.currentItem = item.id;
      uni.switchTab({
        url: item.path
      });
    }
  }
};
</script>
<style>
view {
  padding: 0;
  margin: 0;
  box-sizing: border-box;
}
.tabbar-container {
  position: fixed;
  bottom: 0;
  left: 0;
  width: 100%;
  height: 110rpx;
  box-shadow: 0 0 5px #999;
  display: flex;
  align-items: center;
  padding: 5rpx 0;
  color: #999999;
}
.tabbar-container .tabbar-item {
  width: 20%;
  height: 100rpx;
  display: flex;
  flex-direction: column;
  justify-content: center;
  align-items: center;
  text-align: center;
}
.tabbar-container .item-active {
  color: #f00;
}
.tabbar-container .center-item {
  display: block;
  position: relative;
}
.tabbar-container .tabbar-item .item-top {
  width: 70rpx;
  height: 70rpx;
  padding: 10rpx;
}
.tabbar-container .center-item .item-top {
  flex-shrink: 0;
  width: 100rpx;
  height: 100rpx;
  position: absolute;
  top: -50rpx;
  left: calc(50% - 50rpx);
  border-radius: 50%;
  box-shadow: 0 0 5px #999;
  background-color: #ffffff;
}
.tabbar-container .tabbar-item .item-top image {
  width: 100%;
  height: 100%;
}
.tabbar-container .tabbar-item .item-bottom {
  font-size: 28rpx;
  width: 100%;
}
.tabbar-container .center-item .item-bottom {
  position: absolute;
  bottom: 5rpx;
}
</style>
2.然后我們配置下page.js
{
  "pages": [{
    "path": "pages/index/index",
    "style": {
      "navigationBarTitleText": "簡介"
    }
  }, {
    "path": "pages/discount/discount",
    "style": {
      "navigationBarTitleText": "優惠"
    }
  }, {
    "path": "pages/code/code",
    "style": {
      "navigationBarTitleText": "二維碼"
    }
  }, {
    "path": "pages/search/search",
    "style": {
      "navigationBarTitleText": "探索"
    }
  }, {
    "path": "pages/mine/mine",
    "style": {
      "navigationBarTitleText": "我的"
    }
  }],
  "globalStyle": {
    "navigationBarTextStyle": "black",
    "navigationBarTitleText": "CRM",
    "navigationBarBackgroundColor": "#F8F8F8",
    "backgroundColor": "#F8F8F8",
    "app-plus": {
      "background": "#efeff4"
    }
  },
  "tabBar": {
    "color": "#999999",
    "selectedColor": "#f00",
    "borderStyle": "black",
    "backgroundColor": "#ffffff",
    "midButton":{
      "text":"二維碼",
      "pagePath":"pages/code/code",
      "iconPath":"static/code.png",
      "selectedIconPath":"static/codeSelected.png"
    },
    "list":[
      {
        "pagePath":"pages/index/index",
        "iconPath":"static/home.png",
        "selectedIconPath":"static/homeSelected.png",
        "text":"簡介"
      },
      {
        "pagePath":"pages/discount/discount",
        "iconPath":"static/gift.png",
        "selectedIconPath":"static/giftSelected.png",
        "text":"優惠"
      },
      {
        "pagePath":"pages/code/code",
        "iconPath":"static/code.png",
        "selectedIconPath":"static/codeSelected.png",
        "text":"二維碼"
      },
      {
        "pagePath":"pages/search/search",
        "iconPath":"static/search.png",
        "selectedIconPath":"static/searchSelected.png",
        "text":"探索"
      },
      {
        "pagePath":"pages/mine/mine",
        "iconPath":"static/mine.png",
        "selectedIconPath":"static/mineSelected.png",
        "text":"我的"
      }
    ]
  }
}
3.注冊全局組件tabbar在main.js文件中,配置如下:
import Vue from 'vue'
import App from './App'
import diyTabbar from "components/zdy-tabbar.vue"
// 注冊全局組件
Vue.component('diy-tabbar', diyTabbar)
Vue.config.productionTip = false
App.mpType = 'app'
const app = new Vue({
  ...App
})
app.$mount()
4.所有的tabbar頁面引入自定義tabbar:
<diy-tabbar :current-page="0"></diy-tabbar> // current-page 對應的就是tabbar的index
對于初次加載閃屏問題的資料網上一大堆假的,這個有這么難嗎?為啥連個像樣的資料都找不到,...
于是只能自己造小三輪車了,思路就是
創建一個主頁面
將所有tabbar組件和頁面都引入其中,
這樣共用一個tabbar就不會出現閃屏的問題
這樣就能稍微優雅的坐上三輪車,誒?不對,我在說什么...
1.首先,我們先建一個主頁面,將所有tabbar頁面引入
<template>
    <view>
        <view class="main_box">
            <index v-if="currentIndex === 0"></index>
            <message v-if="currentIndex === 1"></message>
            <!-- <midBtn v-if="currentIndex === 2"></midBtn> -->
            <member v-if="currentIndex === 3"></member>
            <my v-if="currentIndex === 4"></my>
        </view>
        <view class="foot_box">
            <diy-tabbar :current-page="currentIndex" @changeItem="changeItem"></diy-tabbar>
        </view>
        <u-popup class="firstPagePopup" :show="active" :closeable="true" @close="close" @open="open">
            <view>
                <view class="tabbar-box-wrap">
                    <view class="tabbar-box">
                        <view class="tabbar-box-item" @click="goToPage('/pages/tabbar-3-detial/tabbar-3-release/tabbar-3-release')">
                            <image class="box-image" src="@/static/img/mid_btn1.png" mode="aspectFit"></image>
                            <text class="explain">發文章</text>
                        </view>
                        <view class="tabbar-box-item" @click="goToPage('/pages/tabbar-3-detial/tabbar-3-video/tabbar-3-video')">
                            <image class="box-image" src="@/static/img/mid_btn2.png" mode="aspectFit"></image>
                            <text class="explain">發圖文</text>
                        </view>
                        <view class="tabbar-box-item" @click="goToPage('/pages/tabbar-3-detial/tabbar-3-qa/tabbar-3-qa')">
                            <image class="box-image" src="@/static/img/mid_btn3.png" mode="aspectFit"></image>
                            <text class="explain">發視頻</text>
                        </view>
                    </view>
                </view>
            </view>
        </u-popup>
    </view>
</template>
<script>
    import index  from '@/pages/index/index.vue'
    import my  from '@/pages/my/index.vue'
    import message  from '@/pages/message/index.vue'
    import member from '@/pages/memberCenter/index.vue'
    export default {
        components:{
            index,
            my,
            message,
            member
        },
        data() {
            return {
                active:false,
                currentIndex:4
            }
        },
        onLoad() {
        },
        methods: {
            // 如果
            changeItem(item){
                if(item.id === 2){
                    this.active = true
                }else{
                    this.currentIndex = item.id
                }
                // uni.switchTab({
                //   url: item.path
                // });
                // console.log(item)
            },
            close(){
                debugger
                this.active=false
            },
            open(){}
        }
    }
</script>
<style lang="scss" scoped>
.main_box{
    height: calc(100vh - 110rpx);
    overflow: scroll;
}
.foot_box{
    height: 110rpx;
}
.content {
    display: flex;
    align-items: center;
    justify-content: center;
    width: 100%;
    /* #ifdef H5 */
    height: calc(100vh - var(--window-bottom) - var(--window-top));
    /* #endif */
    /* #ifndef H5 */
    height: 100vh;
    /* #endif */
    transition: opacity 0.3s;
    background: #999;
    opacity: 0;
    &.active {
        opacity: 1;
    }
    .logo {
        position: relative;
        margin-top: -400upx;
        width: 200upx;
        height: 200upx;
        // z-index: -1;
        opacity: 0;
        transition: opacity 0.3s;
        &.active {
            opacity: 1;
        }
    }
}
.tabbar-box-wrap {
    width: 100%;
    padding: 50upx;
    box-sizing: border-box;
    .tabbar-box {
        display: flex;
        width: 100%;
        background: #fff;
        border-radius: 20upx;
        padding: 15upx 20upx;
        box-sizing: border-box;
        z-index: 2;
        .tabbar-box-item {
            // position: relative;
            width: 100%;
            z-index: 3;
            margin: 10upx;
            color: $uni-color-subtitle;
            text-align: center;
            font-size: $uni-font-size-base;
            .box-image {
                width: 100%;
                height: $uni-img-size-lg;
            }
        }
    }
}
/deep/ .u-popup__content{
    border-radius: 30rpx 30rpx 0 0;
}
</style>
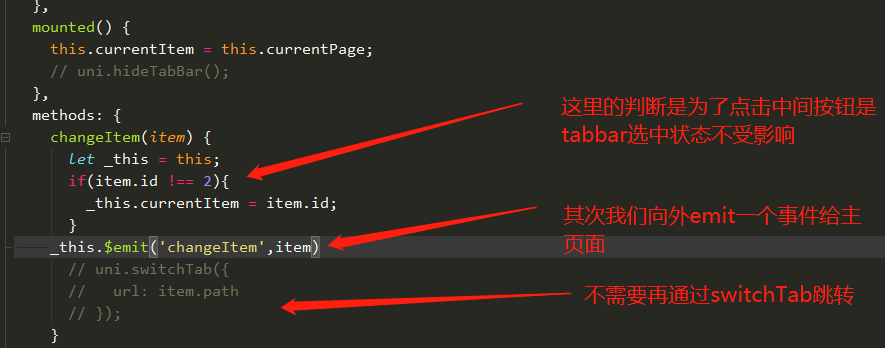
其中中間按鈕我是做一個底部彈窗所以就不要組件了,大家自行根據情況改動,這里我們不需要再通過switchTab來進行跳轉,只用currentIndex來切換組件即可,下面的u-popup,是底部彈窗,效果如下

2.接下來我們來改動,tabbar中的代碼

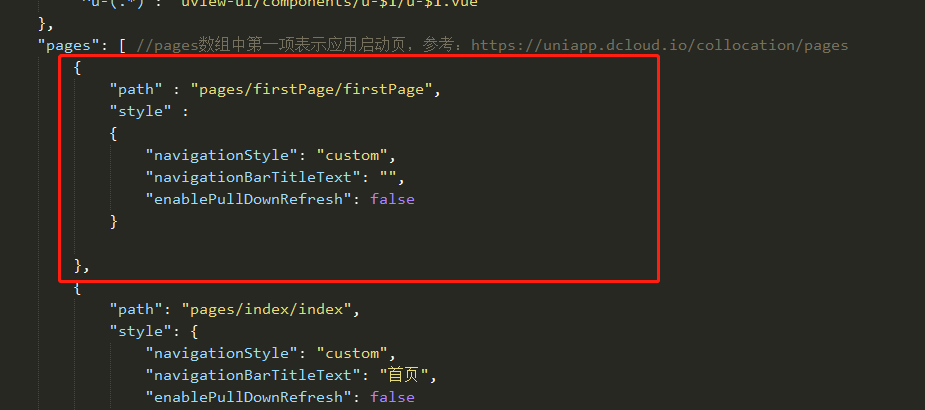
修改page.js
首先我們先將主頁面放到page.js的第一個,作為入口文件

補充:到這一步,page.js中的tabbar整個就可以刪除了
關于“uniapp小程序自定義tabbar及初次加載閃屏問題怎么解決”的內容就介紹到這里了,感謝大家的閱讀。如果想了解更多行業相關的知識,可以關注億速云行業資訊頻道,小編每天都會為大家更新不同的知識點。
免責聲明:本站發布的內容(圖片、視頻和文字)以原創、轉載和分享為主,文章觀點不代表本網站立場,如果涉及侵權請聯系站長郵箱:is@yisu.com進行舉報,并提供相關證據,一經查實,將立刻刪除涉嫌侵權內容。