您好,登錄后才能下訂單哦!
您好,登錄后才能下訂單哦!
這篇“vue如何封裝一個高質量的表單通用組件”文章的知識點大部分人都不太理解,所以小編給大家總結了以下內容,內容詳細,步驟清晰,具有一定的借鑒價值,希望大家閱讀完這篇文章能有所收獲,下面我們一起來看看這篇“vue如何封裝一個高質量的表單通用組件”文章吧。
特性復用:必須繼承原有組件的所有特性。
命名規范:二次組件名必須見名知意,我們一般都是起一個公用名+原有組件名,比如lib-form。
接口簡單:自定義暴露出來的接口越簡單越好。
容易拓展:留有自定義插槽,讓用戶可以自己選擇。
功能完善:具備更完善的功能如:表單驗證、動態刪減表單,集成第三方的插件(富文本)...
場景通用:具備多個場景使用,比如彈框嵌套表單、頁面嵌套表單。
封裝一個高質量的通用組件,上面是真的只是基操,話不多說,直接上實踐手把手教你封裝組件。
繼承原有組件的所有特性(這也是封裝的核心)。先明確三個大方向:
表單固定屬性,繼承Form表單的所有屬性、方法。
 // 定義el-form的ref繼承原有組件的form屬性
 export interface FormInstance {
  registerLabelWidth(width: number, oldWidth: number): void,
  deregisterLabelWidth(width: number): void,
  autoLabelWidth: string | undefined,
  emit: (evt: string, ...args: any[]) => void,
  labelSuffix: string,
  inline?: boolean,
  model?: Record<string, unknown>,
  size?: string,
  showMessage?: boolean,
  labelPosition?: string,
  labelWidth?: string,
  rules?: Record<string, unknown>,
  statusIcon?: boolean,
  hideRequiredAsterisk?: boolean,
  disabled?: boolean,
  validate: (callback?: Callback) => Promise<boolean>,
  resetFields: () => void,
  clearValidate: (props?: string | string[]) => void,
  validateField: (props: string | string[], cb: ValidateFieldCallback) => void,
}
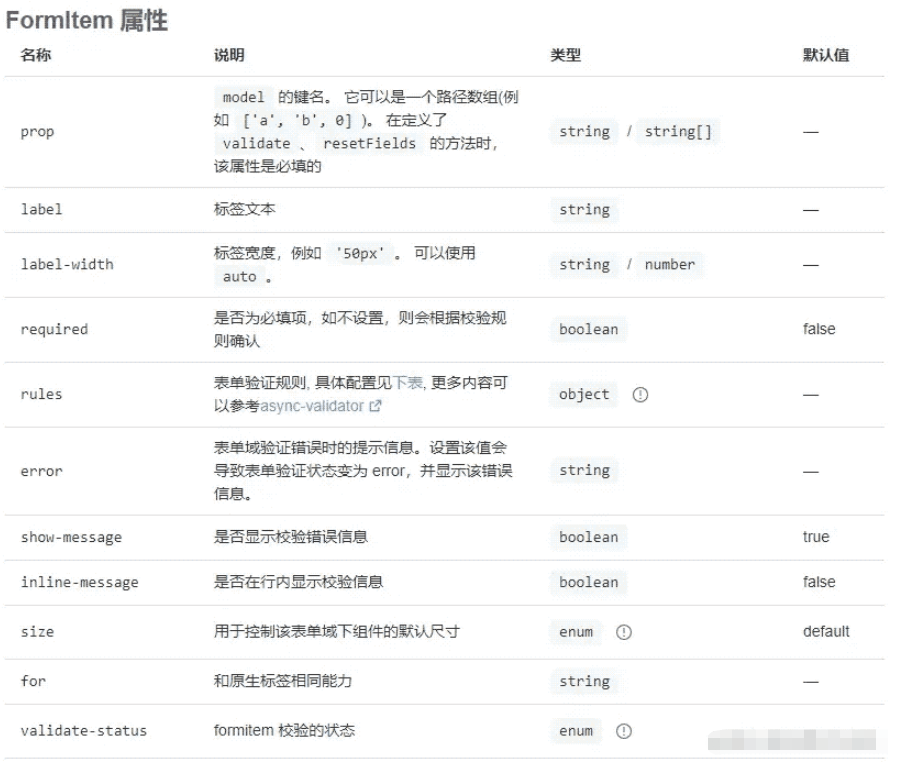
表單項固定屬性,繼承表單項的所有屬性、方法。
// 表單每一項的配置選項
export interface FormOptions {
  // 表單項顯示的元素
  type: '',// 定義表單項類型
  value?: any, // 表單項的值
  label?: string,// 表單項label
  prop?: string,// 表單項的標識
  rules?: RuleItem[],// 表單項的驗證規則
  placeholder?: string,// 表單項的占位符
  attrs?: {  // 按需定義不同表單類型屬性
    ...
  },
  children?: FormOptions[],// 表單項的子元素,可能存在嵌套表單組件,如select
  ....// 適當擴展我們需要的屬性,比如上傳組件屬性,行布局表單屬性
}
由于Element-plus組件都是以el-為前綴,所以type取值只需要取el-后面部分作為值就行,比如el-input取 'input' 為值。

表單驗證效果,繼承組件原有的所有驗證屬性。由于Element-plus的驗證都是使用 async-validator 這個插件的驗證方法,直接復用插件源碼路徑async-validator/src/interface.ts文件下的所有代碼:
// 核心代碼:封裝驗證方式時的屬性
export interface RuleItem {
  type?: RuleType; // 驗證種類
  required?: boolean;// 是否必填
  pattern?: RegExp | string;// 驗證方式匹配
  min?: number; // 表單項最小值
  max?: number; // 表單項最大值
  len?: number; // 表單項字符長度
  trigger?: string | string[];// 驗證觸發方式
  ....
}實現一個完善的通用組件封裝,通過對標簽封裝、接口 暴露、開發者傳參等。明確表單類型,根據不同類型表單復用多種場景,不僅開發者用戶拓展,而且,讓開發者用最少代碼就可以復用:
<!--表單框架:model就是傳入的表單對象,rules就是傳入的驗證對象 -->
  <el-form
    v-if="model"
    :validate-on-rule-change="false"
    v-bind="$attrs"
    :model="model"
    :rules="rules"
    ref="form"
  >
    ... <!--表單項封裝 -->
  </el-form>
普通表單項封裝,比如日期、輸入等組件。
<template v-for="(item, index) in options" :key="index">
    <el-form-item  :label="item.label" :prop="item.prop">
      <component
        v-else
        :is="`el-${item.type}`"
        v-bind="item.attrs"
        v-model="model[item?.prop!]"
      >
      </component>
    </el-form-item>
</template>
嵌套表單項封裝,比如下拉框,除了select組件還嵌套option組件。
<template v-for="(item, index) in options" :key="index">
    <el-form-item
      v-if="item.children && item.children.length"
      :label="item.label"
      :prop="item.prop"
    >
      <component
        :is="`el-${item.type}`"
        v-bind="item.attrs"
        v-model="model[item?.prop!]"
      >
        <component
          v-for="(child, i) in item.children"
          :key="i"
          :label="child.label"
          :value="child.value"
          :is="`el-${child.type}`"
        >
        </component>
      </component>
    </el-form-item>
</template>本文使用的是wangEditor。
<div id="editor" v-else-if="item.type === 'editor'"></div>
import E from 'wangeditor';
// 遍歷傳入的prop的options對象,初始化富文本
if (item.type === 'editor') {
// 初始化富文本
nextTick(() => {
  if (document.getElementById('editor')) {
    const editor = new E('#editor');
    editor.config.placeholder = item.placeholder!;
    editor.create();
    // 初始化富文本的內容
    editor.txt.html(item.value);
    editor.config.onchange = (newHtml: string) => {
      model.value[item.prop!] = newHtml;
    };
    edit.value = editor;
  }
});
}向開發者暴露上傳的核心方法:預覽、刪除、上傳成功等,同時允許開發者自定義上傳信息以及渲染區域等。
<el-form-item  :label="item.label" :prop="item.prop">
  <!-- 上傳表單 -->
  <el-upload
    v-if="item.type === 'upload'"
    v-bind="item.uploadAttrs"
    :on-preview="onPreview"
    :on-remove="onRemove"
    :on-success="onSuccess"
    :on-error="onError"
    :on-progress="onProgress"
    :on-change="onChange"
    :before-upload="beforeUpload"
    :before-remove="beforeRemove"
    :http-request="httpRequest"
  >
    <slot name="uploadArea"></slot>
    <slot name="uploadTip"></slot>
  </el-upload>
</el-form-item>
有時業務需要,一行可以定義多個表單,所以需要使用el-row,此時需要修改FormOptions屬性接口,完善多個表單場景,cols是一個數組定義FormOptions數組,colOption是el-col組件的相關屬性,然后重新復用嵌套表單的代碼。
<template v-if="item.type === 'row'">
    <el-row :gutter="item.rowGutter">
    <el-col
    v-for="(jtem, jndex) in item.cols"
    v-bind="jtem.colOption"
    :key="jndex"
    >
    <el-form-item :label="jtem.label" :prop="jtem.prop">
      <component
        :is="`el-${jtem.type}`"
        v-bind="jtem.attrs"
        v-model="model[jtem?.prop!]"
      >
        <template v-if="jtem.children && jtem.children.length">
          <component
            v-for="(child, i) in jtem.children"
            :key="i"
            :label="child.label"
            :value="child.value"
            :is="`el-${child.type}`"
          >
          </component>
        </template>
      </component>
    </el-form-item>
    </el-col>
    </el-row>
</template>
自定義插槽:開發者可以根據需要,在封裝的el-form中添加插槽,可以允許組件功能的拓展,我們可以根據自己需要進行封裝,這里就不一一演示了。
提交取消按鈕區域:這個最好可以實現插槽讓開發者可以自定義。
<el-form-item>
      <slot name="action" :form="form" :model="model"></slot>
</el-form-item>
開發者的調用封裝組件,通過配置不同表單類型的數組,然后調用lib-form封裝組件實現業務代碼復用。
組件的調用:根據業務需要,可以適當定義我們需要的組件屬性以及必須要傳的參數。
<lib-form
  ref="form"
  label-width="100px"
  :options="options"
  @on-change="handleChange"
  @before-upload="handleBeforeUpload"
  @on-preview="handlePreview"
  @on-remove="handleRemove"
  @before-remove="beforeRemove"
  @on-success="handleSuccess"
  @on-exceed="handleExceed"
>
  <template #uploadArea>
    <el-button size="small" type="primary">Click to upload</el-button>
  </template>
  <template #uploadTip>
    <div >
      jpg/png files with a size less than 500kb
    </div>
  </template>
  <template #action="scope">
    <el-button type="primary" @click="submitForm(scope)">提交</el-button>
    <el-button @click="resetForm">重置</el-button>
  </template>
</lib-form>
表單項的配置數組:由于這配置數組比較長,所以一般可以單獨抽離出來,不要寫在vue文件中,這樣可以提高代碼的可讀性。
// 這里以多行表單布局為例子
let options: FormOptions[] = [
  {
    type: 'row',
    rowGutter: 20,
    cols: [
      {
        type: 'input',
        value: '',
        label: '用戶名',
        prop: 'username',
        placeholder: '請輸入用戶名',
        rules: [
          {
            required: true,
            message: '用戶名不能為空',
            trigger: 'blur',
          },
          {
            min: 2,
            max: 6,
            message: '用戶名在2-6位之間',
            trigger: 'blur',
          },
        ],
        attrs: {
          clearable: true,
        },
        colOption: {
          offset: 0,
          span: 12,
        },
      },
      {
        type: 'input',
        value: '',
        label: '用戶名',
        prop: 'username',
        placeholder: '請輸入用戶名',
        rules: [
          {
            required: true,
            message: '用戶名不能為空',
            trigger: 'blur',
          },
          {
            min: 2,
            max: 6,
            message: '用戶名在2-6位之間',
            trigger: 'blur',
          },
        ],
        attrs: {
          clearable: true,
        },
        colOption: {
          offset: 0,
          span: 12,
        },
      },
    ],
  },
 ]
以上就是關于“vue如何封裝一個高質量的表單通用組件”這篇文章的內容,相信大家都有了一定的了解,希望小編分享的內容對大家有幫助,若想了解更多相關的知識內容,請關注億速云行業資訊頻道。
免責聲明:本站發布的內容(圖片、視頻和文字)以原創、轉載和分享為主,文章觀點不代表本網站立場,如果涉及侵權請聯系站長郵箱:is@yisu.com進行舉報,并提供相關證據,一經查實,將立刻刪除涉嫌侵權內容。