溫馨提示×
您好,登錄后才能下訂單哦!
點擊 登錄注冊 即表示同意《億速云用戶服務條款》
您好,登錄后才能下訂單哦!
今天小編給大家分享一下js如何實現拖動模態框效果的相關知識點,內容詳細,邏輯清晰,相信大部分人都還太了解這方面的知識,所以分享這篇文章給大家參考一下,希望大家閱讀完這篇文章后有所收獲,下面我們一起來了解一下吧。
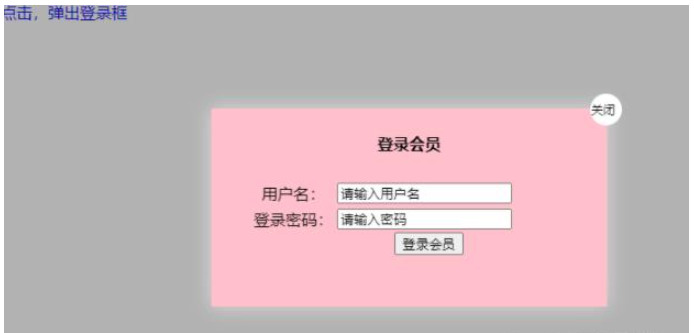
1.實現效果:

點擊鏈接,彈出模態框。點擊關閉,關閉模態框。
點擊標題部分,可以隨意移動模態框的位置。
主要是獲取鼠標位置。
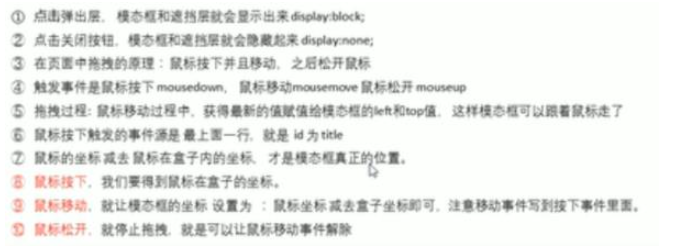
2.思路:

3.代碼:
<!DOCTYPE html>
<html lang="en">
<head>
    <meta charset="UTF-8">
    <meta http-equiv="X-UA-Compatible" content="IE=edge">
    <meta name="viewport" content="width=device-width, initial-scale=1.0">
    <title>拖動模態框</title>
    <style>
        body {
            padding: 0;
            margin: 0;
        }
        .login {
            display: none;
            position: fixed;
            top: 50%;
            left:50%;
            box-sizing:border-box;
            width:400px;
            height: 200px;
            background-color: pink;
            box-shadow: 0px 0px 20px #ddd;
            z-index: 9999;
            transform: translate(-50%, -50%);
            /* 讓一個固定定位的盒子 垂直居中 */


        }
        h5 {
            text-align: center;
            line-height: 70px;
        }
        form {
            text-align: center;
            margin-left: 40px;
        }
        a {
            text-decoration: none;
            text-align: center;
        }
        .finish {
            position: absolute;
            top:-15px;
            right:-15px;
            width: 30px;
            height: 30px;
            border: 1px solid white;
            border-radius: 50%;
            background-color: white;
            font-size: 10px;
            line-height: 30px;
        }
        .login-bg {
            display: none;
            width: 100%;
            height: 100%;
            position: fixed;
            top:0px;
            left: 0px;
            background-color: rgba(0,0,0,0.3);
        }
        .title {
            width: 400px;
            height: 50px;
            cursor: move;
            margin-top: -20px;
            height: 70px;

        }
    </style>
</head>
<body>
    <div class="bg">
        <div class="link"><a href="javascript:;" >點擊,彈出登錄框</a></div>
        <div class="login">
            <div class="finish">關閉</div>
            <div class = "title"><h5>登錄會員</h5></div>
            <form action="">
                <table>
                    <tr>
                        <td>用戶名:</td>
                        <td><input type="text" name="" id="" value="請輸入用戶名"></td>
                    </tr>
                    <tr>
                        <td>登錄密碼:</td>
                        <td><input type="text" name="" id="" value="請輸入密碼"></td>
                    </tr>
                </table>
                <input type="submit" name="" id="" value="登錄會員">
            </form>
        </div>
    </div>
    <!-- 遮蓋層 -->
    <div id="bg" class="login-bg"></div>
    <script>
        var a = document.querySelector('a');
        var login = document.querySelector('.login');
        var mask = document.querySelector('.login-bg');
        var finish = document.querySelector('.finish');
        a.addEventListener('click',function() {
            login.style.display = 'block';
            mask.style.display = 'block';
        });
        finish.addEventListener('click', function(){
            login.style.display = 'none';
            mask.style.display = 'none';
        })
        var title = document.querySelector('.title');
        title.addEventListener('mousedown', function(e){
            var x = e.pageX - login.offsetLeft;
            var y = e.pageY - login.offsetTop;
            // 鼠標移動的時候,把鼠標在頁面中的坐標,減去 鼠標在盒子內的坐標就是模態框的left和top值。
            document.addEventListener('mousemove', move)
            function move(e) {
                // 別忘了加單位。
                login.style.left = e.pageX - x + 'px';
                login.style.top = e.pageY - y + 'px';
            }
            // 鼠標彈起,讓鼠標移動事件停止。
            document.addEventListener('mouseup', function() {
                document.removeEventListener('mousemove', move);
            })
        })
    </script>
</body>
</html>
以上就是“js如何實現拖動模態框效果”這篇文章的所有內容,感謝各位的閱讀!相信大家閱讀完這篇文章都有很大的收獲,小編每天都會為大家更新不同的知識,如果還想學習更多的知識,請關注億速云行業資訊頻道。
免責聲明:本站發布的內容(圖片、視頻和文字)以原創、轉載和分享為主,文章觀點不代表本網站立場,如果涉及侵權請聯系站長郵箱:is@yisu.com進行舉報,并提供相關證據,一經查實,將立刻刪除涉嫌侵權內容。