您好,登錄后才能下訂單哦!
您好,登錄后才能下訂單哦!
本篇內容介紹了“怎么使用Android Flutter實現彈幕效果”的有關知識,在實際案例的操作過程中,不少人都會遇到這樣的困境,接下來就讓小編帶領大家學習一下如何處理這些情況吧!希望大家仔細閱讀,能夠學有所成!
需求要點如下:
彈幕行數為3行,每條彈幕相互依靠但不存在重疊
每條彈幕可交互點擊跳轉
滾動速度恒定 觸摸不可暫停播放
彈幕數據固定一百條且支持輪詢播放
彈幕排序規則如下:
1 4 7
2 5 8
3 6 9

Flutter Dev Package已有開源彈幕實現組件,這里舉例barrage_page的實現方式(大多數實現底層邏輯基本一樣)。
基本架構采用Stack然后向布局中提交彈幕布局,添加時設置好彈幕偏移量來設置彈幕位置。
Stack(fit: StackFit.expand, children: <Widget>[
        widget.child,
        _controller.isEnabled
            ? Stack(
            fit: StackFit.loose,
            children: <Widget>[]
              ..addAll(_widgets.values ?? const SizedBox()))
            : const SizedBox(),
      ]);
    });
彈幕效果代碼
但因為每條彈幕可能會出現重疊情況無法合理定位每條彈幕的位置因此放棄該方案。
PS:widget只有在build到布局后才能獲取到它基礎信息(相對位置信息,寬高等)就無法計算出所有彈幕的位置信息。
最先想到使用瀑布流flutter_staggered_grid_view實現彈幕布局但由于組件暫時不支持橫向布局就放棄了。
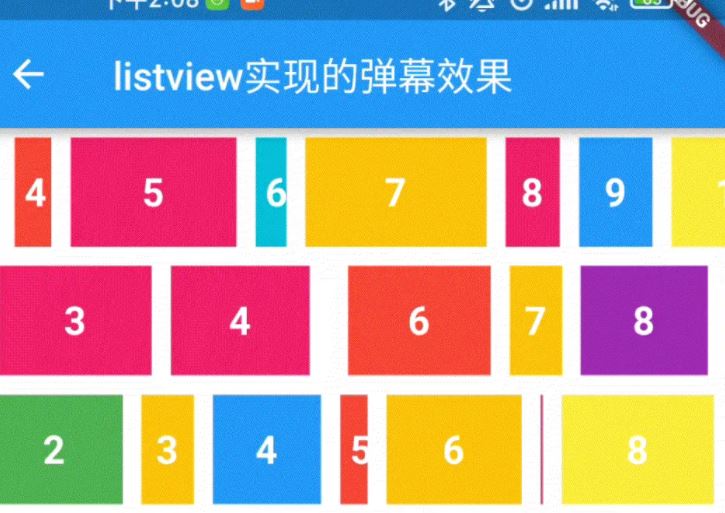
采用三個ListView實現每一行彈幕效果。雖然不太推薦以這種形式實現但從快速實現效果來說是比較簡單便捷兜底方案。(可以實現但不推薦)
Container(
  height: 200,
  child: Column(
    children: [
      Expanded(
        child: ListView.builder(
          scrollDirection: Axis.horizontal,
          controller: scrollController1,
          itemBuilder: (context, index) {
            return Common.getWidget(index,
                height: 30, width: random.nextInt(100).toDouble());
          },
        ),
      ),
      Expanded(
          child: ListView.builder(
        scrollDirection: Axis.horizontal,
        controller: scrollController2,
        itemBuilder: (context, index) {
          return Common.getWidget(index,
              height: 30, width: random.nextInt(100).toDouble());
        },
      )),
      Expanded(
          child: ListView.builder(
        scrollDirection: Axis.horizontal,
        controller: scrollController3,
        itemBuilder: (context, index) {
          return Common.getWidget(index,
              height: 30, width: random.nextInt(100).toDouble());
        },
      ))
    ],
  ),
)添加定時器periodic定時每秒鐘執行一次scrollController的animateTo方法移動偏移量并且偏移量不斷累加。
其次ListView支持無限滑動只要ListView.builder不設置itemCount就能實現。
Timer _timer;

scroll = () {
  offset += 100;
  scrollController1.animateTo(offset,
      duration: Duration(seconds: 1), curve: Curves.linear);
  scrollController2.animateTo(offset,
      duration: Duration(seconds: 1), curve: Curves.linear);
  scrollController3.animateTo(offset,
      duration: Duration(seconds: 1), curve: Curves.linear);
};
_timer = Timer.periodic(Duration(seconds: 1), (timer) {
  scroll();
});ListView支持無限滑動后itemBuilder回調下標Index會超出數據源最大值。因此數據源也需要支持無限輪詢來配合列表滾動。start表示彈幕開始取值,這里設置為(0,1,2);index表示itemBuilder回調下標Index。
int findIndex(int start, int index) {
  index = start + index * 3;
  if (expressList.length < index) {
    index = index % (expressList.length - 1); // 取余
  } else if (expressList.length == index) { // 是否是最后一個數據
    index = start;
    if (index >= expressList.length) { // 還需要判斷數據源是否比start還小
      index = (index % expressList.length - 1);
    }
  }
  return index;
}一切都實現得很順利最終就是彈幕點擊實現。但實際上當ListView的scrollController在執行animateTo時其實點擊操作是失效的,ListView無法響應點擊事件。只有當animateTo操作結束之后再執行點擊才能執行點擊。因此若要實現這個功能只能先將Timer暫停再執行一次點擊,再一次點擊不可能是用戶再去觸發,這里只能采用模擬點擊形式實現。
PS:ListView無法響應點擊事件具體原因還待研究,個人猜測列表做動畫時對外部觸摸事件進行了屏蔽處理。
GestureDetector(
  onTapUp: (details){
   // 點擊抬起之后暫停定時器
    _timer?.cancel();
    // 模擬一次點擊
    Timer(Duration(milliseconds: 100),() {
      GestureBinding.instance.handlePointerEvent(PointerAddedEvent(pointer: 0,position: details.globalPosition));
      GestureBinding.instance.handlePointerEvent(PointerDownEvent(pointer: 0,position: details.globalPosition));
      GestureBinding.instance.handlePointerEvent(PointerUpEvent(pointer: 0,position: details.globalPosition));
    });
  },
  child: ListView.builder(
    controller: scrollController,
    physics: NeverScrollableScrollPhysics(),
    itemBuilder: (context, index) {
      return GestureDetector(
        behavior: HitTestBehavior.opaque,
        child: Common.getWidget(index),
        onTap: () {
          // 內部響應點擊事件 然后重新設置定時器滾動列表
          _timer = Timer.periodic(Duration(seconds: 1), (timer) {
            scroll();
          });
        },
      );
    },
  ),
);
“怎么使用Android Flutter實現彈幕效果”的內容就介紹到這里了,感謝大家的閱讀。如果想了解更多行業相關的知識可以關注億速云網站,小編將為大家輸出更多高質量的實用文章!
免責聲明:本站發布的內容(圖片、視頻和文字)以原創、轉載和分享為主,文章觀點不代表本網站立場,如果涉及侵權請聯系站長郵箱:is@yisu.com進行舉報,并提供相關證據,一經查實,將立刻刪除涉嫌侵權內容。