您好,登錄后才能下訂單哦!
您好,登錄后才能下訂單哦!
本文小編為大家詳細介紹“Flutter怎么實現單選,復選和開關組件”,內容詳細,步驟清晰,細節處理妥當,希望這篇“Flutter怎么實現單選,復選和開關組件”文章能幫助大家解決疑惑,下面跟著小編的思路慢慢深入,一起來學習新知識吧。
構造方法:
const Switch({
  Key? key,
  required this.value,//當前開關狀態
  required this.onChanged,// 改變狀態回調
  this.activeColor,// 開啟全部顏色
  this.activeTrackColor,// 開啟軌道的顏色
  this.inactiveThumbColor,//關閉滑塊顏色
  this.inactiveTrackColor,// 關閉軌道顏色
  this.activeThumbImage,// 開啟滑塊圖片
  this.onActiveThumbImageError,// 開啟滑塊圖片加載失敗觸發
  this.inactiveThumbImage,// 關閉滑塊圖片
  this.onInactiveThumbImageError,// 關閉滑塊圖片加載失敗觸發
  this.thumbColor,// 可以通過不同狀態設置滑塊顏色
  this.trackColor,// 可以通過不同狀態設置軌道顏色
  this.materialTapTargetSize,//設置組件的最小大小
  this.dragStartBehavior = DragStartBehavior.start,// 處理手勢拖拽行為
  this.mouseCursor,//設置鼠標停留狀態 app用不到
  this.focusColor,// 獲取焦點顏色
  this.hoverColor,//指針懸停顏色
  this.overlayColor,// 設置按壓滑動覆蓋上面的顏色
  this.splashRadius,// 設置點擊滑動覆蓋圓環的半徑
  this.focusNode,//焦點控制
this.autofocus = false,// 是否自動獲取焦點通過Switch構造方法我們可以實現簡單的開關組件,并且除了改變顏色之外我們還可以自定義滑塊,如果對這個開關組件進行說明除了自定義布局,還可以使用SwitchListTile組件,一個列表和Swith的組合,官方幫我們實現了很多常見的功能,可以直接拿來使用。如果使用蘋果風格開關可以使用封裝好的CupertinoSwitch。
示例代碼:
Switch(
    // activeColor: Colors.blue,
    activeTrackColor: Colors.red,
    inactiveTrackColor: Colors.green,
    // inactiveThumbColor: Colors.yellow,
    materialTapTargetSize: MaterialTapTargetSize.shrinkWrap,
    dragStartBehavior: DragStartBehavior.start,
    activeThumbImage: AssetImage("images/lbxx.png"),
    inactiveThumbImage: AssetImage("images/lbxx.png"),
    value: _switchSelected,
    onChanged: (value) {
      setState(() {
        _switchSelected = value;
      });
    }),
構造方法:
const Radio<T>({
  Key? key,
  required this.value,//單選按鈕的值
  required this.groupValue,//當前選中的值
  required this.onChanged,//選中這個按鈕的回調
  this.mouseCursor,// 鼠標懸停狀態
  this.toggleable = false,//點擊已選中按鈕是否調用onChanged回調
  this.activeColor,// 選項按鈕顏色
  this.fillColor,//設置單選框不同狀態的的顏色
  this.focusColor,// 獲取焦點顏色
  this.hoverColor,//指針懸停顏色
  this.overlayColor,//按壓覆蓋顏色
  this.splashRadius,//按壓覆蓋顏色的半徑
  this.materialTapTargetSize,//組件最小大小
  this.visualDensity,//組件的緊湊程度
  this.focusNode,//焦點
  this.autofocus = false,//是否自動獲取焦點
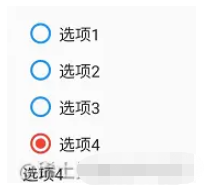
})單選組件使用了泛型,我們在使用的時候可以自定義選項的數據類型,一般都是在列表中使用,通過單選組件可以幫我們實現一個單選列表選項,當然Radio也有對應的RadioListTile,用來對單選框進行說明。
示例代碼:
Column(
  children: [
_radioCheckBox(_dataList[0]),
_radioCheckBox(_dataList[1]),
_radioCheckBox(_dataList[2]),
_radioCheckBox(_dataList[3])
  ],
),
Row _radioCheckBox(FMRadioBean fmRadioBean) {
  return Row(
    children: [
      Radio<FMRadioBean>(
          visualDensity: VisualDensity(
              horizontal: VisualDensity.minimumDensity,
              vertical: VisualDensity.minimumDensity),
          value: fmRadioBean,
          // activeColor: Colors.red,
          fillColor: MaterialStateProperty.resolveWith((state) {
            if (state.contains(MaterialState.selected)) {
              return Colors.red;
            } else {
              return Colors.blue;
            }
          }),
          focusColor: Colors.orange,
          groupValue: groupValue,
          toggleable: false,
          onChanged: (value) {
            setState(() {
              groupValue = fmRadioBean;
              radioText = fmRadioBean.text;
            });
          }),
      Text(fmRadioBean.text)
    ],
  );
}
class FMRadioBean {
  int index;
  String text;
  bool isSelect;
  FMRadioBean(this.index, this.text, this.isSelect);
}
構造方法:
const Checkbox({
  Key? key,
  required this.value,// 是否被選中
  this.tristate = false,//復選框value是否可以為null
  required this.onChanged,// 選中回調
  this.mouseCursor,// 鼠標指針狀態
  this.activeColor,// 選中顏色
  this.fillColor,// 不同狀態顏色設置
  this.checkColor,// 對勾顏色
  this.focusColor,// 獲取焦點顏色
  this.hoverColor,// 指針懸停顏色
  this.overlayColor,// 按壓覆蓋顏色
  this.splashRadius,// 按壓覆蓋半徑
  this.materialTapTargetSize,//最小大小
  this.visualDensity,// 組件緊湊程度
  this.focusNode,
  this.autofocus = false,
  this.shape,// 自定義選項框樣式
  this.side,// 自定義選項框邊框樣式
})多選組件可以使用shape和side字段自定義選擇框樣式,不過一般交互都是單選用圓形,多選用方形。既然前面倆兄弟都有現成的輔助說明組件,多選自然也有CheckboxListTile,仨兄弟用法基本一樣。
示例代碼:
Column(
  children: [
    _checkCheckBox(_dataList[0]),
    _checkCheckBox(_dataList[1]),
    _checkCheckBox(_dataList[2]),
    _checkCheckBox(_dataList[3])
  ],
),
Text(_checkText.toString())

Row _checkCheckBox(FMRadioBean fmRadioBean) {
  return Row(
    children: [
      Checkbox(
          visualDensity: VisualDensity(
              horizontal: VisualDensity.minimumDensity,
              vertical: VisualDensity.minimumDensity),
          value: fmRadioBean.isSelect,
          activeColor: Colors.blue,
          checkColor: Colors.white,
          shape: RoundedRectangleBorder(
            borderRadius: BorderRadius.all(Radius.circular(6))
          ),
          side: BorderSide(color: Colors.black,width: 2,style: BorderStyle.solid),
          onChanged: (value) {
            setState(() {
              if (value == true) {
                fmRadioBean.isSelect = true;
                _checkText.add(fmRadioBean.text);
              } else {
                fmRadioBean.isSelect = false;
                _checkText.remove(fmRadioBean.text);
              }
            });
          }),
      Text(fmRadioBean.text)
    ],
  );
}
讀到這里,這篇“Flutter怎么實現單選,復選和開關組件”文章已經介紹完畢,想要掌握這篇文章的知識點還需要大家自己動手實踐使用過才能領會,如果想了解更多相關內容的文章,歡迎關注億速云行業資訊頻道。
免責聲明:本站發布的內容(圖片、視頻和文字)以原創、轉載和分享為主,文章觀點不代表本網站立場,如果涉及侵權請聯系站長郵箱:is@yisu.com進行舉報,并提供相關證據,一經查實,將立刻刪除涉嫌侵權內容。