您好,登錄后才能下訂單哦!
您好,登錄后才能下訂單哦!
這篇文章給大家分享的是有關Android如何采集傳感器數據并顯示的內容。小編覺得挺實用的,因此分享給大家做個參考,一起跟隨小編過來看看吧。
Android 項目主配置文件 AndroidManifest.xml
Android Activity 概念
Android Sensor 接口
Android UI 布局管理器、文本框組件、編輯框組件
1.布局文件,用于控制UI界面顯示,這里使用了表格布局管理器和四個行,每一行之中有四列,其中外面的兩列是為了讓中間兩列居中,而中間兩列分別是一個顯示數據來源的TextView文本框組件和一個顯示數據值的編輯框組件。
<!-- activity_main.xml -->
<?xml version="1.0" encoding="utf-8"?>
<!-- 表格布局管理器TableLayout -->
<TableLayout xmlns:android="http://schemas.android.com/apk/res/android"
    xmlns:tools="http://schemas.android.com/tools"
    android:layout_width="match_parent"
    android:layout_height="match_parent"
    android:paddingBottom="16dp"
    android:paddingLeft="16dp"
    android:paddingRight="16dp"
    android:paddingTop="16dp"
    android:stretchColumns="0,3"
    tools:context=".MainActivity" >

    <!--三行,傳感器數據顯示-->
    <TableRow android:paddingTop="10dp">
        <!--文本框組件-->
        <TextView />
        <TextView
            android:layout_width="wrap_content"
            android:layout_height="wrap_content"
            android:text="x軸加速度:"
            android:textSize="18sp"
            android:gravity="center_horizontal"/>
     <!--編輯框組件-->
        <EditText
            android:id="@+id/et1"
            android:layout_width="wrap_content"
            android:layout_height="wrap_content"
            android:hint="000"/>
        <TextView />
    </TableRow>

    <TableRow >
        <TextView />
        <TextView
            android:layout_width="wrap_content"
            android:layout_height="wrap_content"
            android:text="y軸加速度:"
            android:textSize="18sp"
            android:gravity="center_horizontal"/>

        <EditText
            android:id="@+id/et2"
            android:layout_width="wrap_content"
            android:layout_height="wrap_content"
            android:hint="000"/>
        <TextView />
    </TableRow>

    <TableRow >
        <TextView />
        <TextView
            android:layout_width="wrap_content"
            android:layout_height="wrap_content"
            android:text="z軸加速度:"
            android:textSize="18sp"
            android:gravity="center_horizontal"/>

        <EditText
            android:id="@+id/et3"
            android:layout_width="wrap_content"
            android:layout_height="wrap_content"
            android:hint="000"/>
        <TextView />
    </TableRow>
</TableLayout>
2.程序文件,用于采集傳感器數據并控制其顯示
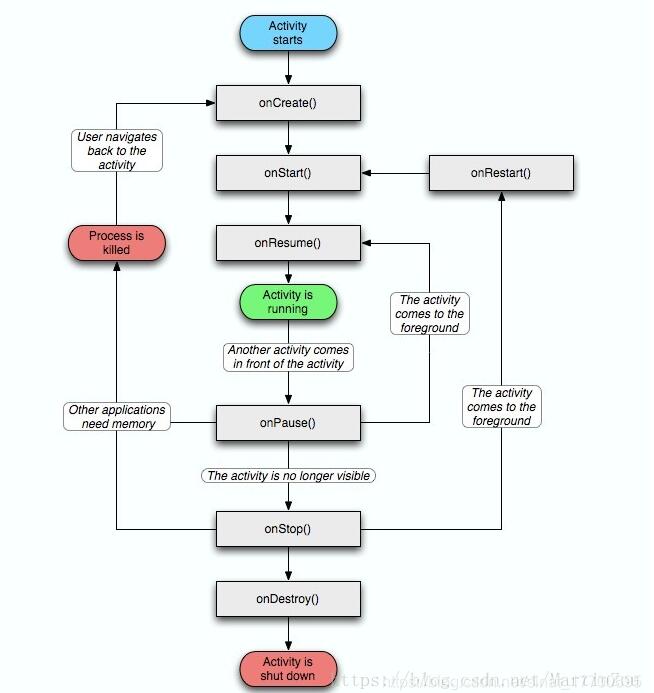
關于 Android Activity 有很多資料,這里就說其是一個 Android 程序的一個頁面及其對應的執行內容;Activity 的生命流程,onCreate( ),onStart( ),onResume( )…

采集傳感器數據有三步,首先獲取一個傳感器管理器對象,然后注冊監聽器,最后判斷傳感器值改變時是否需要的傳感器類型,然后做出刷新或其它反應;
//    MainActivity.java
package com.example.myapplication;

import androidx.appcompat.app.AppCompatActivity;

import android.content.Context;
import android.hardware.Sensor;
import android.hardware.SensorEvent;
import android.hardware.SensorEventListener;
import android.hardware.SensorManager;
import android.os.Bundle;
import android.widget.EditText;

public class MainActivity extends AppCompatActivity implements SensorEventListener {  // 實現Sensor Event Listener接口
    private EditText textAcceX,textAcceY,textAcceZ;   //編輯框組件
    private SensorManager sensorManager;  //傳感器管理器組件
    @Override
    protected void onCreate(Bundle savedInstanceState) {
        super.onCreate(savedInstanceState);
        setContentView(R.layout.activity_main);
        textAcceX = findViewById(R.id.et1);
        textAcceY = findViewById(R.id.et2);
        textAcceZ = findViewById(R.id.et3);
        sensorManager = (SensorManager) getSystemService(Context.SENSOR_SERVICE);    // 獲取傳感器管理器
    }

    @Override
    protected void onResume() {
        super.onResume();
        //設置傳感器類型及采樣率
        sensorManager.registerListener(this,
                sensorManager.getDefaultSensor(Sensor.TYPE_ACCELEROMETER),SensorManager.SENSOR_DELAY_UI);
    }

    @Override
    protected void onPause() {
        super.onPause();
        sensorManager.unregisterListener(this);  // 暫停采集
    }

    @Override
    public void onSensorChanged(SensorEvent event) {   // 重寫SensorEventListener接口的方法
        float [] values = event.values;
        int sensorType = event.sensor.getType();
        StringBuilder stringBuilderX = null,stringBuilderY = null,stringBuilderZ = null;
        if(sensorType == Sensor.TYPE_ACCELEROMETER ){   //  判斷是否所需傳感器
            stringBuilderX = new StringBuilder();
            stringBuilderY = new StringBuilder();
            stringBuilderZ = new StringBuilder();
            stringBuilderX.append(values[0]);
            stringBuilderY.append(values[1]);
            stringBuilderZ.append(values[2]);
            textAcceX.setText(stringBuilderX.toString());   // 編輯框內顯示
            textAcceY.setText(stringBuilderY.toString());
            textAcceZ.setText(stringBuilderZ.toString());
        }
    }

    @Override
    public void onAccuracyChanged(Sensor sensor, int accuracy) {   //  重寫SensorEventListener接口的方法

    }
}
感謝各位的閱讀!關于“Android如何采集傳感器數據并顯示”這篇文章就分享到這里了,希望以上內容可以對大家有一定的幫助,讓大家可以學到更多知識,如果覺得文章不錯,可以把它分享出去讓更多的人看到吧!
免責聲明:本站發布的內容(圖片、視頻和文字)以原創、轉載和分享為主,文章觀點不代表本網站立場,如果涉及侵權請聯系站長郵箱:is@yisu.com進行舉報,并提供相關證據,一經查實,將立刻刪除涉嫌侵權內容。