您好,登錄后才能下訂單哦!
您好,登錄后才能下訂單哦!
這篇文章主要介紹“vue3.0+vite2實現動態異步組件懶加載的方法”,在日常操作中,相信很多人在vue3.0+vite2實現動態異步組件懶加載的方法問題上存在疑惑,小編查閱了各式資料,整理出簡單好用的操作方法,希望對大家解答”vue3.0+vite2實現動態異步組件懶加載的方法”的疑惑有所幫助!接下來,請跟著小編一起來學習吧!
性能決定成敗;vite確實快;
cmd 命令行(默認你已經安裝了node & npm),執行npm init @vitejs/app vue-study – --template vue;
cd至vue-study,npm install(安裝依賴); npm run dev(啟動項目);
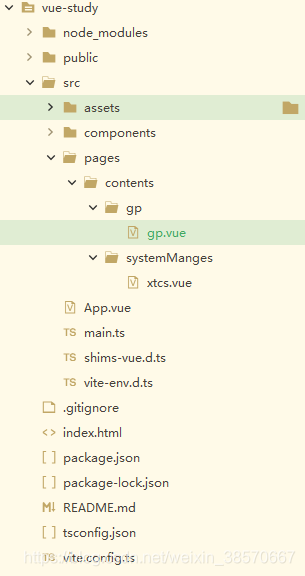
新建一個目錄為pages,pages下面再新建一個目錄contents,contens下面可以新建具體的組件目錄頁面,此時目錄結構為

App.vue
<template>
 <p @click="onChangeContents('./pages/contents/gp/gp.vue')">郭培</p>
 <p @click="onChangeContents('./pages/contents/systemManges/xtcs.vue')">系統參數</p>
 <p>{{currentTabComponent}}</p>
 <!-- <Suspense> -->
 <component :is="DefineAsyncComponent({
     // 工廠函數
     loader: Modeuls[currentTabComponent],
     // // 默認值:Infinity(即永不超時,單位 ms)
     timeout: 3000,
    })"></component>
 <!-- </Suspense> -->
</template>
<script lang="ts">
 import {
  defineComponent,
  defineAsyncComponent,
  reactive,
  ref
 } from 'vue'
 export default defineComponent({
  name: 'App',
  setup() {
   //vite加載指定路徑的所有模塊
   const Modeuls = import.meta.glob('./pages/contents/*/*');
   const onChangeContents = function(URL) {
    currentTabComponent.value = URL;
    console.log(currentTabComponent)
   }
   let currentTabComponent = ref('./pages/contents/systemManges/xtcs.vue');
   const DefineAsyncComponent = defineAsyncComponent;
   return {
    DefineAsyncComponent,
    currentTabComponent,
    onChangeContents,
    Modeuls
   }
  },
 })
</script>
到此,關于“vue3.0+vite2實現動態異步組件懶加載的方法”的學習就結束了,希望能夠解決大家的疑惑。理論與實踐的搭配能更好的幫助大家學習,快去試試吧!若想繼續學習更多相關知識,請繼續關注億速云網站,小編會繼續努力為大家帶來更多實用的文章!
免責聲明:本站發布的內容(圖片、視頻和文字)以原創、轉載和分享為主,文章觀點不代表本網站立場,如果涉及侵權請聯系站長郵箱:is@yisu.com進行舉報,并提供相關證據,一經查實,將立刻刪除涉嫌侵權內容。