您好,登錄后才能下訂單哦!
您好,登錄后才能下訂單哦!
這篇文章主要講解了“怎么用Springboot整合SpringSecurity實現賬號密碼和手機驗證碼登陸功能”,文中的講解內容簡單清晰,易于學習與理解,下面請大家跟著小編的思路慢慢深入,一起來研究和學習“怎么用Springboot整合SpringSecurity實現賬號密碼和手機驗證碼登陸功能”吧!
SpringSecurity 是 Spring 提供安全管理框架。核心內容包含認證、授權、攻擊防護。實際上SpringSecurity 已經發展了多年了,但是在 SSM/SSH 中整合 SpringSecurity 相較于 Shiro 來說顯得要麻煩很多,所以在安全管理框架這塊一直都是 Shiro 的天下。
自從有了 SpringBoot ,SpringSecurity 的完美兼容讓其價值完整的體現了出來。在 SpringBoot 中基本零配置就可以使用 SpringSecurity了。
網上教程一大堆,一知半解導致寫的錯誤一大堆,出錯了又要去搜索,知識點越來越多,陷入惡性循環。
這里提供一個完整Demo ,雖然不一定說完全理解SpringSecurity,但是可以了解其運行方式。
示例中提供了 2 種認證方式,賬號密碼、手機驗證碼,請根據需要自定義。
SpringBoot 2.3.3
JDK 1.8
Mybatis 2.1.3
Mysql 5.7+
下載 Demo
GitHub : https://github.com/liuqi0725/springboot-useful/tree/master/springboot-security
Gitee : https://gitee.com/alexliu0725/springboot-useful/tree/master/springboot-security
修改 application.yaml 端口、數據庫 等配置
啟動后在不同的客戶端機器上訪問 http://localhost:8080 (根據自己配置的端口訪問)
測試用2 種登陸方式: 用戶密碼、手機驗證碼
查看不同用戶菜單是否不一樣(測試授權)
訪問不存在的路由地址,查看返回值
為避免遷移腳本沖突,如果不建多個數據庫腳本的情況為,請先清空數據庫里的內容
Spring Security 官方說明
Spring Security 官方文檔
Spring Security 參考手冊-中文
之前SSM/SSH 一直用 Shiro。后面慢慢過渡到 SpringBoot 后,改用了 SpringSecurity。然后就沒有然后了。Spring 真的好用,教程也全。 再說中型項目后續會涉及集群或微服務,security、cloud 打包用一套不香么。
以下是我對這兩點膚淺的認識。不包含 SSO、OAuth 等。后續會在其他文章中介紹。
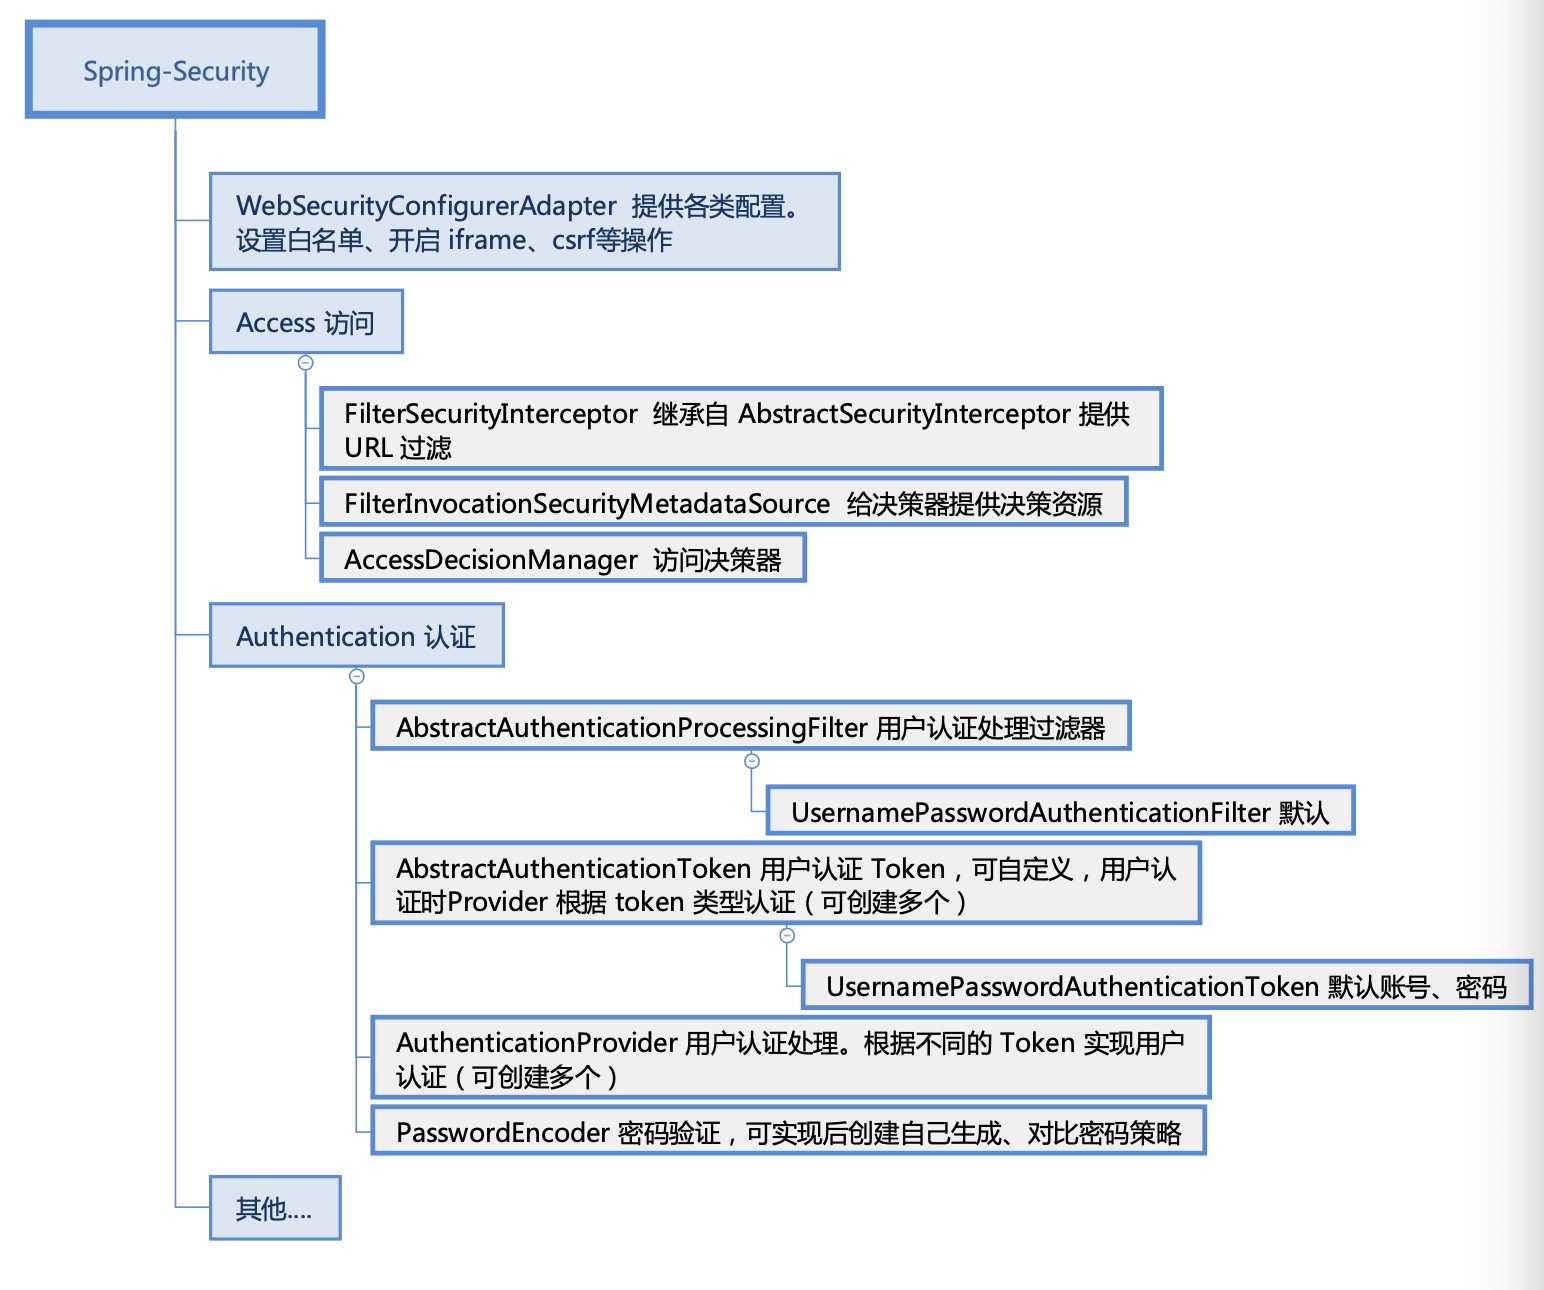
編碼分為 2 大塊 access(訪問)、authenticaton(認證)
access 會放過白名單,對非白名單的請求進行認證,認證的依據來源(權限、角色...),沒有則返回 403
authenticaton 用戶訪問一個需要授權的 URL 時,會進行用戶認證,認證通過后再通過 access 去判斷是否可以訪問**(授權)**

Demo 中沒有開啟 csrf。 如果需要可以自行開啟。
開啟后,通過如下代碼獲取
<input name="${_csrf.parameterName}" type="hidden" value="${_csrf.token}">
或者放在head 中
<head>
	<meta  name = “_csrf” content = “${_csrf.token}” />
	<meta  name = “_csrf_header”  content = “${_csrf.headerName}” />
</head>SpringSecurity 默認是關閉了 frame 的嵌入的,可以開啟。
參考 Demo 代碼 SecurityWebConfig 中 setFrameAllow(http) 方法
private void setFrameAllow(HttpSecurity http) throws Exception {

        /*
         * iframe 允許顯示的方式 <br>
         * SAMEORIGIN 僅允許 frame 頁面當前域名下的顯示 <br>
         *
         * FROMURI 允許 frame 頁面在指定域名下顯示 <br>
         *     例如:
         *     <ul>
         *          <li>http://www.baidu.com 允許該域名可以嵌套我的 frame</li>
         *          <li>http://www.taobao.com 允許該域名可以嵌套我的 frame</li>
         *     </ul>
         */

        // 正式環境請配置在配置文件中。方便管理

        String xframe = "SAMEORIGIN";
        // 如果是 FROMURI 允許嵌套的外部域名白名單
        String[] frameAllowWhiteDomain = new String[]{"https://example.cn","https://example.com"};

        if(xframe.equals("SAMEORIGIN")){
            // 僅允許本域名
            http.headers().frameOptions().sameOrigin();
        }else if(xframe.equals("FROMURI")){
            //disable 默認策略。 這一句不能省。
            http.headers().frameOptions().disable();
            //新增新的策略。
            http.headers().addHeaderWriter(new XFrameOptionsHeaderWriter(
                    new WhiteListedAllowFromStrategy(Arrays.asList(frameAllowWhiteDomain))
            ));
        }else{
            throw new Exception("未知的 XFrameOptions 。僅支持 SAMEORIGIN , FROMURI");
        }
}異常處理
Demo 中并沒有做全局的統一異常處理,在正式項目中,可以通過全局的異常處理來提升錯誤后的用戶體驗。通過以下 2 點可以實現,view 訪問返回錯誤 view,json 訪問返回錯誤 json
	// 處理 spring `/error`
    @Controller
    @RequestMapping({"${server.error.path:${error.path:/error}}"})
    public class SpringErrorProcessController extends AbstractErrorController {
        ...
    }

    // 處理 Controller 層錯誤
    @ControllerAdvice
    public class ControllerExceptionHandler{

    }
自定義配置 SpringSecurity 中還是有很多參數的,比如白名單,開啟 csrf、iframe 都是可以通過配置實現,這樣換一個項目不用把代碼又改一堆。可以通過 @ConfigurationProperties 實現 spring 配置,在 spring 加載時讀取。
靈活的設計 SpringSecurity 只提供了工具,具體的實現還是要在項目(可以理解為第三方)中去實現,比如 Demo 中的CustomerSecurityAuthenticationProcessService,CustomerPasswordService 等。這些都是需要在啟動時注入到SpringSecurity 中的,如何將這些類在啟動時獲取到實體,或者根據獲取內容讓 SpringSecurity 實現其他的邏輯。
感謝各位的閱讀,以上就是“怎么用Springboot整合SpringSecurity實現賬號密碼和手機驗證碼登陸功能”的內容了,經過本文的學習后,相信大家對怎么用Springboot整合SpringSecurity實現賬號密碼和手機驗證碼登陸功能這一問題有了更深刻的體會,具體使用情況還需要大家實踐驗證。這里是億速云,小編將為大家推送更多相關知識點的文章,歡迎關注!
免責聲明:本站發布的內容(圖片、視頻和文字)以原創、轉載和分享為主,文章觀點不代表本網站立場,如果涉及侵權請聯系站長郵箱:is@yisu.com進行舉報,并提供相關證據,一經查實,將立刻刪除涉嫌侵權內容。