您好,登錄后才能下訂單哦!
您好,登錄后才能下訂單哦!
這篇文章主要講解了基于opencv的selenium怎么實現滑動驗證碼,內容清晰明了,對此有興趣的小伙伴可以學習一下,相信大家閱讀完之后會有幫助。
基于selenium進行動作鏈
由于最近很多人聊到滑動驗證碼怎么處理,所以決定自己動手試一下。
做一個東西前。我們首先要對這個東西的操作過程有一個大概的了解。
from selenium import webdriver
from selenium.webdriver.common.action_chains import ActionChains

artice = browser.find_element_by_class_name('geetest_slider_button') # 滑動按鈕
action = ActionChains(browser)
action.click_and_hold(artice).perform() #按住按鈕不放
action.reset_actions()
action.pause(0.01).move_by_offset(step, 0).perform() #step 為滑動的水平距離
action.release(artice).perform() # 松開按鈕
上面就是本方用到的有關于ActionChains的方法。其他方法這里不過多介紹,想了解更多的請轉 seleniun ActionChains 鼠標鍵盤操作
接下來到我本次要介紹的重點,滑動距離的介紹,也就是圖片求陰影區域的位置。
這里我使用了opencv庫,主要流程包括
import cv2 as cv
import numpy as np
import math

# 尋找直線
def FindLines(image):
  image = cv.cvtColor(image, cv.COLOR_BGR2GRAY) # 二值化
  blurred = cv.GaussianBlur(image, (5, 5), 0) # 高斯模糊
  canny = cv.Canny(blurred, 200, 400) # canny邊緣檢測
  lines = cv.HoughLinesP(canny, 1, np.pi / 180, 20, minLineLength=15, maxLineGap=8) # 霍夫變換尋找直線
  return lines[:, 0, :] # 返回直線


# 這里對直線進行過濾
def FindResultLises(lines):
  resultLines = []
  for x1, y1, x2, y2 in lines:
    if (abs(y2 - y1) < 5 or abs(x2 - x1) < 5) and min(x1, x2) > 60: # 只要垂直于坐標軸的直線并且起始位置在60像素以上
      resultLines.append([x1, y1, x2, y2])
  return resultLines


# 判斷點是否在直線上
def distAbs(point_exm, list_exm):
  x, y = point_exm
  x1, y1, x2, y2 = list_exm
  dist_1 = math.sqrt(abs((y2 - y1) + (x2 - x1) + 1)) # 直線的長度
  dist_2 = math.sqrt(abs((y1 - y) + (x1 - x) + 1)) + math.sqrt(abs((y2 - y) + (x2 - x) + 1)) # 點到兩直線兩端點距離和
  return abs(dist_2 - dist_1)


# 交點函數 y = kx + b 求交點位置
def findPoint(line1, line2):
  poit_status = False
  x1, y1, x2, y2 = line1
  x3, y3, x4, y4 = line2
  x = y = 0

  if (x2 - x1) == 0: # 垂直x軸
    k1 = None
    b1 = 0
  else:
    k1 = 1.0 * (y2 - y1) / (x2 - x1)
    b1 = y1 * 1.0 - k1 * x1 * 1.0

  if (x4 - x3) == 0:
    k2 = None
    b2 = 0
  else:
    k2 = 1.0 * (y4 - y3) / (x4 - x3)
    b2 = y3 * 1.0 - k2 * x3 * 1.0

  if k1 is None:
    if not k2 is None:
      x = x1
      y = k2 * x1 + b2
      poit_status = True
  elif k2 is None:
    x = x3
    y = k1 * x3 + b1
    poit_status = True
  elif k1 != k2:
    x = (b2 - b1) * 1.0 / (k1 - k2)
    y = k1 * x * 1.0 + b1 * 1.0
    poit_status = True

  return poit_status, [x, y]


# 求交點
def linePoint(resultLines):
  for x1, y1, x2, y2 in resultLines:
    for x3, y3, x4, y4 in resultLines:
      point_is_exist, [x, y] = findPoint([x1, y1, x2, y2], [x3, y3, x4, y4])  # 兩線是否有交點
      if point_is_exist:
        dist_len1 = distAbs([x, y], [x1, y1, x2, y2])
        dist_len2 = distAbs([x, y], [x3, y3, x4, y4])
        if dist_len1 < 5 and dist_len2 < 5: # 如果誤差在5內我們認為點在直線上
          # 判斷交點在行直線中是左端點還是右端點
          if abs(y2 - y1) < 5:
            # x1是行直線
            if abs(x1 - x) + abs(y1 - y) < 5: # 左端點
              return -1, [x, y]
            else:
              return 1, [x, y]
          else:
            # x2是行直線
            if abs(x3 - x) + abs(y3 - y) < 5:
              return -1, [x, y]
            else:
              return 1, [x, y]
  return 0, [0, 0]

if __name__ == '__main__':
  img = cv.imread(r'C:\Users\Administrator\Desktop\opencv\temImg.png')
  lines = FindLines(img)
  lines = FindResultLises(lines)
  L_or_R, point_x = linePoint(lines)  # L_or_R 用于判斷交點在行直線左邊還是右邊 后面拖動要用到
  xoffset = point_x[0]
  yoffset = point_x[1]
  cv.circle(img, (int(xoffset), int(yoffset)), 5, (0, 0, 255), 3)
  cv.imshow('circle', img)
  cv.waitKey(0)
  cv.destroyAllWindows()

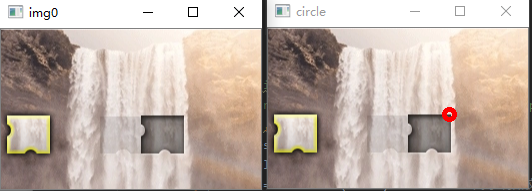
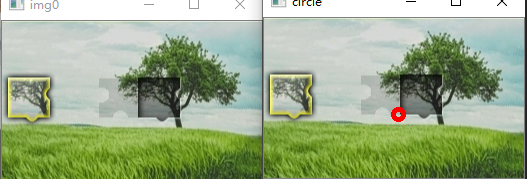
效果圖
當然也有操作不到的圖片,各位有興趣的可以嘗試并且修改其中的參數
滑動驗證碼
在上面我們已經找到了邊緣點,并且根據交點是在左邊還是右邊進行計算,找到我們要滑動的最后值
if L_or_R == 1:
  x_offset = xoffset - 20 # 20是陰影快一半的長度 可根據實際情況調整
else:
  x_offset = offset + 20
有了滑動距離,接下來就應該是滑動了
如果我們直接用 action.move_by_offset(x_offset,0).perform() 圖片會圖示被怪物吃了。那就是運動軌跡被檢測到不是正常人的行為,因為正常人很難一拉就拉到對應的位置。
滑動軌跡算法
所以我們還要有一個模擬人的正常操作的拖動軌跡:下面是以先加速再減速的軌跡
import ramdom

# 通過加速減速模擬滑動軌跡
def moveTrack(xoffset):
  updistance = xoffset*4/5
  t = 0.2
  v = 0
  steps_list = []
  current_offset = 0
  while current_offset<xoffset:
    if current_offset<updistance:
      a = 2 + random.random() * 2
    else:
      a = -random.uniform(12,13)
    vo = v
    v = vo + a * t
    x = vo * t + 1 / 2 * a * (t * t)
    x = round(x, 2)
    current_offset += abs(x)
    steps_list.append(abs(x))
  # 上面的 sum(steps_list) 會比實際的大一點,所以再模擬一個往回拉的動作,補平多出來的距離
  disparty = sum(steps_list)-xoffset
  last1 = round(-random.random() - disparty, 2)
  last2 = round(-disparty-last1, 2)
  steps_list.append(last1)
  steps_list.append(last2)

  return steps_list
有了軌跡 steps_list 我們就可以通過循環來拖動按鈕。需要注意的一點是 每一次循環都要action.reset_actions() 不然他會把之前的距離也算進來,循環結束記得松開按鈕
for step in steps_list:
  action.reset_actions()
  action.pause(0.01).move_by_offset(step, 0).perform()
action.release(artice).perform()
看完上述內容,是不是對基于opencv的selenium怎么實現滑動驗證碼有進一步的了解,如果還想學習更多內容,歡迎關注億速云行業資訊頻道。
免責聲明:本站發布的內容(圖片、視頻和文字)以原創、轉載和分享為主,文章觀點不代表本網站立場,如果涉及侵權請聯系站長郵箱:is@yisu.com進行舉報,并提供相關證據,一經查實,將立刻刪除涉嫌侵權內容。