您好,登錄后才能下訂單哦!
您好,登錄后才能下訂單哦!
這篇文章主要介紹了Springcloud seata nacos環境怎么搭建,具有一定借鑒價值,感興趣的朋友可以參考下,希望大家閱讀完這篇文章之后大有收獲,下面讓小編帶著大家一起了解一下。
1.nacos配置(自行上官網下載)
將nacos/conf/nacos-mysql.sql導入自己的數據庫
2.配置修改nacos/conf/application.properties
spring.datasource.platform=mysql
db.num=1
db.url.0=jdbc:mysql://127.0.0.1:3306/nacos?characterEncoding=utf8&connectTimeout=1000&socketTimeout=3000&autoReconnect=true
db.user=root
db.password=123456
3.啟動nacos
windows直接雙擊startup.cmd
linux不要直接sh startup.sh 加入參數 -m standalone或者改startup.sh -m參數,linux腳本默認集群啟動,不改參數也不加啟動參數會報錯

啟動成功
4.下載seata,建議直接下載源碼編譯
mvn -Prelease-all -DskipTests clean install -U
5.使用db模式導入配置

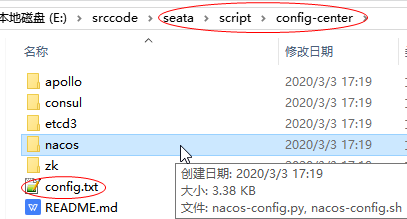
上面是源碼目錄,mysql.sql為seata庫必須的表,執行sql即可

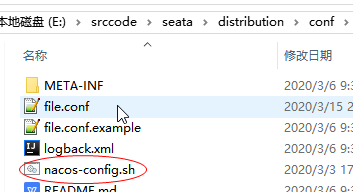
將上面的config.txt文件復制到seata目錄,nacos中的nacos-config.shnacos-config.py復制到seata的conf目錄

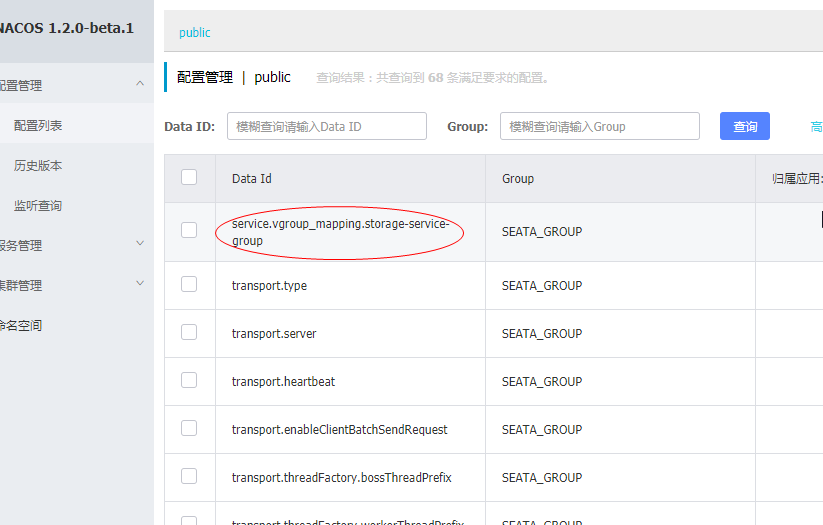
git 命令框執行 sh nacos-config.sh hostip 即可,位置為什么這樣自己看下腳本就知道了

配置都進來了,注意上面的紅框,如果你網上搜的腳本導入的,seata是1.0及之前的版本上面是對的,如果1.1及最新的源碼改成vgroupMapping了,報錯參考另一篇博客
5.修改seata配置
修改file.conf
service {
  #transaction service group mapping
  vgroupMapping.my_tx_group="default" #此處根據自己的情況修改
  default.grouplist="127.0.0.1:8091"
  disableGlobalTransaction=false
}
## transaction log store, only used in seata-server
store {
 ## store mode: file、db
 mode = "db"

 ## file store property
 file {
  ## store location dir
  dir = "sessionStore"
  # branch session size , if exceeded first try compress lockkey, still exceeded throws exceptions
  maxBranchSessionSize = 16384
  # globe session size , if exceeded throws exceptions
  maxGlobalSessionSize = 512
  # file buffer size , if exceeded allocate new buffer
  fileWriteBufferCacheSize = 16384
  # when recover batch read size
  sessionReloadReadSize = 100
  # async, sync
  flushDiskMode = async
 }

 ## database store property
 db {
  ## the implement of javax.sql.DataSource, such as DruidDataSource(druid)/BasicDataSource(dbcp) etc.
  datasource = "druid"
  ## mysql/oracle/h3/oceanbase etc.
  dbType = "mysql"
  driverClassName = "com.mysql.jdbc.Driver" #不要用mysql8的驅動,否則報錯
  url = "jdbc:mysql://127.0.0.1:3306/seata"
  user = "root"
  password = "123456"
  minConn = 1
  maxConn = 10
  globalTable = "global_table"
  branchTable = "branch_table"
  lockTable = "lock_table"
  queryLimit = 100
 }
}
registry.conf
registry {
 # file 、nacos 、eureka、redis、zk、consul、etcd3、sofa
 type = "nacos"

 nacos {
  serverAddr = "localhost:8848"
  namespace = ""
  cluster = "default"
 }


}

config {
 # file、nacos 、apollo、zk、consul、etcd3
 type = "nacos"

 nacos {
  serverAddr = "localhost"
  namespace = ""
  group = "SEATA_GROUP"
 }
}
然后將上面兩個配置文件復制到你的springcloud模塊中
6.啟動seata

如果之前在其他ip啟動過,將file_store/data下的文件清掉,不然會報錯
7.springcloud代碼
去https://gitee.com/code_fun/example.git 把demo.zip下載跑就可以了,前提是建好數據庫哦
demo.sql有表結構,undo_log表每個庫都要有
感謝你能夠認真閱讀完這篇文章,希望小編分享的“Springcloud seata nacos環境怎么搭建”這篇文章對大家有幫助,同時也希望大家多多支持億速云,關注億速云行業資訊頻道,更多相關知識等著你來學習!
免責聲明:本站發布的內容(圖片、視頻和文字)以原創、轉載和分享為主,文章觀點不代表本網站立場,如果涉及侵權請聯系站長郵箱:is@yisu.com進行舉報,并提供相關證據,一經查實,將立刻刪除涉嫌侵權內容。