溫馨提示×
您好,登錄后才能下訂單哦!
點擊 登錄注冊 即表示同意《億速云用戶服務條款》
您好,登錄后才能下訂單哦!
這篇文章主要為大家展示了如何實現Python接口測試數據庫封裝,內容簡而易懂,希望大家可以學習一下,學習完之后肯定會有收獲的,下面讓小編帶大家一起來看看吧。
引言
做接口測試的時候,避免不了操作數據庫。因為數據校驗需要,測試數據初始化需要、一些參數化場景需要等。
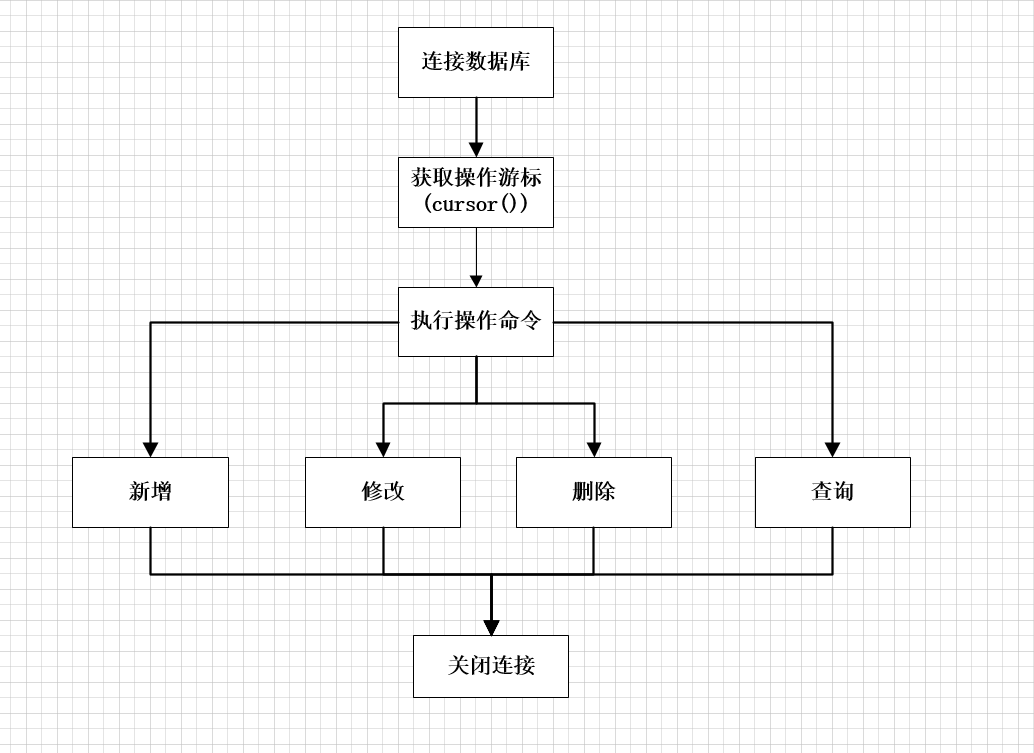
數據庫操作框架設計
這里主要操作mysql數據庫,整體思路:

封裝實現
具體代碼實現:
import pymysql
import json


class OperateMysql(object):
  def __init__(self):
    # 數據庫初始化連接
    self.connect_interface_testing = pymysql.connect(
      "localhost",
      "root",
      "123456",
      "test",
      charset='utf8mb4',
      cursorclass=pymysql.cursors.DictCursor
    )

    # 創建游標操作數據庫
    self.cursor_interface_testing = self.connect_interface_testing.cursor()

  def select_first_data(self, sql):
    """
    查詢第一條數據
    """
    try:
      # 執行 sql 語句
      self.cursor_interface_testing.execute(sql)
    except Exception as e:
      print("執行sql異常:%s"%e)
    else:
      # 獲取查詢到的第一條數據
      first_data = self.cursor_interface_testing.fetchone()
      # print(first_data)
      # 將返回結果轉換成 str 數據格式,禁用acsii編碼
      first_data = json.dumps(first_data,ensure_ascii=False)
      # self.connect_interface_testing.close()
      return first_data

  def select_all_data(self,sql):
    """
    查詢結果集
    """
    try:
      self.cursor_interface_testing.execute(sql)
    except Exception as e:
      print("執行sql異常:%s"%e)
    else:
      first_data = self.cursor_interface_testing.fetchall()
      first_data = json.dumps(first_data,ensure_ascii=False)
      # self.connect_interface_testing.close()
      return first_data

  def del_data(self,sql):
    """
    刪除數據
    """
    res = {}
    try:
      # 執行SQL語句
      result = self.cursor_interface_testing.execute(sql)
      # print(result)
      if result != 0:
        # 提交修改
        self.connect_interface_testing.commit()
        res = {'刪除成功'}
      else:
        res = {'沒有要刪除的數據'}
    except:
      # 發生錯誤時回滾
      self.connect_interface_testing.rollback()
      res = {'刪除失敗'}
    return res

  def update_data(self,sql):
    """
    修改數據
    """
    try:
      self.cursor_interface_testing.execute(sql)
      self.connect_interface_testing.commit()
      res = {'更新成功'}
    except Exception as e:
      self.connect_interface_testing.rollback()
      res = {'更新刪除'}
    return res

  def insert_data(self,sql,data):
    """
    新增數據
    """

    try:
      self.cursor_interface_testing.execute(sql,data)
      self.connect_interface_testing.commit()
      res = {data,'新增成功'}
    except Exception as e:
      res = {'新增失敗',e}
    return res
  def conn_close(self):
    # 關閉數據庫
    self.cursor_interface_testing.close()


if __name__ == "__main__":
  # ()類的實例化
  om = OperateMysql()

  # 新增
  data = [{'id': 1, 'name': '測試', 'age': 15}, {'id': 2, 'name': '老王', 'age': 10}, {'id': 3, 'name': '李四', 'age': 20}]
  for i in data:
    i_data = (i['id'],i['name'],i['age'])
    insert_res = om.insert_data(
      """
       INSERT INTO test_student (id,name,age) VALUES (%s,%s,%s)
      """,i_data
    )
    print(insert_res)

  # 查詢
  one_data = om.select_first_data(
    """
      SELECT * FROM test_student;
    """
  )
  all_data = om.select_all_data(
    """
    SELECT * FROM test_student;
    """
  )
  print(one_data)
  # all_data字符串類型的list轉list
  print("查詢總數據:%s",len(json.loads(all_data)),"分別是:%s",all_data)

  # 修改
  update_data = om.update_data(
    """
    UPDATE test_student SET name = '王五' WHERE id = 1;
    """
  )
  print(update_data)

  # 刪除
  del_data = om.del_data(
    """
    DELETE FROM test_student WHERE id in (1,2,3);
    """
  )
  print(del_data)

  # 關閉游標
  om.conn_close()
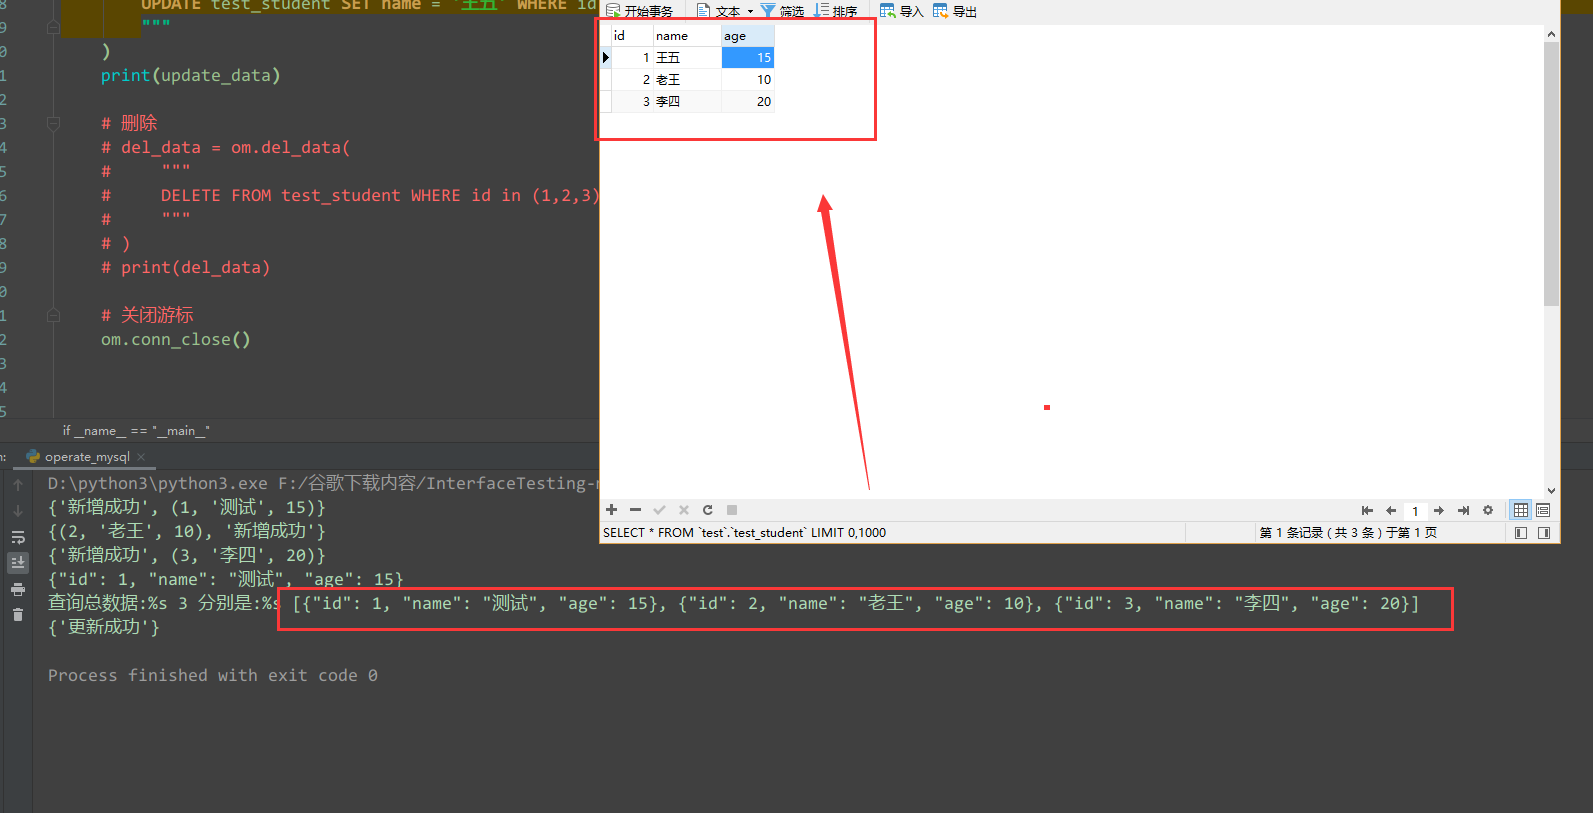
運行結果:

為了方便演示,先注釋刪除數據的sql,再執行程序:

以上就是關于如何實現Python接口測試數據庫封裝的內容,如果你們有學習到知識或者技能,可以把它分享出去讓更多的人看到。
免責聲明:本站發布的內容(圖片、視頻和文字)以原創、轉載和分享為主,文章觀點不代表本網站立場,如果涉及侵權請聯系站長郵箱:is@yisu.com進行舉報,并提供相關證據,一經查實,將立刻刪除涉嫌侵權內容。