您好,登錄后才能下訂單哦!
您好,登錄后才能下訂單哦!
為了研究一下sql自動化檢查和分析工具,是否有網上介紹的好用,我在本地進行soar 和 soar-web的安裝和使用。
初步的實驗結果,總結如下:
1. 安裝相對來說較為麻煩,特別是soar-web的依賴包安裝,涉及到python pip相關組件的下載安裝。
2. 啟動soar-web會遇到一些奇怪問題,提示 “ImportError: No module named xxx“ 沒有安裝,但是通過python -m pip list檢查是有安裝成功的。
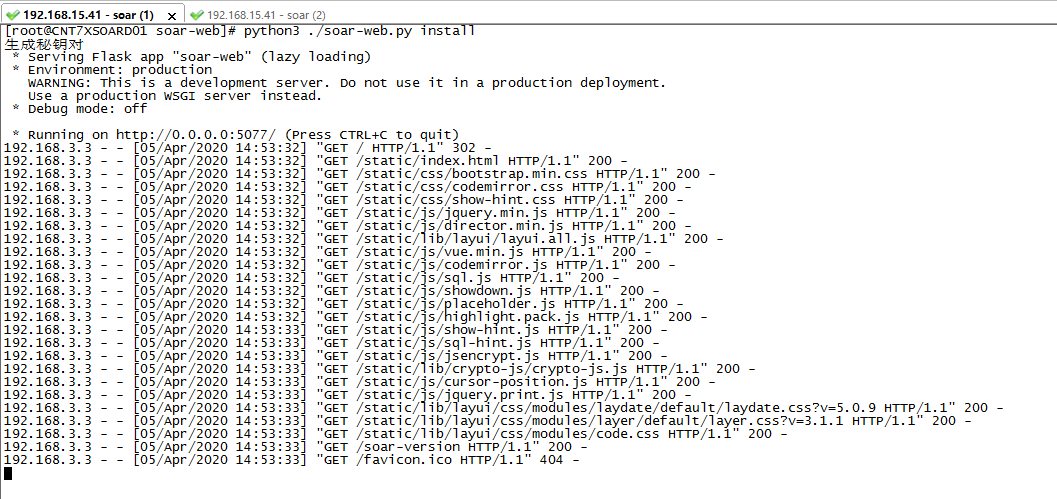
3. soar-web的啟動腳本run.sh,不能正常啟動;但是使用python./soar-web.py install卻可以正常啟動。
4. 數據庫類型,只支持MySQL一種
后續:
最后,綜合感覺,soar-web的功能,距離自動化SQL檢查和優化,還有很大空間。接下來,我將繼續調研和對比剩下兩個工具:see 和 Yearning
1.see 工具
https://github.com/myide/see
2. Yearning 工具
https://github.com/cookieY/Yearning
一 、soar主要步驟,如下:
step 1: 下載安裝包
# prepare dir and install
mkdir -p /opt/soft/soar && mkdir -p /opt/install/soar/{log,conf}
wget -O /opt/soft/soar/soar -c https://github.com/XiaoMi/soar/releases/download/0.11.0/soar.linux-amd64
step 2: 復制和安裝文件
# install server
mv /opt/soft/soar/soar /opt/install/soar

# 目錄介紹:
# 配置文件為yaml格式。一般情況下只需要配置online-dsn, test-dsn, log-output等少數幾個參數。即使不創建配置文件SOAR仍然會給出基本的啟發式建議。
# 默認文件會按照/etc/soar.yaml, ./etc/soar.yaml, ./soar.yaml順序加載,
# 找到第一個后不再繼續加載后面的配置文件。如需指定其他配置文件可以通過-config參數指定。
# 關于數據庫權限online-dsn需要相應庫表的SELECT權限,test-dsn需要root最高權限。

# 修改默認配置參數,如下
# 參考
# # 1. 修改soar.conf的基本參數
root >> cat > /opt/install/soar/conf/soar.yaml << EOF
# 線上環境配置
online-dsn:
 addr: CNT7XMYSQLD01:13306
 schema: sakila
 user: root
 password: 1t'sB1g3rt
 disable: false
# 測試環境配置
test-dsn:
 addr: CNT7XMYSQLD01:13307
 schema: test
 user: root
 password: 1t'sB1g3rt
 disable: false
# 是否允許測試環境與線上環境配置相同
allow-online-as-test: true
# 是否清理測試時產生的臨時文件
drop-test-temporary: true
# 語法檢查小工具
only-syntax-check: false
sampling-statistic-target: 100
sampling: false
# 日志級別,[0:Emergency, 1:Alert, 2:Critical, 3:Error, 4:Warning, 5:Notice, 6:Informational, 7:Debug]
log-level: 7
log-output: ${SOAR_LOG_DIR}/soar.log
# 優化建議輸出格式
report-type: markdown
ignore-rules:
- ""
# 黑名單中的 SQL 將不會給評審意見。一行一條 SQL,可以是正則也可以是指紋,填寫指紋時注意問號需要加反斜線轉義。
blacklist: ${SOAR_CONF_DIR}/soar.blacklist
# 啟發式算法相關配置
max-join-table-count: 5
max-group-by-cols-count: 5
max-distinct-count: 5
max-index-cols-count: 5
max-total-rows: 9999999
spaghetti-query-length: 2048
allow-drop-index: false
# EXPLAIN相關配置
explain-sql-report-type: pretty
explain-type: extended
explain-format: traditional
explain-warn-select-type:
- ""
explain-warn-access-type:
- ALL
explain-max-keys: 3
explain-min-keys: 0
explain-max-rows: 10000
explain-warn-extra:
- ""
explain-max-filtered: 100
explain-warn-scalability:
- O(n)
query: ""
list-heuristic-rules: false
list-test-sqls: false
verbose: true
root >> EOF
 step 3: 準備環境變量

# env parameter and path
echo '' >> /etc/profile && \
echo 'SOAR_HOME=/opt/install/soar' >> /etc/profile && \
echo 'SOAR_CONF_DIR=$SOAR_HOME/conf' >> /etc/profile && \
echo 'SOAR_LOG_DIR=$SOAR_HOME/log' >> /etc/profile && \
echo 'PATH=$PATH:$SOAR_HOME' >> /etc/profile && \
source /etc/profile
 step 4: 文件賦予權限

chmod -R 777 $SOAR_HOME/soar
 step 5: 檢查soar全局配置生效

# 查看版本
soar -version

# 打印所有的啟發式規則
soar -list-heuristic-rules

# 打印支持的報告格式
soar -list-report-types
二 、soar-web主要步驟,如下:
step 1: 安裝soar-web的依賴包
# 1.1 安裝python3 和 python3-pip 和 gcc (gcc在源代碼安裝pycryptodome等python組件時候需要)
yum install -y python36 python36-pip gcc

# 檢查python3安裝結果
python -V
# 檢查pip已經安裝的python組件
python3 -m pip list
# 卸載pip組件
# python3 -m pip uninstall "packagename"

# 1.2 flask (必須先安裝python3)
# 安裝教程:https://www.cnblogs.com/wobeinianqing/p/7650498.html
# yum install -y flask
python3 -m pip install flask


# 1.3 安裝 pymysql (必須先安裝python3)
# 安裝教程:https://blog.csdn.net/qq_37788558/article/details/73716002
# 安裝教程:https://github.com/PyMySQL/PyMySQL
python3 -m pip install PyMySQL


# 1.4 安裝 pycryptodome (必須先安裝python3)
python3 -m pip install pycryptodome
# 如果pip下載速度慢,可以用如下命令
#### 或 安裝方式2,如下
python3 -m pip install /opt/soft/soar/pycryptodome-3.9.6.tar.gz
#### 或 安裝方式3,如下
# 格式 = python3 -m pip install https://pypi.tuna.tsinghua.edu.cn/simple/simple/{包名}
# 格式 = python3 -m pip install https://pypi.doubanio.com/simple/{包名}
python3 -m pip install https://pypi.tuna.tsinghua.edu.cn/simple/pycryptodome-3.9.6.tar.gz
step 2: 安裝soar-web

# 2.1 下載soar-web的源代碼
wget -O /opt/soft/soar/soar-web-master.zip -c https://codeload.github.com/xiyangxixian/soar-web/zip/master
yum install -y unzip
unzip /opt/soft/soar/soar-web-master.zip -d /opt/soft/soar/

# 2.2 安裝soar-web
mkdir -p /opt/install/soar-web && \
mv /opt/soft/soar/soar-web-master/* /opt/install/soar-web
# 運行soar-web
chmod -R 777 /opt/install/soar-web/run.sh
bash /opt/install/soar-web/run.sh

# 2.3 或者如下方法啟動soar-web
cd /opt/install/soar-web/
python3 ./soar-web.py install
step 3:檢查端口,如下
netstat -nltp | grep 5077

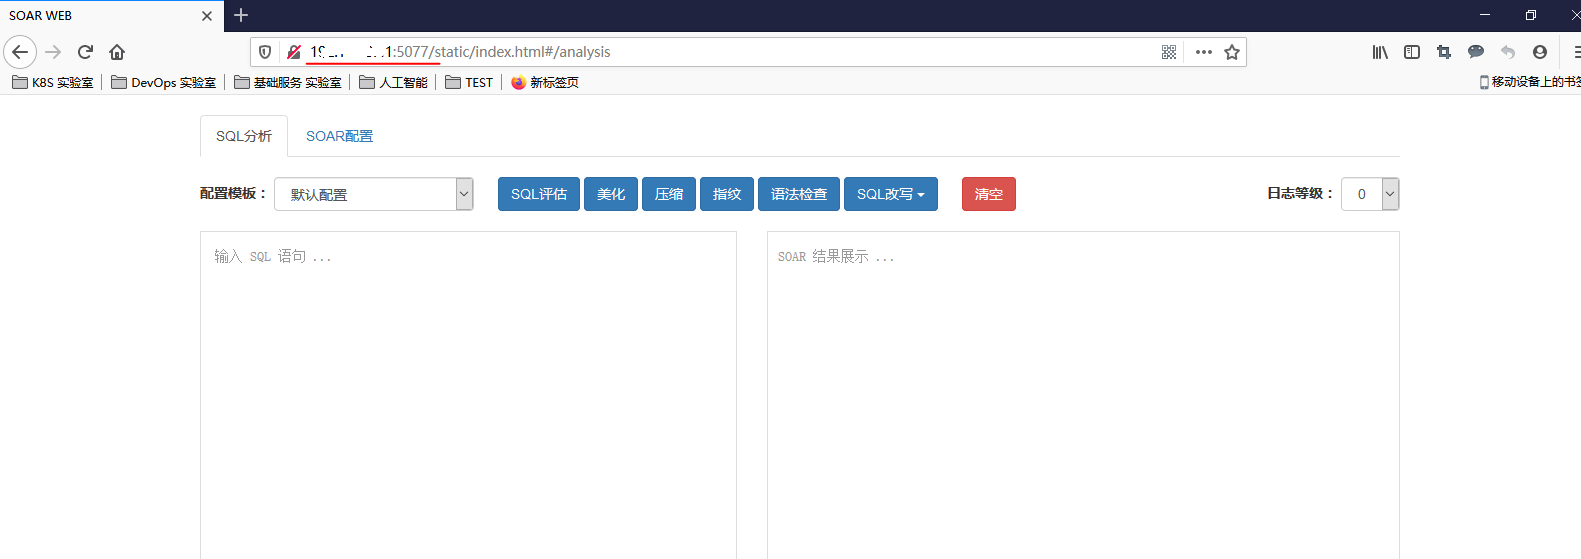
step 4:客戶端,訪問URL,如下:
地址 = http://{server-ip}:5077

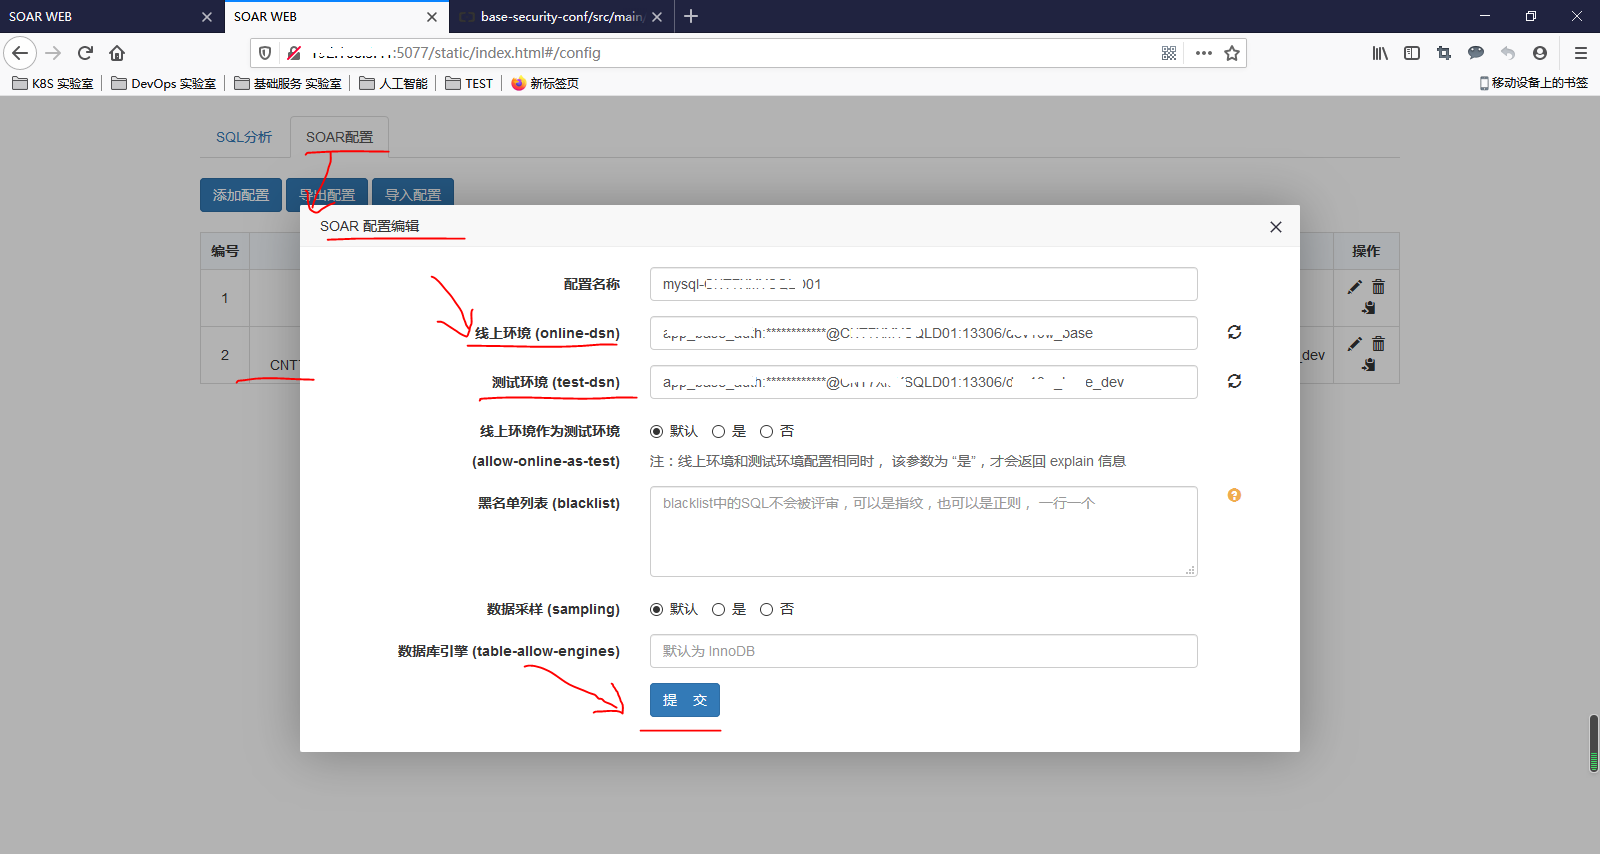
step 5: 配置數據庫源
線上環境參數 = 數據庫賬號:數據庫密碼@數據庫hostname:數據庫hostport/數據庫實例名稱

step 6:測試和使用SQL檢查
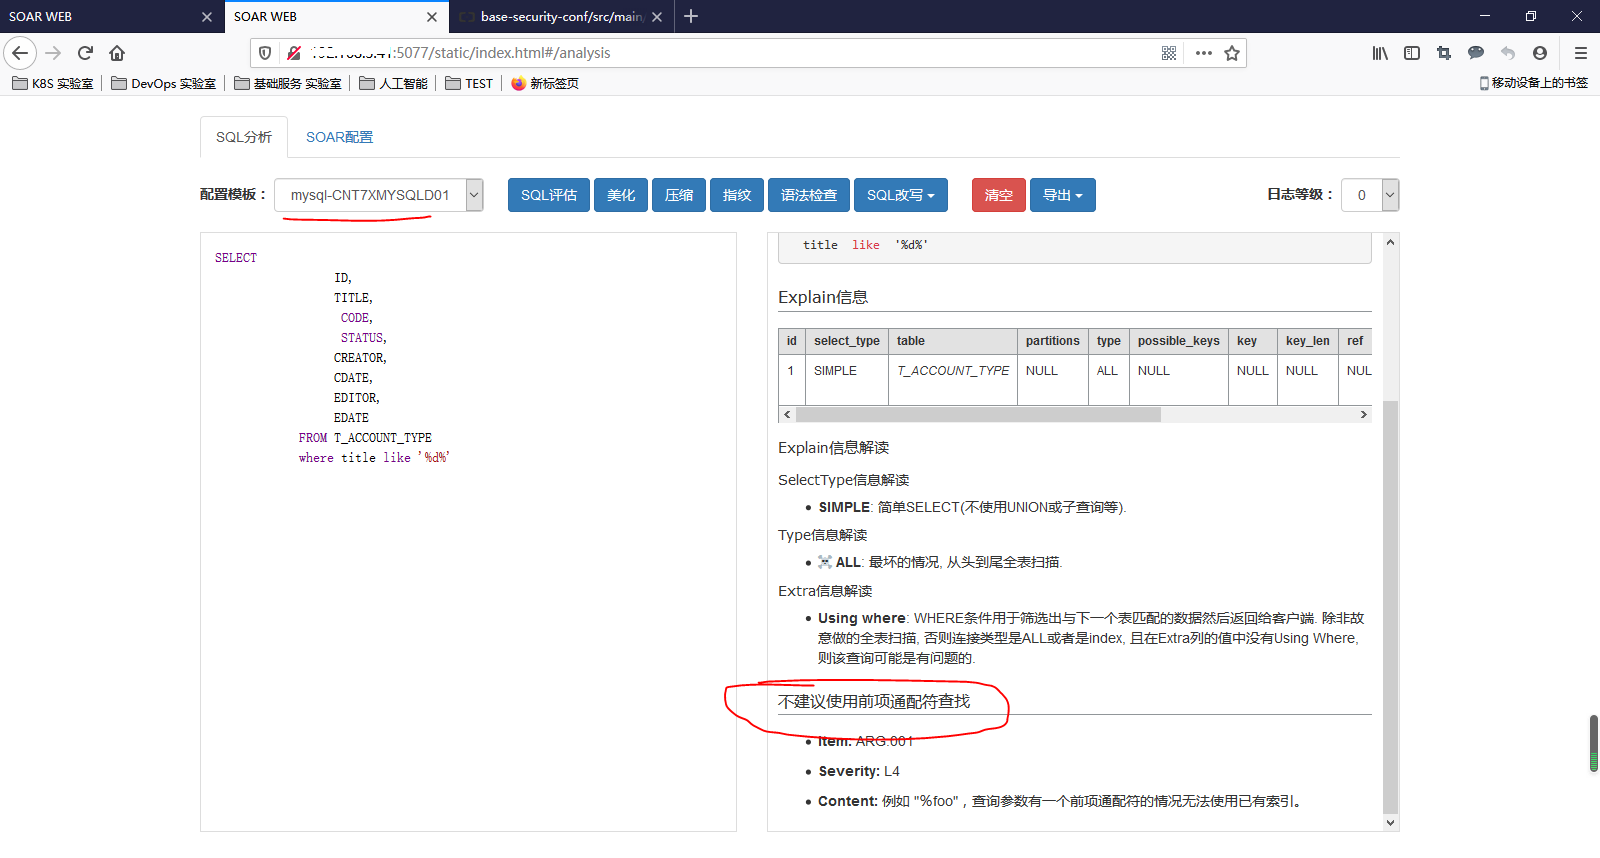
首先,選擇配置參數“mysql-CNT7XMYSQLD01”,然后輸入要檢查的SQL,如下圖:得到檢查SQL的結果

總結
到此這篇關于sql自動化檢查和分析工具 之soar和soar-web 安裝和使用體驗的文章就介紹到這了,更多相關sql自動化檢查和分析工具內容請搜索億速云以前的文章或繼續瀏覽下面的相關文章希望大家以后多多支持億速云!
免責聲明:本站發布的內容(圖片、視頻和文字)以原創、轉載和分享為主,文章觀點不代表本網站立場,如果涉及侵權請聯系站長郵箱:is@yisu.com進行舉報,并提供相關證據,一經查實,將立刻刪除涉嫌侵權內容。