您好,登錄后才能下訂單哦!
您好,登錄后才能下訂單哦!
適配器模式定義的:將一個類的接口轉換成客戶希望的另外一個接口。Adapter 模式使得原本由于接口不兼容而不能一起工作的那些類可以一起工作。
適配器模式分為類適配器模式和對象適配器模式。區別僅在于適配器角色對于被適配角色的適配是通過繼承完成的還是通過組合來完成的。由于在java 中不支持多重繼承,而且繼承有破壞封裝之嫌,眾多的書中都提倡使用組合來代替繼承。對于C++,為了實現類適配器模式,需要通過多繼承實現。
一、UML示意圖
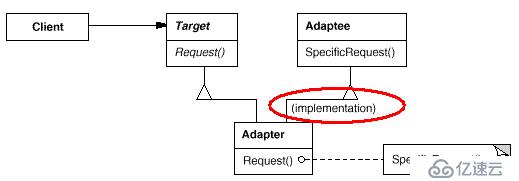
1)采用繼承原有接口類的方式(類適配器模式)

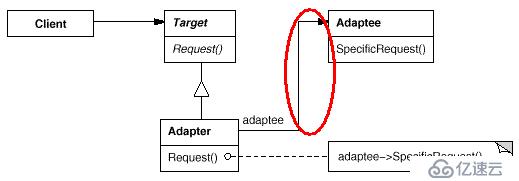
2)采用組合原有接口類的方式(對象適配器模式)

二、組成:
1)采用繼承原有接口類的方式(類適配器模式):
a,目標(Target)角色:這就是所期待的接口。注意,對于java,由于這里討論的是類適配器模式,因此目標不可以是類。
b,源(Adaptee)角色:現有需要適配的接口。
c,適配器(Adapter)角色:適配器類是本模式的核心。適配器把源接口轉換到目標接口。顯然這一角色不可以是接口,二必須是具體類。
2)采用組合原有接口類的方式(對象適配器模式):
a, 目標(Target)角色:這就是所期待的接口。注意,對于java,目標可以是具體的或者抽象的類。
b,源(Adaptee)角色:這個角色有一個已存在并使用了的接口,而這個接口是需要我們適配的。
c,適配器(Adapter)角色:這個適配器模式的核心。它將源角色已有的接口轉換為目標角色希望的接口。對于java,這一角色必須是具體類。
三、代碼實現:
1)采用繼承原有接口類的方式(類適配器模式):
JAVA:
ClassAdapter.java:
interface Target{
public void operation1();
public void operation2();
}
class Adaptee {
public void operation2() {
System.out.println("operation2 come from Adaptee");
}
}
class Adapter extends Adaptee implements Target {
@Override
public void operation1() {
// TODO Auto-generated method stub
System.out.println("operation1");
}
}
public class ClassAdapter {
public static void main(String[] args) {
Adapter ad = new Adapter();
ad.operation1();
ad.operation2();
}
}
運行結果:
operation1
operation2 come from Adaptee
C++:
//============================================================================
// Name : ClassAdapter.cpp
// Author : Yan Chao
// Version :
// Copyright : Your copyright notice
// Description : Hello World in C++, Ansi-style
//============================================================================
#include <iostream>
using namespace std;
class Target {
public:
virtual void operation1() = 0;
virtual void operation2() = 0;
virtual ~Target(){}
};
class Adaptee {
public:
void operation1(){
cout << "operation1 from Adaptee!" << endl;
}
};
class Adapter : public Target, Adaptee {
public:
virtual void operation2() {
cout << "operation2!" << endl;
}
virtual void operation1() {
this->operation1(); // c++中,調用繼承的父類的方法,要用this->
}
};
int main() {
Adapter *ad = new Adapter();
ad->operation1();
ad->operation2();
return 0;
}
運行結果:
operation1 from Adaptee!
operation2!
2)采用組合原有接口類的方式(對象適配器模式):
JAVA:
ObjectAdapter.java:
interface Target{
public void operation1();
public void operation2();
}
class Adaptee {
public void operation2() {
System.out.println("operation2 come from Adaptee");
}
}
class Adapter implements Target {
private Adaptee adaptee;
public Adapter(Adaptee adaptee) {
this.adaptee = adaptee;
}
@Override
public void operation1() {
// TODO Auto-generated method stub
System.out.println("operation1");
}
@Override
public void operation2() {
// TODO Auto-generated method stub
adaptee.operation2();
}
}
public class ObjectAdapter {
public static void main(String[] args) {
Adaptee ae = new Adaptee();
Adapter adapter = new Adapter(ae);
adapter.operation1();
adapter.operation2();
}
}
運行結果:
operation1
operation2 come from Adaptee
C++:
//============================================================================
// Name : ObjcetAdapter.cpp
// Author : Yan Chao
// Version :
// Copyright : Your copyright notice
// Description : Hello World in C++, Ansi-style
//============================================================================
#include <iostream>
using namespace std;
class Target {
public:
virtual void operation1() = 0;
virtual void operation2() = 0;
virtual ~Target(){}
};
class Adaptee {
public:
void operation1(){
cout << "operation1 from Adaptee!" << endl;
}
};
class Adapter : public Target {
public:
Adapter(Adaptee *adaptee){
myAdaptee = adaptee;
}
virtual void operation2() {
cout << "operation2!" << endl;
}
virtual void operation1() {
myAdaptee->operation1();
}
private:
Adaptee *myAdaptee;
};
int main() {
Adaptee *adaptee = new Adaptee();
Adapter *ad = new Adapter(adaptee);
ad->operation1();
ad->operation2();
return 0;
}
運行結果:
operation1 from Adaptee!
operation2!
免責聲明:本站發布的內容(圖片、視頻和文字)以原創、轉載和分享為主,文章觀點不代表本網站立場,如果涉及侵權請聯系站長郵箱:is@yisu.com進行舉報,并提供相關證據,一經查實,將立刻刪除涉嫌侵權內容。