溫馨提示×
您好,登錄后才能下訂單哦!
點擊 登錄注冊 即表示同意《億速云用戶服務條款》
您好,登錄后才能下訂單哦!
前面呢,服務器搭建起來了,可是光搭個監控報警服務器有什么用呢,難道只為了監控本機,可是如果本機宕機了,那還能收到報警信息嗎,呵呵!
現在我們來弄點被監控機吧...額,我現在就先弄下Linux和Windows主機
被監控機Linux
linux客戶端的所用到的工具

- #!/bin/bash
- #filename: nagios-clt.sh
- #Environment: Centos 5.6 32-bit
- #Author: maoxian
- #blog: maoxian.blog.51cto.com
- #定義變量
- tooldir=/usr/local/src
- #添加nagios用戶
- useradd nagios
- #安裝nagios-plugins-1.4.15,nrpe,
- cd $tooldir
- tar zxvf nagios-plugins-1.4.15.tar.gz
- cd nagios-plugins-1.4.15
- ./configure --with-nagios-user=nagios --with-nagios-group=nagios
- make && make install
- cd $tooldir
- tar zxvf nrpe-2.12.tar.gz
- cd nrpe-2.12
- ./configure
- make all
- make install-plugin
- make install-daemon
- make install-daemon-config
- #配置nrpe信息
- #vim /usr/local/nagios/etc/nrpe.cfg
- #allowed_hosts=127.0.0.1 //允許監控的IP
- #
- /usr/local/nagios/bin/nrpe -c /usr/local/nagios/etc/nrpe.cfg -d
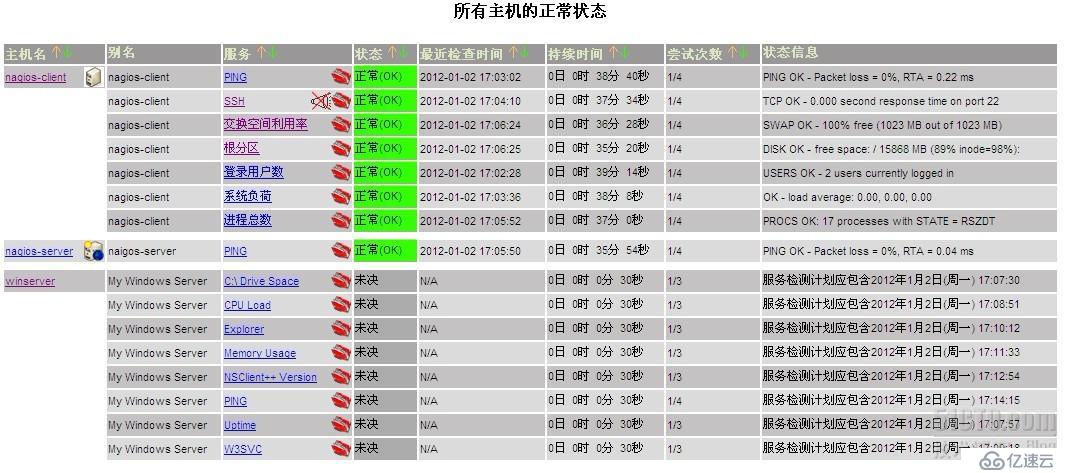
到服務器上修改配置文件nagios.cfg,注釋localhost.cfg那行 添加一樣mylinux.cfg

創建/usr/local/nagios/etc/objects/mylinux.cfg
- #定義主機部分
- define host{
- use linux-server
- host_name nagios-server
- alias naigos-server
- address 192.168.81.128
- icon_p_w_picpath web.gif
- statusmap_p_w_picpath web.gd2
- 2d_coords 100,300
- 3d_coords 100,300,100
- }
- define host{
- use linux-server
- host_name nagios-client
- alias nagios-client
- address 192.168.81.129
- icon_p_w_picpath server.gif
- statusmap_p_w_picpath server.gd2
- 2d_coords 200,300
- 3d_coords 200,300,100
- }
- #定義主機組部分
- define hostgroup{
- hostgroup_name linux-servers ; The name of the hostgroup
- alias Linux Servers ; Long name of the group
- members * ; Comma separated list of hosts that belong to this group
- }
- define hostgroup{
- hostgroup_name linux-server
- alias nagios-test
- members nagios-server,nagios-client
- }
- #定義服務組部分
- define servicegroup{
- servicegroup_name 系統負荷檢查
- alias 負荷檢查
- members nagios-client,進程總數,nagios-client,登錄用戶數,nagios-client,根分區,nagios-client,交換空間利用率,nagios-client,PING
- }
- #定義服務部分
- define service{
- use local-service ; Name of service template to use
- host_name *
- service_description PING
- check_command check_ping!100.0,20%!500.0,60%
- }
- define service{
- use local-service ; Name of service template to use
- host_name nagios-client
- service_description 根分區
- check_command check_local_disk!20%!10%!/
- }
- define service{
- use local-service ; Name of service template to use
- host_name nagios-client
- service_description 登錄用戶數
- check_command check_local_users!20!50
- }
- define service{
- use local-service ; Name of service template to use
- host_name nagios-client
- service_description 進程總數
- check_command check_local_procs!250!400!RSZDT
- }
- define service{
- use local-service ; Name of service template to use
- host_name nagios-client
- service_description 系統負荷
- check_command check_local_load!5.0,4.0,3.0!10.0,6.0,4.0
- }
- define service{
- use local-service ; Name of service template to use
- host_name nagios-client
- service_description 交換空間利用率
- check_command check_local_swap!20!10
- }
- define service{
- use local-service ; Name of service template to use
- host_name nagios-client
- service_description SSH
- check_command check_tcp!22!1.0!10.0
- notifications_enabled 0
- }
- define service{
- use local-service ; Name of service template to use
- host_name nagios-client
- service_description HTTP
- check_command check_http
- notifications_enabled 0
- }
由于我這臺機器并沒有http 所以會出現異常,可以將以上文件的最后一段去掉.
Windows客戶端所用到的客戶端 NSClient++
這個很簡單,安裝完成后編輯安裝目錄下的NSC.ini這個文件,按需求配置.之后再運行nsclient++.exe
將nagios-ser上的nagios.cfg的windows.cfg那行注釋去掉,再編輯windows.cfg 改下IP就行了. 然后重啟nagios服務!
配置文件中的配置可以到網上找找相關的資料,這里就不啰嗦了,呵呵!
免責聲明:本站發布的內容(圖片、視頻和文字)以原創、轉載和分享為主,文章觀點不代表本網站立場,如果涉及侵權請聯系站長郵箱:is@yisu.com進行舉報,并提供相關證據,一經查實,將立刻刪除涉嫌侵權內容。