您好,登錄后才能下訂單哦!
您好,登錄后才能下訂單哦!
今天小編給大家分享一下Go語言kube-scheduler之scheduler初始化的方法是什么的相關知識點,內容詳細,邏輯清晰,相信大部分人都還太了解這方面的知識,所以分享這篇文章給大家參考一下,希望大家閱讀完這篇文章后有所收獲,下面我們一起來了解一下吧。
下面我們先看下 Scheduler 的結構
type Scheduler struct {
   Cache internalcache.Cache
   Extenders []framework.Extender
   NextPod func() *framework.QueuedPodInfo
   FailureHandler FailureHandlerFn
   SchedulePod func(ctx context.Context, fwk framework.Framework, state  *framework.CycleState, pod *v1.Pod) (ScheduleResult, error)
   StopEverything <-chan struct{}
   SchedulingQueue internalqueue.SchedulingQueue
   Profiles profile.Map
   client clientset.Interface
   nodeInfoSnapshot *internalcache.Snapshot
   percentageOfNodesToScore int32
   nextStartNodeIndex int
}
為一個 Pod 選擇一個 Node 是按照固定順序運行擴展點的;在擴展點內,是按照插件注冊的順序運行插件,如下圖
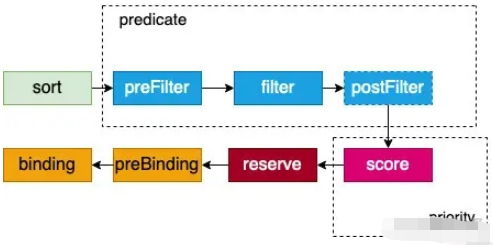
上面的這些擴展點在 kube-scheduler 中是固定的,而且也不支持增加擴展點(實際上有這些擴展點已經足夠了),而且擴展點順序也是固定執行的。
下圖是插件(以preFilter為例)運行的順序,擴展點內的插件,你既可以調整插件的執行順序(實際很少會修改默認的插件執行順序),可以關閉某個內置插件,還可以增加自己開發的插件。
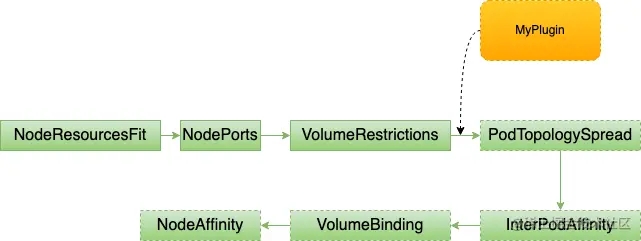
那么這些插件是怎么注冊的,注冊在哪里呢,自己開發的插件又是怎么加進去的呢?
我們來看下 Scheduler 里面最重要的一個成員:Profiles profile.Map
// 路徑:pkg/scheduler/profile/profile.go
// Map holds frameworks indexed by scheduler name.
type Map map[string]framework.Framework
Profiles 是一個 key 為 scheduler name,value 是 framework.Framework 的map,表示根據 scheduler name 來獲取 framework.Framework 類型的值,所以可以有多個scheduler。或許你在使用 k8s 的時候沒有關注過 pod 或 deploment 里面的 scheduler,因為你沒有指定的話,k8s 就會自動設置為默認的調度器,下圖是 deployment 中未指定 schedulerName 被設置了默認調度器的一個deployment
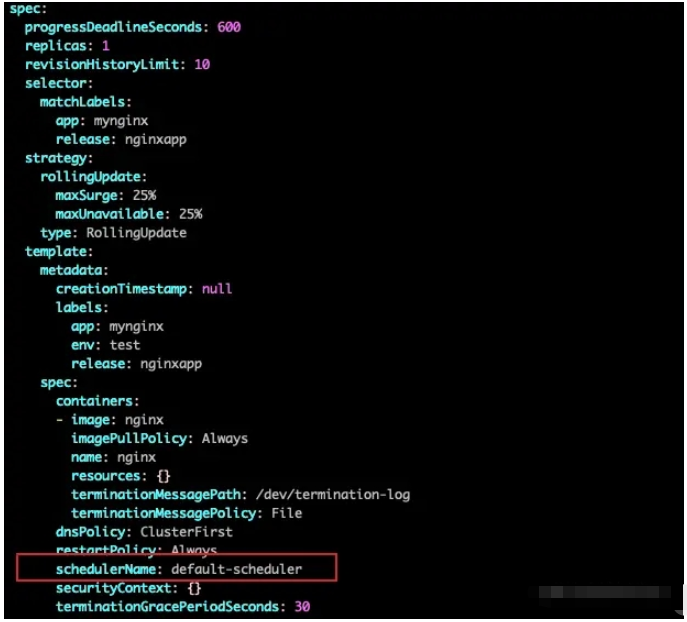
假設現在我想要使用自己開發的一個名叫 my-scheduler-1 的調度器,這個調度器在 preFilter 擴展點中增加了 zoneLabel 插件,怎么做?
使用 kubeadm 部署的 k8s 集群,會在 /etc/kubernetes/manifests 目錄下創建 kube-scheduler.yaml 文件,kubelet 會根據這個文件自動拉起來一個靜態 Pod,一個 kube-scheduler pod就被創建了,而且這個 kube-scheduler 運行的參數是直接在命令行上指定的。
apiVersion: v1
kind: Pod
metadata:
  creationTimestamp: null
  labels:
    component: kube-scheduler
    tier: control-plane
  name: kube-scheduler
  namespace: kube-system
spec:
  containers:
  - command:
    - kube-scheduler
    - --address=0.0.0.0
    - --authentication-kubeconfig=/etc/kubernetes/scheduler.conf
    - --authorization-kubeconfig=/etc/kubernetes/scheduler.conf
    - --bind-address=127.0.0.1
    - --kubeconfig=/etc/kubernetes/scheduler.conf
    - --leader-elect=true
    image: k8s.gcr.io/kube-scheduler:v1.16.8
    ....
其實 kube-scheduler 運行的時候可以指定配置文件,而不直接把參數寫在啟動命令上,如下形式。
./kube-scheduler --config /etc/kube-scheduler.conf
于是乎,我們就可以在配置文件中配置我們調度器的插件了
apiVersion: kubescheduler.config.k8s.io/v1beta2
kind: KubeSchedulerConfiguration
leaderElection:
  leaderElect: true
clientConnection:
  kubeconfig: "/etc/kubernetes/scheduler.conf"
profiles:
- schedulerName: my-scheduler
  plugins:
    preFilter:
      enabled:
        - name: zoneLabel
      disabled:
        - name: NodePorts
我們可以使用 enabled,disabled 開關來關閉或打開某個插件。 通過配置文件,還可以控制擴展點的調用順序,規則如下:
如果某個擴展點沒有配置對應的擴展,調度框架將使用默認插件中的擴展
如果為某個擴展點配置且激活了擴展,則調度框架將先調用默認插件的擴展,再調用配置中的擴展
默認插件的擴展始終被最先調用,然后按照 KubeSchedulerConfiguration 中擴展的激活 enabled 順序逐個調用擴展點的擴展
可以先禁用默認插件的擴展,然后在 enabled 列表中的某個位置激活默認插件的擴展,這種做法可以改變默認插件的擴展被調用時的順序
還可以添加多個調度器,在 deployment 等控制器中指定自己想要使用的調度器即可:
apiVersion: kubescheduler.config.k8s.io/v1beta2
kind: KubeSchedulerConfiguration
leaderElection:
  leaderElect: true
clientConnection:
  kubeconfig: "/etc/kubernetes/scheduler.conf"
profiles:
- schedulerName: my-scheduler-1
  plugins:
    preFilter:
      enabled:
        - name: zoneLabel
- schedulerName: my-scheduler-2
  plugins:
    queueSort:
      enabled:
        - name: mySort
當然了,現在我們在配置文件中定義的 mySort,zoneLabel 這樣的插件還不能使用,我們需要開發具體的插件注冊進去,才能正常運行,后面的文章會詳細講。
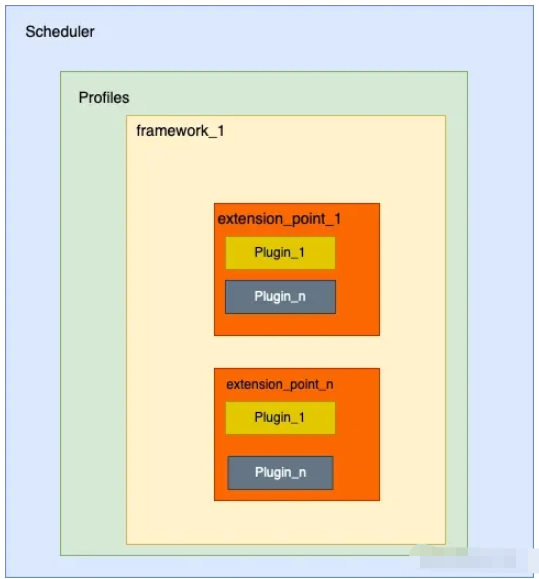
好了,現在 Profiles 成員(一個map)已經包含了兩個元素,{"my-scheduler-1": framework.Framework ,"my-scheduler-2": framework.Framework}。當一個 Pod 需要被調度的時候,kube-scheduler 會先取出 Pod 的 schedulerName 字段的值,然后通過 Profiles[schedulerName],拿到 framework.Framework 對象,進而使用這個對象開始調度,我們可以用下面這種張圖總結下上面描述的各個對象的關系。
那么重點就來到了 framework.Framework ,下面是 framework.Framework 的定義:
// pkg/scheduler/framework/interface.go
type Framework interface {
   Handle
   QueueSortFunc() LessFunc
   RunPreFilterPlugins(ctx context.Context, state *CycleState, pod *v1.Pod) (*PreFilterResult, *Status)
   RunPostFilterPlugins(ctx context.Context, state *CycleState, pod *v1.Pod, filteredNodeStatusMap NodeToStatusMap) (*PostFilterResult, *Status)
   RunPreBindPlugins(ctx context.Context, state *CycleState, pod *v1.Pod, nodeName string) *Status
   RunPostBindPlugins(ctx context.Context, state *CycleState, pod *v1.Pod, nodeName string)
   RunReservePluginsReserve(ctx context.Context, state *CycleState, pod *v1.Pod, nodeName string) *Status
   RunReservePluginsUnreserve(ctx context.Context, state *CycleState, pod *v1.Pod, nodeName string)
   RunPermitPlugins(ctx context.Context, state *CycleState, pod *v1.Pod, nodeName string) *Status
   WaitOnPermit(ctx context.Context, pod *v1.Pod) *Status
   RunBindPlugins(ctx context.Context, state *CycleState, pod *v1.Pod, nodeName string) *Status
   HasFilterPlugins() bool
   HasPostFilterPlugins() bool
   HasScorePlugins() bool
   ListPlugins() *config.Plugins
   ProfileName() string
}
Framework 是一個接口,需要實現的方法大部分形式為:Run***Plugins,也就是運行某個擴展點的插件,那么只要實現這個 Framework 接口就可以對 Pod 進行調度了。那么需要用戶自己實現么?答案是不用,kube-scheduler 已經有一個該接口的實現:frameworkImpl
// pkg/scheduler/framework/runtime/framework.go
type frameworkImpl struct {
	registry             Registry
	snapshotSharedLister framework.SharedLister
	waitingPods          *waitingPodsMap
	scorePluginWeight    map[string]int
	queueSortPlugins     []framework.QueueSortPlugin
	preFilterPlugins     []framework.PreFilterPlugin
	filterPlugins        []framework.FilterPlugin
	postFilterPlugins    []framework.PostFilterPlugin
	preScorePlugins      []framework.PreScorePlugin
	scorePlugins         []framework.ScorePlugin
	reservePlugins       []framework.ReservePlugin
	preBindPlugins       []framework.PreBindPlugin
	bindPlugins          []framework.BindPlugin
	postBindPlugins      []framework.PostBindPlugin
	permitPlugins        []framework.PermitPlugin
	clientSet       clientset.Interface
	kubeConfig      *restclient.Config
	eventRecorder   events.EventRecorder
	informerFactory informers.SharedInformerFactory
	metricsRecorder *metricsRecorder
	profileName     string
	extenders []framework.Extender
	framework.PodNominator
	parallelizer parallelize.Parallelizer
}
frameworkImpl 這個結構體里面包含了每個擴展點插件數組,所以某個擴展點要被執行的時候,只要遍歷這個數組里面的所有插件,然后執行這些插件就可以了。我們看看 framework.FilterPlugin 是怎么定義的(其他的也類似):
type Plugin interface {
	Name() string
}
type FilterPlugin interface {
	Plugin
	Filter(ctx context.Context, state *CycleState, pod *v1.Pod, nodeInfo *NodeInfo) *Status
}
插件數組的類型是一個接口,那么某個插件只要實現了這個接口就可以被運行。實際上,我們前面說的那些默認插件,都實現了這個接口,在目錄 pkg/scheduler/framework/plugins 目錄下面包含了所有內置插件的實現,主要就是對上面說的這個插件接口的實現。我們可以簡單用圖描述下 Pod被調度的時候執行插件的流程
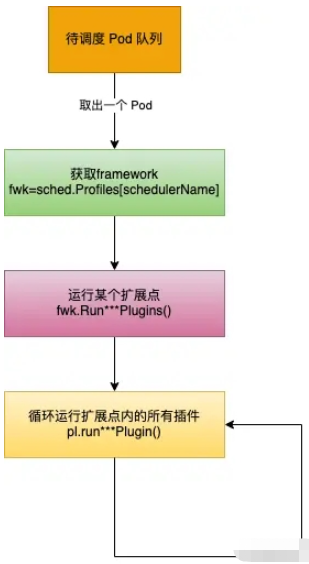
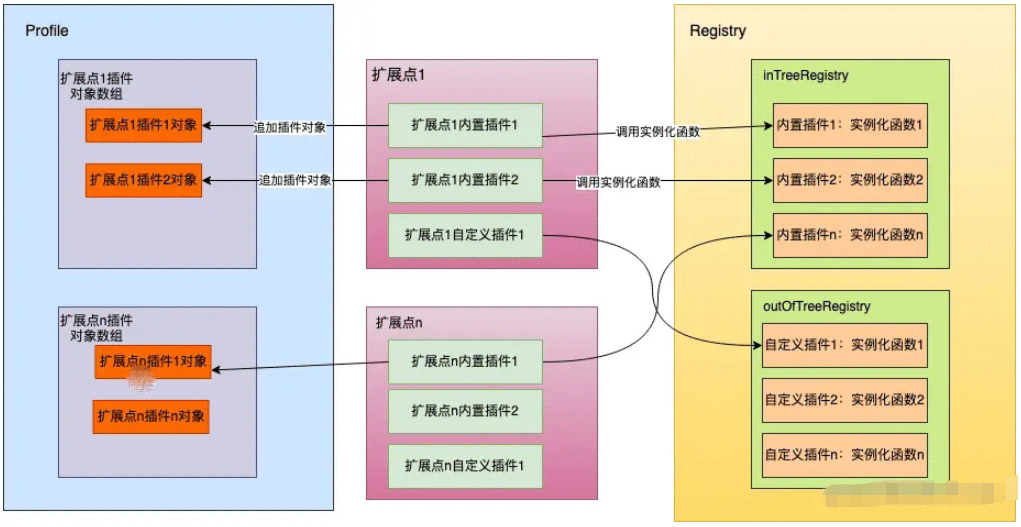
那么這些默認插件是怎么加到framework里面的,自定義插件又是怎么加進來的呢?
分三步:
根據配置文件(--config指定的)、系統默認的插件,按照擴展點生成需要被加載的插件數組(包括插件名字,權重信息),也就是初始化 KubeSchedulerConfiguration 中的 Profiles 成員。
type KubeSchedulerConfiguration struct {
  metav1.TypeMeta
  Parallelism int32
  LeaderElection componentbaseconfig.LeaderElectionConfiguration
  ClientConnection componentbaseconfig.ClientConnectionConfiguration
  HealthzBindAddress string
  MetricsBindAddress string
  componentbaseconfig.DebuggingConfiguration
  PercentageOfNodesToScore int32
  PodInitialBackoffSeconds int64
  PodMaxBackoffSeconds int64
  Profiles []KubeSchedulerProfile
  Extenders []Extender
}
創建 registry 集合,這個集合內是每個插件實例化函數,也就是 插件名字->插件實例化函數的映射,通俗一點說就是告訴系統:1.我叫王二; 2. 你應該怎么把我創建出來。那么張三、李四、王五分別告訴系統怎么創建自己,就組成了這個集合。
type PluginFactory = func(configuration runtime.Object, f framework.Handle) (framework.Plugin, error)
type Registry map[string]PluginFactory
這個集合是內置(叫inTree)默認的插件映射和用戶自定義(outOfTree)的插件映射的并集,內置的映射通過下面函數創建:
// pkg/scheduler/framework/plugins/registry.go
func NewInTreeRegistry() runtime.Registry {
	fts := plfeature.Features{
		EnableReadWriteOncePod:                       feature.DefaultFeatureGate.Enabled(features.ReadWriteOncePod),
		EnableVolumeCapacityPriority:                 feature.DefaultFeatureGate.Enabled(features.VolumeCapacityPriority),
		EnableMinDomainsInPodTopologySpread:          feature.DefaultFeatureGate.Enabled(features.MinDomainsInPodTopologySpread),
		EnableNodeInclusionPolicyInPodTopologySpread: feature.DefaultFeatureGate.Enabled(features.NodeInclusionPolicyInPodTopologySpread),
	}
	return runtime.Registry{
		selectorspread.Name:                  selectorspread.New,
		imagelocality.Name:                   imagelocality.New,
		tainttoleration.Name:                 tainttoleration.New,
		nodename.Name:                        nodename.New,
		nodeports.Name:                       nodeports.New,
		nodeaffinity.Name:                    nodeaffinity.New,
		podtopologyspread.Name:               runtime.FactoryAdapter(fts, podtopologyspread.New),
		nodeunschedulable.Name:               nodeunschedulable.New,
		noderesources.Name:                   runtime.FactoryAdapter(fts, noderesources.NewFit),
		noderesources.BalancedAllocationName: runtime.FactoryAdapter(fts, noderesources.NewBalancedAllocation),
		volumebinding.Name:                   runtime.FactoryAdapter(fts, volumebinding.New),
		volumerestrictions.Name:              runtime.FactoryAdapter(fts, volumerestrictions.New),
		volumezone.Name:                      volumezone.New,
		nodevolumelimits.CSIName:             runtime.FactoryAdapter(fts, nodevolumelimits.NewCSI),
		nodevolumelimits.EBSName:             runtime.FactoryAdapter(fts, nodevolumelimits.NewEBS),
		nodevolumelimits.GCEPDName:           runtime.FactoryAdapter(fts, nodevolumelimits.NewGCEPD),
		nodevolumelimits.AzureDiskName:       runtime.FactoryAdapter(fts, nodevolumelimits.NewAzureDisk),
		nodevolumelimits.CinderName:          runtime.FactoryAdapter(fts, nodevolumelimits.NewCinder),
		interpodaffinity.Name:                interpodaffinity.New,
		queuesort.Name:                       queuesort.New,
		defaultbinder.Name:                   defaultbinder.New,
		defaultpreemption.Name:               runtime.FactoryAdapter(fts, defaultpreemption.New),
	}
}
那么用戶自定義的插件怎么來的呢?這里咱們先不展開,在后面插件開發的時候再詳細講,不影響我們理解。我們假設用戶自定義的也已經生成了 registry,下面的代碼就是把他們合并在一起
// pkg/scheduler/scheduler.go
registry := frameworkplugins.NewInTreeRegistry()
if err := registry.Merge(options.frameworkOutOfTreeRegistry); err != nil {
	return nil, err
}
現在內置插件和系統默認插件的實例化函數映射已經創建好了
將(1)中每個擴展點的每個插件(就是插件名字)拿出來,去(2)的映射(map)中獲取實例化函數,然后運行這個實例化函數,最后把這個實例化出來的插件(可以被運行的)追加到上面提到過的 frameworkImpl 中對應擴展點數組中,這樣后面要運行某個擴展點插件的時候就可以遍歷運行就可以了。我們可以把上述過程用下圖表示
上面我們介紹了 Scheduler 第一個關鍵成員 Profiles 的初始化和作用,下面我們來談談第二個關鍵成員:SchedulingQueue。
// pkg/scheduler/scheduler.go
podQueue := internalqueue.NewSchedulingQueue(
	profiles[options.profiles[0].SchedulerName].QueueSortFunc(),
	informerFactory,
	// 1s
	internalqueue.WithPodInitialBackoffDuration(time.Duration(options.podInitialBackoffSeconds)*time.Second),
	// 10s
	internalqueue.WithPodMaxBackoffDuration(time.Duration(options.podMaxBackoffSeconds)*time.Second),
	internalqueue.WithPodNominator(nominator),
	internalqueue.WithClusterEventMap(clusterEventMap),
	// 5min
	internalqueue.WithPodMaxInUnschedulablePodsDuration(options.podMaxInUnschedulablePodsDuration),
)
func NewSchedulingQueue(
	lessFn framework.LessFunc,
	informerFactory informers.SharedInformerFactory,
	opts ...Option) SchedulingQueue {
	return NewPriorityQueue(lessFn, informerFactory, opts...)
}
type PriorityQueue struct {
framework.PodNominator
stop chan struct{}
clock clock.Clock
podInitialBackoffDuration time.Duration
podMaxBackoffDuration time.Duration
podMaxInUnschedulablePodsDuration time.Duration
lock sync.RWMutex
cond sync.Cond
activeQ *heap.Heap
podBackoffQ *heap.Heap
unschedulablePods *UnschedulablePods
schedulingCycle int64
moveRequestCycle int64
clusterEventMap map[framework.ClusterEvent]sets.String
closed bool
nsLister listersv1.NamespaceLister
}SchedulingQueue 是一個 internalqueue.SchedulingQueue 的接口類型,PriorityQueue 對這個接口進行了實現,創建 Scheduler 的時候 SchedulingQueue 會被 PriorityQueue 類型對象賦值。
PriorityQueue 中有關鍵的3個成員:activeQ、podBackoffQ、unschedulablePods。
activeQ 是一個優先隊列,用來存放待調度的 Pod,Pod 按照優先級存放在隊列中
podBackoffQ 用來存放異常的 Pod, 該隊列里面的 Pod 會等待一定時間后被移動到 activeQ 里面重新被調度
unschedulablePods 中會存放調度失敗的 Pod,它不是隊列,而是使用 map 來存放的,這個 map 里面的 Pod 在一定條件下會被移動到 activeQ 或 podBackoffQ 中
PriorityQueue 還有兩個方法:flushUnschedulablePodsLeftover 和 flushBackoffQCompleted
flushUnschedulablePodsLeftover:調度失敗的 Pod 如果滿足一定條件,這個函數會將這種 Pod 移動到 activeQ 或 podBackoffQ
flushBackoffQCompleted:運行異常的 Pod 等待時間完成后,flushBackoffQCompleted 將該 Pod 移動到 activeQ
Scheduler 在啟動的時候,會創建2個協程來定期運行這兩個函數
func (p *PriorityQueue) Run() {
   go wait.Until(p.flushBackoffQCompleted, 1.0*time.Second, p.stop)
   go wait.Until(p.flushUnschedulablePodsLeftover, 30*time.Second, p.stop)
}
上面是定期對 Pod 在這些隊列之間的轉換,那么除了定期刷新的方式,還有下面情況也會觸發隊列轉換:
有新節點加入集群
節點配置或狀態發生變化
已經存在的 Pod 發生變化
集群內有Pod被刪除
要說 cache 最大的作用就是提升 Scheduler 的效率,降低 kube-apiserver(本質是 etcd)的壓力,在調用各個插件計算的時候所需要的 Node 信息和其他 Pod 信息都緩存在本地,在需要使用的時候直接從緩存獲取即可,而不需要調用 api 從 kube-apiserver 獲取。cache 類型是 internalcache.Cache 的接口,cacheImpl 實現了這個接口。
下面是 cacheImpl 的結構
type Cache interface
  NodeCount() int
  PodCount() (int, error)
  AssumePod(pod *v1.Pod) error
  FinishBinding(pod *v1.Pod) error
  ForgetPod(pod *v1.Pod) error
  AddPod(pod *v1.Pod) error
  UpdatePod(oldPod, newPod *v1.Pod) error
  RemovePod(pod *v1.Pod) error
  GetPod(pod *v1.Pod) (*v1.Pod, error)
  IsAssumedPod(pod *v1.Pod) (bool, error)
  AddNode(node *v1.Node) *framework.NodeInfo
  UpdateNode(oldNode, newNode *v1.Node) *framework.NodeInfo
  RemoveNode(node *v1.Node) error
  UpdateSnapshot(nodeSnapshot *Snapshot) error
  Dump() *Dump
}
type cacheImpl struct {
  stop   <-chan struct{}
  ttl    time.Duration
  period time.Duration
  mu sync.RWMutex
  assumedPods sets.String
  podStates map[string]*podState
  nodes     map[string]*nodeInfoListItem
  headNode *nodeInfoListItem
  nodeTree *nodeTree
  imageStates map[string]*imageState
}
cacheImpl 中的 nodes 存放集群內所有 Node 信息;podStates 存放所有 Pod 信息;,assumedPods 存放已經調度成功但是還沒調用 kube-apiserver 的進行綁定的(也就是還沒有執行 bind 插件)的Pod,需要這個緩存的原因也是為了提升調度效率,將綁定和調度分開,因為綁定需要調用 kube-apiserver,這是一個重操作會消耗比較多的時間,所以 Scheduler 樂觀的假設調度已經成功,然后返回去調度其他 Pod,而這個 Pod 就會放入 assumedPods 中,并且也會放入到 podStates 中,后續其他 Pod 在進行調度的時候,這個 Pod 也會在插件的計算范圍內(如親和性), 然后會新起協程進行最后的綁定,要是最后綁定失敗了,那么這個 Pod 的信息會從 assumedPods 和 podStates 移除,并且把這個 Pod 重新放入 activeQ 中,重新被調度。
Scheduler 在啟動時首先會 list 一份全量的 Pod 和 Node 數據到上述的緩存中,后續通過 watch 的方式發現變化的 Node 和 Pod,然后將變化的 Node 或 Pod 更新到上述緩存中。
到了這里,調度框架 framework 和調度隊列 SchedulingQueue 都已經創建出來了,現在是時候開始調度Pod了。
Scheduler 中有個成員 NextPod 會從 activeQ 隊列中嘗試獲取一個待調度的 Pod,該函數在 SchedulePod 中被調用,如下:
// 啟動 Scheduler
func (sched *Scheduler) Run(ctx context.Context) {
	sched.SchedulingQueue.Run()
	go wait.UntilWithContext(ctx, sched.scheduleOne, 0)
	<-ctx.Done()
	sched.SchedulingQueue.Close()
}
// 嘗試調度一個 Pod,所以 Pod 的調度入口
func (sched *Scheduler) scheduleOne(ctx context.Context) {
	// 會一直阻塞,直到獲取到一個Pod
	......
	podInfo := sched.NextPod()
    ......
}
NextPod 它被賦予如下函數:
// pkg/scheduler/internal/queue/scheduling_queue.go
func MakeNextPodFunc(queue SchedulingQueue) func() *framework.QueuedPodInfo {
	return func() *framework.QueuedPodInfo {
		podInfo, err := queue.Pop()
		if err == nil {
			klog.V(4).InfoS("About to try and schedule pod", "pod", klog.KObj(podInfo.Pod))
			for plugin := range podInfo.UnschedulablePlugins {
				metrics.UnschedulableReason(plugin, podInfo.Pod.Spec.SchedulerName).Dec()
			}
			return podInfo
		}
		klog.ErrorS(err, "Error while retrieving next pod from scheduling queue")
		return nil
	}
}
Pop 會一直阻塞,直到 activeQ 長度大于0,然后去取出一個 Pod 返回
// pkg/scheduler/internal/queue/scheduling_queue.go
func (p *PriorityQueue) Pop() (*framework.QueuedPodInfo, error) {
	p.lock.Lock()
	defer p.lock.Unlock()
	for p.activeQ.Len() == 0 {
		// When the queue is empty, invocation of Pop() is blocked until new item is enqueued.
		// When Close() is called, the p.closed is set and the condition is broadcast,
		// which causes this loop to continue and return from the Pop().
		if p.closed {
			return nil, fmt.Errorf(queueClosed)
		}
		p.cond.Wait()
	}
	obj, err := p.activeQ.Pop()
	if err != nil {
		return nil, err
	}
	pInfo := obj.(*framework.QueuedPodInfo)
	pInfo.Attempts++
	p.schedulingCycle++
	return pInfo, nil
}
以上就是“Go語言kube-scheduler之scheduler初始化的方法是什么”這篇文章的所有內容,感謝各位的閱讀!相信大家閱讀完這篇文章都有很大的收獲,小編每天都會為大家更新不同的知識,如果還想學習更多的知識,請關注億速云行業資訊頻道。
免責聲明:本站發布的內容(圖片、視頻和文字)以原創、轉載和分享為主,文章觀點不代表本網站立場,如果涉及侵權請聯系站長郵箱:is@yisu.com進行舉報,并提供相關證據,一經查實,將立刻刪除涉嫌侵權內容。