您好,登錄后才能下訂單哦!
您好,登錄后才能下訂單哦!
這篇文章主要介紹了Android library native調試代碼遇到問題怎么解決的相關知識,內容詳細易懂,操作簡單快捷,具有一定借鑒價值,相信大家閱讀完這篇Android library native調試代碼遇到問題怎么解決文章都會有所收獲,下面我們一起來看看吧。
在library模塊和application模塊中加入忽略strip的正則匹配,如下
android {
//...
if (isDebug()) {
packagingOptions {
doNotStrip "*/armeabi/*.so"
doNotStrip "*/armeabi-v7a/*.so"
doNotStrip "*/arm64-v8a/*.so"
doNotStrip "*/x86/*.so"
doNotStrip "*/x86_64/*.so"
doNotStrip "*/mips/*.so"
doNotStrip "*/mips64/*.so"
//...
}
}
}
library模塊和application模塊中的gradle都需要加入。但是打正式release包的時候是需要剔除so的符號表的,防止so被破解。因此,最好配置一個開關,且這個開關不會被提交到git中去,因此local.properties是最合適的。isDebug方法寫在頂層的build.gradle中,這樣各個module里邊都可以引用。
boolean isDebug() {
    boolean ret = false
    try {
        Properties properties = new Properties()
        File file = project.rootProject.file('local.properties')
        if (!file.exists()) {
            return false
        }
        properties.load(file.newDataInputStream())
        String debugStr = properties.getProperty("debug")
        if (debugStr != null && debugStr.length() > 0) {
            ret = debugStr.toBoolean()
        }
    } catch (Throwable throwable) {
        throwable.printStackTrace()
        ret = false
    }
    project.logger.error("[${project.name}]Debug:${ret}")
    return ret
}
然后在local.properties中加入debug=true,修改packagingOptions配置,增加判讀邏輯isDebug()。
如果使用上述方式還不行,將主app也添加cmake,包含native代碼。gradle參考配置如下:
plugins {
id 'com.android.application'
}
android {
compileSdk 32
defaultConfig {
applicationId "com.example.app2"
minSdk 21
targetSdk 32
versionCode 1
versionName "1.0"
testInstrumentationRunner "androidx.test.runner.AndroidJUnitRunner"
externalNativeBuild {
cmake {
arguments '-DANDROID_TOOLCHAIN=clang', '-DANDROID_ARM_MODE=arm', '-DANDROID_STL=c++_static'
cppFlags "-std=c++11 -frtti -fexceptions"
}
}
ndk {
abiFilters "arm64-v8a"
}
}
buildTypes {
release {
minifyEnabled false
proguardFiles getDefaultProguardFile('proguard-android-optimize.txt'), 'proguard-rules.pro'
}
}
externalNativeBuild {
cmake {
path "src/main/cpp/CMakeLists.txt"
version "3.18.1"
}
}
compileOptions {
sourceCompatibility JavaVersion.VERSION_1_8
targetCompatibility JavaVersion.VERSION_1_8
}
if(isDebug()){
packagingOptions {
doNotStrip "*/armeabi/*.so"
doNotStrip "*/armeabi-v7a/*.so"
doNotStrip "*/arm64-v8a/*.so"
doNotStrip "*/x86/*.so"
doNotStrip "*/x86_64/*.so"
doNotStrip "*/mips/*.so"
doNotStrip "*/mips64/*.so"
//...
}
}
}
在Run -> Edit Configuration的配置頁面,Debugger -> Symbol Directories里面添加第一步生成debug aar的代碼目錄。
gradle中的task未顯示問題:
解決方法: 依次點擊:File -> Settings -> Experimental -> 取消勾選 “Do not build Gradle task list during Gradle sync”,如下圖所示 最后,sync 一下即可。
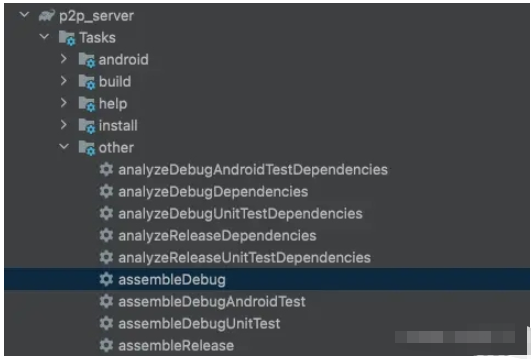
debug aar的生成:

點擊執行assembleDebug。
然后配置Symbol Directories中的符號表目錄。


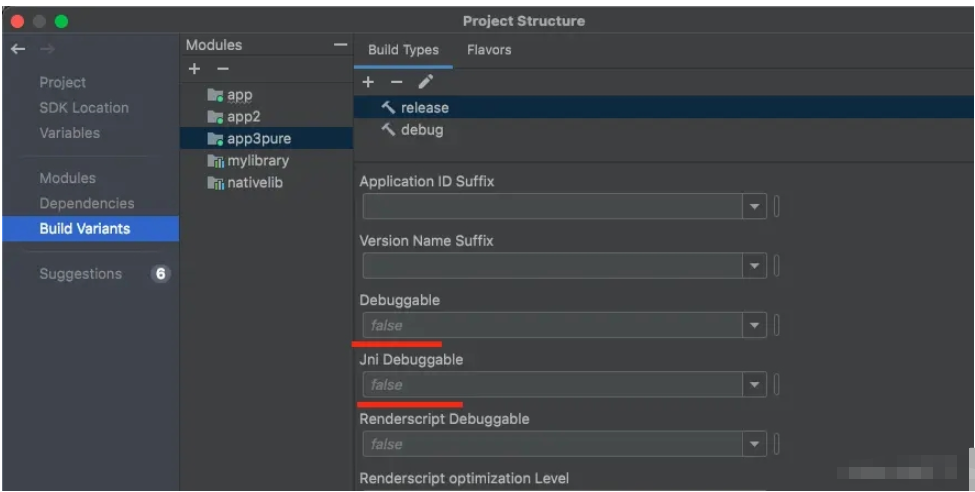
在Project Structure中,對應module的Debuggable和Jni Debuggable置為true。
關于“Android library native調試代碼遇到問題怎么解決”這篇文章的內容就介紹到這里,感謝各位的閱讀!相信大家對“Android library native調試代碼遇到問題怎么解決”知識都有一定的了解,大家如果還想學習更多知識,歡迎關注億速云行業資訊頻道。
免責聲明:本站發布的內容(圖片、視頻和文字)以原創、轉載和分享為主,文章觀點不代表本網站立場,如果涉及侵權請聯系站長郵箱:is@yisu.com進行舉報,并提供相關證據,一經查實,將立刻刪除涉嫌侵權內容。