溫馨提示×
您好,登錄后才能下訂單哦!
點擊 登錄注冊 即表示同意《億速云用戶服務條款》
您好,登錄后才能下訂單哦!
這篇文章主要介紹了Vue前端柱狀圖怎么實現的相關知識,內容詳細易懂,操作簡單快捷,具有一定借鑒價值,相信大家閱讀完這篇Vue前端柱狀圖怎么實現文章都會有所收獲,下面我們一起來看看吧。
通過echarts來實現柱狀圖的效果,echarts是針對數據報表等展現的一個產品,具體了解看官方網站:Echarts官網,在這個官網中有詳細教程以及API,很容易入手Echarts,從個人剛學習Echarts圖表來看,它的難度在于它有自己的一套屬性,這和我們平時用的css是不同的,因而我們需要什么效果就得去遵守它的屬性,去識別圖表的各個部分的專業名稱,才能從它API中獲取相應屬性去實現你想要效果。

代碼:
<template>
	<div>
		<!-- 柱狀圖 -->
		<el-row :gutter="80">
			<!-- 柱狀圖兩側間距 最大24 -->
			<el-col :span="24">
				<div class="border-card ">
					<el-row>
						<div class="chart-wrapper">
							<bar-chart ref="chartOne" v-if="chartOneShow"
								:option="chartOptionOne" />
						</div>
					</el-row>
				</div>
			</el-col>
		</el-row>
	</div>
</template>

<script>
    //保存的柱狀圖組件路徑
	import BarChart from "../../dashboard/chart.vue";
    export default {
      //使用的柱狀圖組件
	  components: {
	  	BarChart,
	  },
	  data(){
	  	return{
			//表圖選項
			chartOptionOne: {},
			//表圖顯示
			chartOneShow: true,
            //前端接收到的數據
			tableData: [],
        }
      },
      created() {
	    this.getList();
	  },
      methods: {
	    getList() {
	      this.loading = true;
		  let data=[];
		  let data1=[];
		  let data2=[];
		  let data3=[];
	      taskStatisticsRwpf(this.queryParams).then(response => {
	        this.tableData = response.data;
			for (var i = 0; i < this.tableData.length; i++) {
				data.push(this.tableData[i].字段名)//此data為x坐標展示的文字
				data1.push(this.tableData[i].字段名)
				data2.push(this.tableData[i].字段名)
				data3.push(this.tableData[i].字段名)
			}
			this.getChartsData(data,data1,data2,data3);
	        this.loading = false;
	      });
	    },
		getChartsData(data,data1,data2,data3) {
			this.chartOneShow = false
			this.chartTwoShow = false
			let that = this;
			taskStatisticsRwpf({
				queryType: "chart"
			}).then(response => {
			that.chartOptionOne = {
				title: {
				    text: "柱狀圖標題名",
					x:'center',
					y:'top',
					textAlign:'left',   //位置
					textStyle:{
					    //文字顏色
					    color:'#000000',
					    //字體風格,'normal','italic','oblique'
					    fontStyle:'normal',
					    //字體粗細 'normal','bold','bolder','lighter',100 | 200 | 300 | 400...
					    fontWeight:'400',
					    //字體系列
					    // fontFamily:'sans-serif',
					    //字體大小
					    fontSize:20,
					}
				},
				grid: {
				  left: '1%',
				  right: '1%',
				  containLabel: true
				},
				legend: {
				    data: data1,data2,data3
				},
                //鼠標懸停顯示數據
				tooltip: {
				    trigger: 'axis',
				    axisPointer: {
				      type: 'shadow'
				    }
				},
                //x坐標
				xAxis: {
					type: 'category',
                    //x坐標顯示的文字
					data: data,
					axisLabel: {
					//x軸文字間距
					interval:0,
					//x軸文字傾斜度
					rotate:0
					}
				},
                //y坐標
				yAxis: {
					type: 'value'
				},
				series: [{
					      name: '文字名',
					      type: 'bar',
					      stack: 'total',
					      label: {
					        show: true
					      },
					      emphasis: {
					        focus: 'series'
					      },
					      data: data1
					    },
					    {
					      name: '文字名',
					      type: 'bar',
					      stack: 'total',
					      label: {
					        show: true
					      },
					      emphasis: {
					        focus: 'series'
					      },
					      data: data2
					    },
					    {
					      name: '文字名',
					      type: 'bar',
					      stack: 'total',
					      label: {
					        show: true
					      },
					      emphasis: {
					        focus: 'series'
					      },
					      data: data3
					    },
					    {
					      stack: 'total',
					type: 'bar',
					//設置柱狀圖大小
					barWidth: 30,
					label: {
					      // 柱圖頭部顯示值
					      show: true,
					      position: "right",
					      color: "#333",
					      fontSize: "12px",
					      formatter: (params) => {
					        return params.value[params.encode.x[0]];
					      },
					}
				}]
			};
                //表圖顯示
				this.chartOneShow = true
			})
		},
	  }
    }
</script><template> <div id="echartsId" ></div> </template>
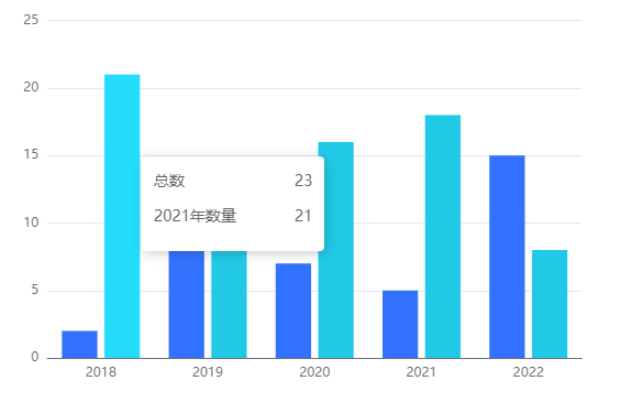
zhuDouble() {
      var myChart = echarts.init(document.getElementById('echartsId'))
      window.addEventListener('resize', function () {
        myChart.resize()
      })
      myChart.setOption({
        legend: {
          left: 'center',
          bottom:'3%',
          icon: 'circle',
          data: ['Forest', 'Steppe'],
          textStyle: {
            fontSize: 12,
            color: '#8C8C8C'
          }
        },
        xAxis: {
          type: 'category',
          axisTick: {
            show: false // 去掉x軸 小細條
          },
          data: ['2018', '2019', '2020', '2021', '2022'],
          axisLabel: {
            width: 30,
            overflow: "breakAll",
            fontSize: 11,
          },
        },
        grid: {
          left: '5%',
          right: '8%',
          bottom: '12%',
          top: '8%',
          containLabel: true,
        },
        color: ['#3372FF', '#21C9E6'],
        yAxis: {
          type: 'value'
        },
        tooltip: {
          trigger: 'item',
          formatter:function(params){
            let tip = '';
            tip += '<div>總數' + 23 + '</div><div>'+ params.seriesName + '數量' + params.value +'所</p></div>'
            return tip
          },
          borderColor: "rgba(255, 255, 255, 1)"
        },
        series: [
        {
	      name: 'Forest',
	      type: 'bar',
	      data: [320, 332, 301, 334, 390]
	    },
	    {
	      name: 'Steppe',
	      type: 'bar',
	      data: [220, 182, 191, 234, 290]
	    },
      })
    }
關于“Vue前端柱狀圖怎么實現”這篇文章的內容就介紹到這里,感謝各位的閱讀!相信大家對“Vue前端柱狀圖怎么實現”知識都有一定的了解,大家如果還想學習更多知識,歡迎關注億速云行業資訊頻道。
免責聲明:本站發布的內容(圖片、視頻和文字)以原創、轉載和分享為主,文章觀點不代表本網站立場,如果涉及侵權請聯系站長郵箱:is@yisu.com進行舉報,并提供相關證據,一經查實,將立刻刪除涉嫌侵權內容。