您好,登錄后才能下訂單哦!
您好,登錄后才能下訂單哦!
本篇內容介紹了“Angular中如何使用FormArray和模態框”的有關知識,在實際案例的操作過程中,不少人都會遇到這樣的困境,接下來就讓小編帶領大家學習一下如何處理這些情況吧!希望大家仔細閱讀,能夠學有所成!
使用FormArray制作動態表單。每創建一個表單,頁面就新增一個input顯示表單填寫的標題,點擊編輯再跳轉到點擊表單的填寫內容。
    // 封裝獲取modelList
    get modelList() {
        return this.formGroup.get('modelList') as FormArray
    }
    constructor(private fb: FormBuilder) {}
    ngOnInit() {
        // 一開始初始化arr為空數組
        this.formGroup = this.fb.group({
            // 內部嵌套FormControl、FormArray、FormGroup
            modelList: this.fb.array([])
        })
    }
    // 模態框構造內部的表單
    function newModel() {
        return this.fb.group({
            modelName: [''],
            // 可以繼續嵌套下去,根據業務需求
        })
    }
    // 省略模態框部分代碼
    // 傳遞到模態框的FormArray
    selectedType: FormArray


<form [FormGroup]="formGroup">
    <div FormArrayName="modelList">
        <ng-container *nfFor="let item of modelList.controls;let i = index" [FormGroupName]="i">
            <nz-input-group
                [nzSuffix]="suffixIconSearch"
              >
                <input type="text" nz-input formControlName="modelName"/>
              </nz-input-group>
              <ng-template #suffixIconSearch>
                <span
                  nz-icon
                  nzType="edit"
                  class="hover"
                  (click)="showModal(i)"
                ></span>
              </ng-template>
        </ng-container>
    </div>
</form>
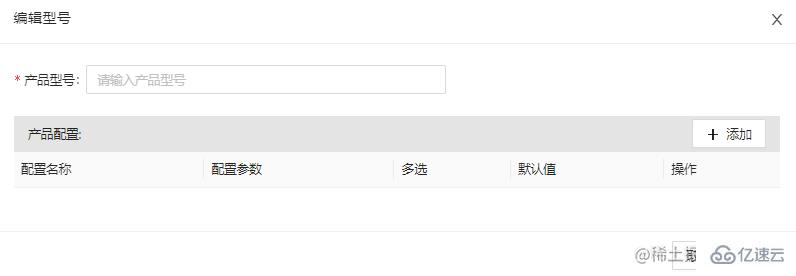
<nz-modal
  [(nzVisible)]="isVisible"
  nzTitle="Model"
  [nzFooter]="modalFooter"
  (nzOnCancel)="handleCancel()"
  (nzOnOk)="handleOk()"
>
  <ng-container *nzModalContent>
    <form nz-form [formGroup]="selectedType">
      <nz-form-item>
        <nz-form-label nzRequired>Model Test</nz-form-label>
        <nz-form-control>
          <input
            type="text"
            nz-input
            placeholder="請輸入ModelName"
            formControlName="modelName"
          />
        </nz-form-control>
      </nz-form-item>
      <nz-form-item>
        <nz-form-control>
          <product-config></product-config>
        </nz-form-control>
      </nz-form-item>
    </form>
  </ng-container>
  <ng-template #modalFooter>
    <button *ngIf="!isNewModel" nzDanger nz-button nzType="default" (click)="handleDelete()">刪除</button>
    <button *ngIf="isNewModel" nz-button nzType="default" (click)="handleCancel()">取消</button>
    <button nz-button nzType="primary" (click)="handleOk()">保存</button>
  </ng-template>
</nz-modal>
由于這種模態框比較特殊,割裂了表單的FormGroup之間的關系,在點擊的時候需要傳遞參數到模態框顯示部分值,如果單純傳遞參數使用this.modelList.at(index)獲取實體到模態框上進行賦值修改,在模態框點擊保存后會發現修改的值沒有在表單更新,而表單上對input值修改發現可以影響到模態框的內容。
但是模態框新增的表單卻可以響應到頁面中去。
點擊編輯后,將點擊的FormArray的元素傳遞給一個臨時變量 this.selectedType = <FormGroup>this.modelList.at(index);,并且對模態框表單傳值。
模態框點擊保存再將原FormArray的值重新替換
this.modelList.removeAt(this.modelIndex)
this.modelList.insert(this.modelIndex, this.selectedType)
點擊新增,創建一個新的FormGroup對象
保存添加push到原頁面的FormArray中
newModelType(): FormGroup {
    return this.fb.group({
      modelName: ['', Validators.required],
      configList: this.fb.array([]),
    });
  }
// ...省略
// 模態框顯示
show() {
    this.isVisible = true
    this.selectedType = this.newModelType();
}
// 保存
save() {
    this.isVisible = false
    // 原頁面FormArray
    this.modelList.push(this.selectedType);
}
最后發現這種寫法只能夠單向改變,頁面外input修改值會影響到模態框,但是模態框的值改變保存卻讓外部沒有更新。通過console方式查看頁面的FormArray內部參數發現其實是有改變的,只是angular沒有檢測到。這個時候判斷沒有發生響應的原因一般是沒有觸發angular檢測機制,仔細查看文檔發現有一行很重要 angular文檔在最下面寫著

原本第一次閱讀的時候,覺得我遵守了這種原則,因為在編輯的時候,我選擇了操控原FormArray進行元素刪除和插入,是遵循了這種規則,但是實際上在模態框賦值就已經違反了這種原則,我在賦值的時候拿了FormArray的元素實例賦值給模態框的臨時變量,然后更改實例的值,又重新刪除插入,本質上我操作的是同一個實例,所以angular沒有檢測到發生變化【雖然值發生改變】

在賦值的地方不能偷懶,仍然要重新創建新對象,再拿原對象的賦值。【相當于深拷貝】
      this.selectedType = this.newModelType();
      const old = this.modelList.at(index);
      this.selectedType.setValue({
        'modelName': old.get('modelName').value
    })
這時候就可以正常更新了。
“Angular中如何使用FormArray和模態框”的內容就介紹到這里了,感謝大家的閱讀。如果想了解更多行業相關的知識可以關注億速云網站,小編將為大家輸出更多高質量的實用文章!
免責聲明:本站發布的內容(圖片、視頻和文字)以原創、轉載和分享為主,文章觀點不代表本網站立場,如果涉及侵權請聯系站長郵箱:is@yisu.com進行舉報,并提供相關證據,一經查實,將立刻刪除涉嫌侵權內容。