您好,登錄后才能下訂單哦!
您好,登錄后才能下訂單哦!
今天小編給大家分享一下C#中modbus Tcp協議的數據抓取和使用方法的相關知識點,內容詳細,邏輯清晰,相信大部分人都還太了解這方面的知識,所以分享這篇文章給大家參考一下,希望大家閱讀完這篇文章后有所收獲,下面我們一起來了解一下吧。
基于Modbus tcp 協議的數據抓取,并解析,源碼使用C#開發
using System;
using System.Collections.Generic;
using System.Linq;
using System.Net;
using System.Net.Sockets;
using System.Text;
namespace modbus
{
    class Program
    {
        #region 字節轉換為16進制字符
        /// <summary>
        /// 字節轉換為16進制字符
        /// </summary>
        /// <param name="data"></param>
        /// <returns></returns>jiang
        static string ByteToHexString(byte[] data)
        {
            string strTemp = "";
            for (int i = 2; i < data.Length; i++)
            {
                string a = Convert.ToString(data[i], 16).PadLeft(2, '0');
                strTemp = strTemp + a;
            }
            return strTemp.Substring(0, 100);
        }
        #endregion
        #region 16進制字符轉換為字節
        /// <summary>
        /// 16進制字符轉換為字節
        /// </summary>
        /// <param name="hs"></param>
        /// <returns></returns>
        static byte[] HexString(string hs)
        {
            hs = hs.Replace(" ", "");
            string strTemp = "";
            byte[] b = new byte[hs.Length / 2];
            for (int i = 0; i < hs.Length / 2; i++)
            {
                strTemp = hs.Substring(i * 2, 2);
                b[i] = Convert.ToByte(strTemp, 16);
            }
            return b;
        }
        #endregion
        #region 發送、接收報文并返回報文
        /// <summary>
        /// 發送或接受風機指令
        /// </summary>
        /// <param name="sendCodeMeg">指令</param>
        /// <param name="IpAddress">IP地址</param>
        /// <param name="panelIP">面板IP</param>
        /// <returns></returns>
        static string SendPack(string sendCodeMeg, string IpAddress, int port)
        {
            IPAddress ip = IPAddress.Parse(IpAddress);
            Socket clientSocket = new Socket(AddressFamily.InterNetwork, SocketType.Stream, ProtocolType.Tcp);
            try
            {
                Console.WriteLine("開始發送數據。。。");
                clientSocket.Connect(new IPEndPoint(ip, port)); //配置服務器ip和端口
                //TcpClient tcpClient = new TcpClient();
                Console.WriteLine("服務器連接成功");
            }
            catch
            {
                Console.WriteLine("連接服務器失敗\n");
                return null;
            }
            try
            {
                string sendMessage = sendCodeMeg; // "6B 00 00 00 00 06 02 06 05 10 00 01"; //發送到服務端的內容
                var sendData = HexString(sendMessage);
                string recvStr = null;
                int bytes;
                try
                {
                    Console.WriteLine("發送報文:{0}", sendMessage);
                    clientSocket.Send(sendData);//向服務器發送數據
                    byte[] recvBytes = new byte[1024];
                    //連接時長500ms
                    clientSocket.ReceiveTimeout = 5000;
                    bytes = clientSocket.Receive(recvBytes, recvBytes.Length, 0); //服務端接受返回信息
                    recvStr += ByteToHexString(recvBytes);
                }
                catch (Exception ex)
                {
                    Console.WriteLine("出現錯誤!\n{0}\n\n", ex);
                    recvStr = null;
                }
                if (recvStr != null)
                {
                    Console.WriteLine("獲取成功!\n 獲得數據:{0}\n\n", recvStr);
                }
                clientSocket.Close();//關閉連接釋放資源
                                     //Console.ReadLine();
                return recvStr;
            }
            catch
            {
                Console.WriteLine("出現錯誤!\n");
                return null;
            }
        }
        #endregion
        //主函數
        static void Main(string[] args)
        {
            Console.WriteLine("開始!");
            string IP = "10.139.49.61";
            int port = 502;
            int fnu = 4;
            string a = fnu.ToString("x2");
            string sendCodeMeg1 = "02 00 00 00 00 06 01 03 01 10 00 02";
            string sendCodeMeg2 = "03 00 00 00 00 06 01 03 01 0A 00 02";
            string data1 = null;
            string data2 = null;
            for (int num = 0; num < 5; num++)
            {
                Console.WriteLine("第{0}次調用Get_Fan函數!\n", num + 1);
                data1 = SendPack(sendCodeMeg1, IP, port);
                if (data1 != null)
                {
                    break;
                }
            }
            for (int num = 0; num < 5; num++)
            {
                Console.WriteLine("第{0}次調用Get_Fan函數!\n", num + 1);
                data2 = SendPack(sendCodeMeg2, IP, port);
                if (data2 != null)
                {
                    break;
                }
            }
            Console.WriteLine("結束");
            Console.ReadKey();
        }
    }
}1.引用-添加引用-HslCommunication.dll

2.ModBus組件所有的功能類都在 HslCommunication.ModBus命名空間,所以再使用之前先添加
using HslCommunication.ModBus;
using HslCommunication;
3.在使用讀寫功能之前必須先進行實例化:
private ModbusTcpNet busTcpClient = new ModbusTcpNet("192.168.3.45", 502, 0x01); // 站號1上面的實例化指定了服務器的IP地址,端口號(一般都是502),以及自己的站號,允許設置為0-255,后面的兩個參數有默認值,在實例化的時候可以省略。
private ModbusTcpNet busTcpClient = new ModbusTcpNet("192.168.3.45"); // 端口號502,站號14.

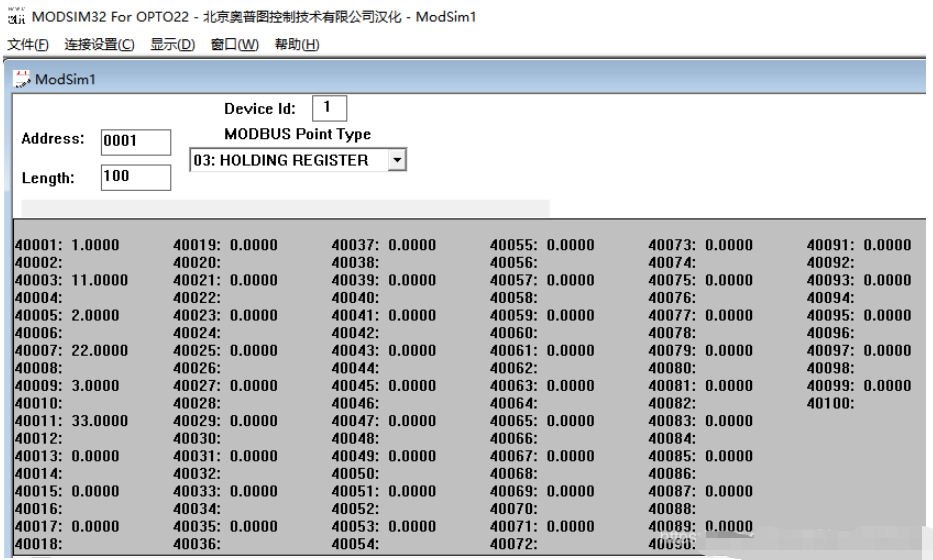
模擬器模擬的是西門子PLC 有四種類型
地址以0開頭的是可讀可寫線圈
地址以1開頭的是只讀線圈
地址以4開頭的是可讀可寫寄存器(string/float/int/ushort/short等都可以放在這里面)
地址以3開頭的是只讀寄存器
我們讀取的時候只看后四位0001,就是1,但是庫里面是從0開始讀的,所以對應的就要減一
5.讀取寄存器的一個值
        private void button1_Click(object sender, EventArgs e)
        {
		    bool coil100 = busTcpClient.ReadCoil("0").Content;   // 讀取線圈1的通斷
		    int int100 = busTcpClient.ReadInt32("0").Content;      // 讀取寄存器1-2的int值
		    float float100 = busTcpClient.ReadFloat("0").Content; // 讀取寄存器1-2的float值
		    double double100 = busTcpClient.ReadDouble("0").Content; // 讀取寄存器1-3的double值
        }
6.讀取寄存器的一組值(一組線圈)(一組float值)
        private void button3_Click(object sender, EventArgs e)
        {
            //讀取地址為0,長度為3的線圈數量
            OperateResult<bool[]> read = busTcpClient.ReadCoil("0", 3);
            if (read.IsSuccess)
            {
                for (int i = 0; i < read.Content.Length; i++)
                {
                    Console.WriteLine(read.Content[i]);
                }
            }
            else
            {
                MessageBox.Show(read.ToMessageShowString());
            }

           	//讀取(一組)寄存器數據
            OperateResult<float[]> result = busTcpClient.ReadFloat("0", 4);
            if (result.IsSuccess)
            {
                //Console.WriteLine(result.Content[0]);
                //Console.WriteLine(result.Content[1]);
                //Console.WriteLine(result.Content[2]);
                for (int i = 0; i < result.Content.Length; i++)
                {
                    Console.WriteLine(result.Content[i]);
                }
            }
            else
            {
                MessageBox.Show(result.ToMessageShowString());
            }
        }
7.寫入一個(線圈)(寄存器)
        private void button2_Click(object sender, EventArgs e)
        {
		    busTcpClient.WriteCoil("0", true);// 寫入線圈1為通
		    busTcpClient.Write("0", 123.456);// 寫入寄存器1-2為123.456
        }
8.批量寫入一組(線圈)(寄存器)
        private void button9_Click(object sender, EventArgs e)
        {
            //寫入一組線圈
            bool[] value = new bool[] { true, true, false, true, false };
            busTcpClient.WriteCoil("0", value);
        }
        private void button10_Click(object sender, EventArgs e)
        {
            //寫入一組寄存器
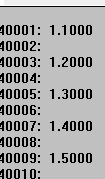
            float[] value = new float[] {1.1F, 1.2F, 1.3F, 1.4F, 1.5F };
            busTcpClient.Write("0", value);
        }
-
-
以上就是“C#中modbus Tcp協議的數據抓取和使用方法”這篇文章的所有內容,感謝各位的閱讀!相信大家閱讀完這篇文章都有很大的收獲,小編每天都會為大家更新不同的知識,如果還想學習更多的知識,請關注億速云行業資訊頻道。
免責聲明:本站發布的內容(圖片、視頻和文字)以原創、轉載和分享為主,文章觀點不代表本網站立場,如果涉及侵權請聯系站長郵箱:is@yisu.com進行舉報,并提供相關證據,一經查實,將立刻刪除涉嫌侵權內容。