您好,登錄后才能下訂單哦!
您好,登錄后才能下訂單哦!
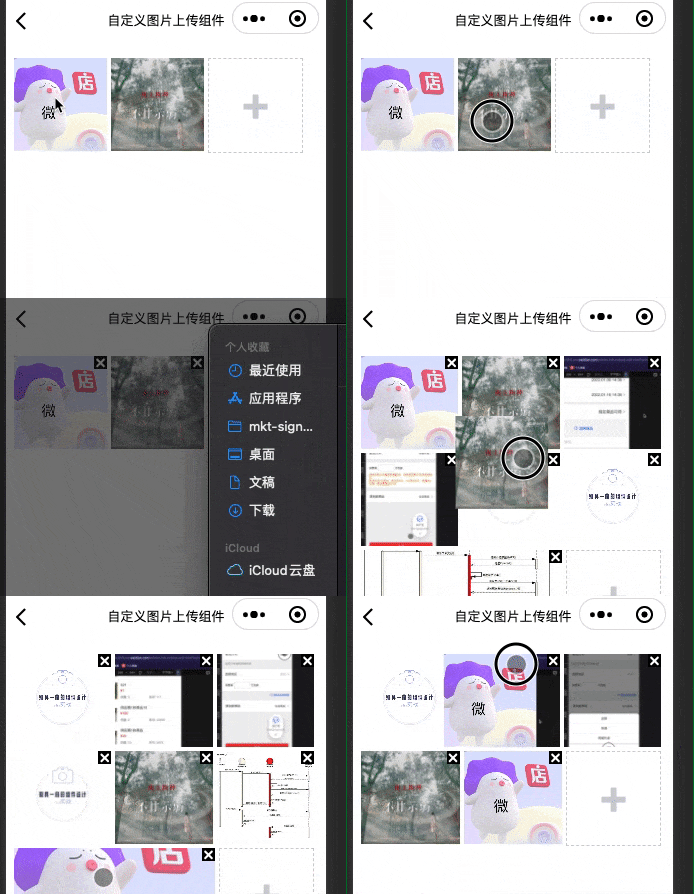
這篇文章主要介紹“微信小程序怎么實現圖片拖拽排序”的相關知識,小編通過實際案例向大家展示操作過程,操作方法簡單快捷,實用性強,希望這篇“微信小程序怎么實現圖片拖拽排序”文章能幫助大家解決問題。

對于組件內部來說。筆者提供了一個參數去讓開發者決定是否應該在場景中支持拖動排序。這里略去這些無關代碼。
拖拽排序功能使用了微信小程序提供的movable-area組件(標簽,但小程序也是封裝了HTML,所以以原生組件代稱)。它相當于提供了一個可滑動區域,在此區域內的movable-view組件內容可以任意排列。其效果就相當于window中的“桌面圖標非對齊”效果 —— 記住這個描述,它和下面的內容聯系緊密!
其中主要的兩個參數是:
x:定義x軸方向的偏移,如果x的值不在可移動范圍內,會自動移動到可移動范圍;改變x的值會觸發動畫;
y:定義y軸方向的偏移,如果y的值不在可移動范圍內,會自動移動到可移動范圍;改變y的值會觸發動畫;
嗯,可以知道,其內部是通過 js 觸發的動畫。而且可能是requestAnimeFrame API。
知道了所用標簽,接下來就該正式開發了。但是你會發現,這里其實有兩種使用方式:
對每個元素使用movable-view包裹,讓他們可以隨意拖拽位置:
<view class="container">
    <movable-area >
        <view class="image-list">
            <!-- 顯示圖片 -->
            <block wx:if="{{yMovable}}">
                <movable-view x="{{x}}" y="{{y}}" direction="all" inertia damping="{{5000}}" friction="{{1}}" disabled="{{disabled}}" wx:for="{{images}}" wx:key="{{item.index}}">
                    <view class="image-wrap image-bg {{(images.length > 2) ? 'image-flex' : ''}}" id="{{item.index}}" data-index='{{index}}' bindlongpress='onShowMenu' bindtouchstart='touchs' bindtouchend='touchend' bindtouchmove='touchm'>
                        <image class="image" src="{{item.img}}" mode="aspectFill" bind:tap="onPreviewImage" data-imgsrc="{{item.img}}"></image>
                        <i class="iconfont icon-delete" wx:if="{{showMenuImg}}" bind:tap="onDelImage" data-index="{{index}}"></i>
                    </view>
                </movable-view>
            </block>

            <!-- 選擇圖片 -->
            <view class="image-wrap selectphoto" bind:tap="onChooseImage" hidden="{{!selectPhoto}}">
                <i class="iconfont icon-jiashang"></i>
            </view>
        </view>
    </movable-area>
</view>
圖片只是展示;單獨設置一個元素,在長按圖片時顯示,其值為當前選中的圖片,拖拽的是這個元素,到達目標位置后消失,圖片列表重新排序。
<view class="container">
    <movable-area >
        <view class="image-list">
            <!-- 顯示圖片 -->
            <block wx:if="{{yMovable}}">
                <block wx:for="{{images}}" wx:key="{{item.index}}">
                    <view class="image-wrap image-bg {{(images.length > 2) ? 'image-flex' : ''}}" id="{{item.index}}" data-index='{{index}}' bindlongpress='onShowMenu' bindtouchstart='touchs' bindtouchend='touchend' bindtouchmove='touchm'>
                        <image class="image" src="{{item.img}}" mode="aspectFill" bind:tap="onPreviewImage" data-imgsrc="{{item.img}}"></image>
                        <i class="iconfont icon-delete" wx:if="{{showMenuImg}}" bind:tap="onDelImage" data-index="{{index}}"></i>
                    </view>
                </block>
                <movable-view x="{{x}}" y="{{y}}" direction="all" inertia damping="{{5000}}" friction="{{1}}" disabled="{{disabled}}">
                    <view class='image-wrap image-check'  hidden='{{hidden}}'>
                        <image class="image" src="{{doubleImg}}" mode="aspectFill"></image>
                    </view>
                </movable-view>
            </block>

            <!-- 選擇圖片 -->
            <view class="image-wrap selectphoto" bind:tap="onChooseImage" hidden="{{!selectPhoto}}">
                <i class="iconfont icon-jiashang"></i>
            </view>
        </view>
    </movable-area>
</view>
第一種方式的優勢在于:可以有更加“真實”的效果。這里的真實意為重新排列時也有滑動的動畫效果。但是帶來的性能損耗也是極大的,你只能盡力調控各種數據來讓顯示更加“跟手”一些。但是基于此,你可以通過js計算達到像QQ空間那樣的實時排列效果!
第二種方式的優勢在于:性能開銷相對小一些。但展示效果更像web而非APP(這兩個的區別你應該是知道的)。
當前版本中,筆者采用的是第二種方式。其關鍵 js 代碼如下:
const MAX_IMG_NUM=9;
Component({
  /**
   * 組件的屬性列表
   */
  properties: {
    yMovable:{
      type:Boolean,
      value:false
    },
  },


  /**
   * 組件的初始數據
   */
  data: {
    images:[],
    selectPhoto:true,
    showMenuImg: false,
    flag: false,
    hidden:true,
    x:0,
    y:0,
    disabled: true,
    elements:[],
    doubleImg: ""
  },

  /**
   * 組件的方法列表
   */
  methods: {
  	//長按事件
    onShowMenu(e){
        const detail = e.currentTarget;
        if(!this.data.showMenuImg) {
          // 使手機振動15ms
          wx.vibrateShort();
        }
        this.setData({
            showMenuImg: true
        })
        if(this.properties.yMovable) {
            this.setData({
                x: detail.offsetLeft+5,
                y: detail.offsetTop,
                hidden: false,
                flag:true,
                doubleImg: this.data.images[detail.dataset.index].img
            })
        }
    },
    //觸摸開始
    touchs:function(e){
        this.setData({
          beginIndex:e.currentTarget.dataset.index
        })
    },
    //觸摸結束
    touchend:function(e){
        if (!this.data.flag) {
          return;
        }
        const x = e.changedTouches[0].pageX
        const y = e.changedTouches[0].pageY
        const list = this.data.elements;
        let data = this.data.images
        for(var j = 0; j<list.length; j++){
          const item = list[j];
          if(x>item.left && x<item.right && y>item.top && y<item.bottom){
            const endIndex = item.dataset.index;
            const beginIndex = this.data.beginIndex;
            //向后移動
            if (beginIndex < endIndex) {
              let tem = data[beginIndex];
              for (let i = beginIndex; i < endIndex; i++) {
                data[i] = data[i + 1]
              }
              data[endIndex] = tem;
            }
            //向前移動
            if (beginIndex > endIndex) {
              let tem = data[beginIndex];
              for (let i = beginIndex; i > endIndex; i--) {
                data[i] = data[i - 1]
              }
              data[endIndex] = tem;
            }

            this.setData({
                images: data
            })
            this.initImg(this.triggerMsg(data, "sort-img"))
          }
        }
        this.setData({
          hidden: true,
          flag: false
        })
    },
    //滑動
    touchm:function(e){
        if(this.data.flag){
          const x = e.touches[0].pageX
          const y = e.touches[0].pageY
          this.setData({
            x: x - 75,
            y: y - 45
          })
        }
    },

    //選擇圖片
    onChooseImage(){
        let images = this.data.images;
        let imageLen = images.length;
        let max=MAX_IMG_NUM-imageLen;
        wx.chooseImage({
          count:max,
          sizeType:['original','compressed'],
          sourceType:['album','camera'],
          success: (res) => {
            max-=res.tempFilePaths.length;
            let _images = images.map(item => {
                return item.img
            })
            images = _images.concat(res.tempFilePaths)
            for(let i=0;i<images.length;i++) {
                images[i] = {
                    img: images[i],
                    index: i+1
                }
            }
            this.setData({
              selectPhoto:max<=0?false:true,
              images,
              showMenuImg: false
            })
            this.triggerMsg(images, "choose-img")
            if(this.properties.yMovable) {
                this.initImg()
            }
          },
          fail:(res)=>{
          }
        })
    },

	// 初始化位置信息
    initImg(fn=function(){}) {
        let query = wx.createSelectorQuery().in(this);
        let nodesRef = query.selectAll(".image-bg");
        nodesRef.fields({
            dataset: true,
            rect:true
        },(result)=>{
            this.setData({
                elements: result;
                fn();
            })
        }).exec()
    },

    //刪除
    onDelImage(event){
        let images = this.data.images;
        images.splice(event.target.dataset.index,1)
        this.setData({
          images
        })
        this.initImg(this.triggerMsg(images, "delete-img"))
        if(images.length== MAX_IMG_NUM-1){
          this.setData({
            selectPhoto:true
          })
        }
    },

    triggerMsg(images, key) {
      this.triggerEvent('chooseImg', {
        images: images.map(item => {
            return item.img
        }),
        key: key
      })
    },
  }
})
上面代碼中最重要的就是initImg函數的這段代碼!它用來獲取wxml節點的相關屬性!fields API的參數及默認值有:
id:false,//是否返回節點id
rect:fasle,//是否返回節點布局位置
dataset: true,//返回數據集
size: true,//返回寬高
scrollOffset: true,//返回 scrollLeft,scrollTop
properties: ['scrollX', 'scrollY'],//監聽屬性名
computedStyle: ['margin', 'backgroundColor']//此處返回指定要返回的樣式名
這個API的調用是后面定位的關鍵,它必須放在獲取到圖片數組之后執行(不管同步還是異步的)。也是第二種方法和第一種方法的區別之處 —— 第一種方法是純 js 計算實時位置。所以它需要在結束后進行排序。
這時候問題就來了:像本文這種場景,同時有 x 和 y 兩個方向的位置,sort將會極其復雜,而且sort本身的性能將會被內部繁雜的代碼死死拖住。這就是上面說第一種方法性能問題的原因所在。
但是本文這種方法將sort簡化為當前拖動元素和目標位置圖片兩個物體的四個方向判斷,也就是經典“小球撞墻”臨界問題。這也是其優勢所在。
另一個需要注意的地方就是 touchm函數中的setData。這里面進行的是拖拽元素位置改變,也就是“跟手率”(我自己編的)。可以對此數值進行微調來讓效果更加nice一些。
首先在json文件中進行組件引入:
{
  "usingComponents": {
    "y-img":"/components/yImg/index"
  }
}
然后再wxml中:
<view class="container">
	<y-img bind:chooseImg="chooseImg"></y-img>
	<!--或:-->
    <y-img yMovable bind:chooseImg="chooseImg"></y-img>
</view>
chooseImg(e) {
      console.log(e.detail)
},
關于“微信小程序怎么實現圖片拖拽排序”的內容就介紹到這里了,感謝大家的閱讀。如果想了解更多行業相關的知識,可以關注億速云行業資訊頻道,小編每天都會為大家更新不同的知識點。
免責聲明:本站發布的內容(圖片、視頻和文字)以原創、轉載和分享為主,文章觀點不代表本網站立場,如果涉及侵權請聯系站長郵箱:is@yisu.com進行舉報,并提供相關證據,一經查實,將立刻刪除涉嫌侵權內容。