您好,登錄后才能下訂單哦!
您好,登錄后才能下訂單哦!
這篇文章主要介紹“如何使用@Valid+BindingResult進行controller參數校驗”,在日常操作中,相信很多人在如何使用@Valid+BindingResult進行controller參數校驗問題上存在疑惑,小編查閱了各式資料,整理出簡單好用的操作方法,希望對大家解答”如何使用@Valid+BindingResult進行controller參數校驗”的疑惑有所幫助!接下來,請跟著小編一起來學習吧!
由于controller是調用的第一層,經常參數校驗將在這里完成,常見有非空校驗、類型校驗等,常見寫法為以下偽代碼:
public void round(Object a){
  if(a.getLogin() == null){
     return "手機號不能為空!";
   }
}
但是調用對象的位置會有很多,而且手機號都不能為空,那么我們會想到把校驗方法抽出來,避免重復的代碼。但有框架支持我們通過注解的方式進行參數校驗。
先立個場景,為往動物園添加動物,動物對象如下,時間節點大概在3030年,我們認為動物可登陸動物專用的系統,所以有password即自己的登錄密碼。
public class Animal {
    private String name;
    private Integer age;
    private String password;
    private Date birthDay;
}
調用創建動物的controller層如下,簡潔明了,打印下信息后直接返回。
@RestController
@RequestMapping("/animal")
public class AnimalController {
   @PostMapping
    public Animal createAnimal(@RequestBody Animal animal){
        logger.info(animal.toString());
        return animal;
    }
}
偽造Mvc調用的測試類。
@RunWith(SpringRunner.class)
@SpringBootTest
public class TestAnimal {

    private final static Logger logger = LoggerFactory.getLogger(TestAnimal.class);
    @Autowired
    private WebApplicationContext wac;
    private MockMvc mockMvc;

    @Before
    public void initMock(){
        mockMvc = MockMvcBuilders.webAppContextSetup(wac).build();
    }

    @Test
    public void createAnimal() throws Exception {
        String content = "{\"name\":\"elephant\",\"password\":null,\"birthDay\":"+System.currentTimeMillis()+"}";
        String result = mockMvc.perform(MockMvcRequestBuilders.post("/animal")
                .content(content)
                .contentType(MediaType.APPLICATION_JSON_UTF8))
                .andExpect(MockMvcResultMatchers.status().isOk())
                .andReturn().getResponse().getContentAsString();
        logger.info(result);
    }
}
以上代碼基于搭建的springboot項目,想搭建的同學可以參考搭建篇 http://www.5655pk.com/article/226998.htm
代碼分析,日期格式的參數建議使用時間戳傳遞,以上birthDay傳遞 "2018-05-08 20:00:00",將會拋出日期轉換異常,感興趣的同學可以試試。
由于密碼很重要,現在要求密碼為必填,操作如下,添加@NotBlank注解到password上:
@NotBlank
private String password;
但光加校驗注解是不起作用的,還需要在方法參數上添加@Valid注解,如下:
@Valid @RequestBody Animal animal
此時執行測試方法,拋出異常,返回狀態為400:
java.lang.AssertionError: Status
Expected :200
Actual :400
<Click to see difference>
at org.springframework.test.util.AssertionErrors.fail(AssertionErrors.java:54)
at org.springframework.test.util.AssertionErrors.assertEquals(AssertionErrors.java:81)
說明對password的非空校驗已經生效了,直接拋出異常。如果不想拋出異常,想返回校驗信息給前端,這個時候就需要用到BindingResult了,修改創建動物的方法,添加BindingResult參數:
@PostMapping
    public Animal createAnimal(@Valid @RequestBody Animal animal, BindingResult bindingResult){
        if (bindingResult.hasErrors()){
            bindingResult.getAllErrors().forEach(o ->{
                FieldError error = (FieldError) o;
                logger.info(error.getField() + ":" + error.getDefaultMessage());
            });
        }
        logger.info(animal.toString());
        return animal;
    }
此時,執行測試,可以看到日志中的錯誤信息:
2018-05-09 00:59:37.453 INFO 14044 --- [ main] c.i.s.d.web.controller.AnimalController : password:may not be empty
為了滿足我們編碼需要我們需要進行代碼改造,1.不能直接返回animal。2.返回的提示信息得是用戶可讀懂的信息。
controller方法改造如下,通過Map對象傳遞請求成功后的信息或錯誤提示信息。
@PostMapping
    public Map<String,Object> createAnimal(@Valid @RequestBody Animal animal, BindingResult bindingResult){
        logger.info(animal.toString());
        Map<String,Object> result = new HashMap<>();
        if (bindingResult.hasErrors()){
            FieldError error = (FieldError) bindingResult.getAllErrors().get(0);
            result.put("code","400");//錯誤編碼400
            result.put("message",error.getDefaultMessage());//錯誤信息
            return result;
        }
        result.put("code","200");//成功編碼200
        result.put("data",animal);//成功返回數據
        return result;
    }
返回的密碼提示信息如下:
@NotBlank(message = "密碼不能為空!")
private String password;
執行測試方法,返回結果
com.imooc.security.demo.TestAnimal : {"code":"400","message":"密碼不能為空!"}
最后貼一個,設置password值返回成功的信息
com.imooc.security.demo.TestAnimal : {"code":"200","data":{"name":"elephant","age":null,"password":"lalaland","birthDay":1525799768955}}
由于篇幅有限,下次會以這個實例為基礎,實現一個自定義的注解實現,該篇文章到此結束。
import com.example.demo.pojo.Student;
import org.springframework.stereotype.Controller;
import org.springframework.web.bind.annotation.PostMapping;
import org.springframework.web.bind.annotation.RequestMapping;
import org.springframework.web.bind.annotation.ResponseBody;
import javax.validation.Valid;

@Controller
@RequestMapping("/stu")
public class StudentController {
    @PostMapping("/addStu")
    @ResponseBody
    public String addStudent(@Valid Student student){
        System.out.println("存儲student對象");
        System.out.println(student);
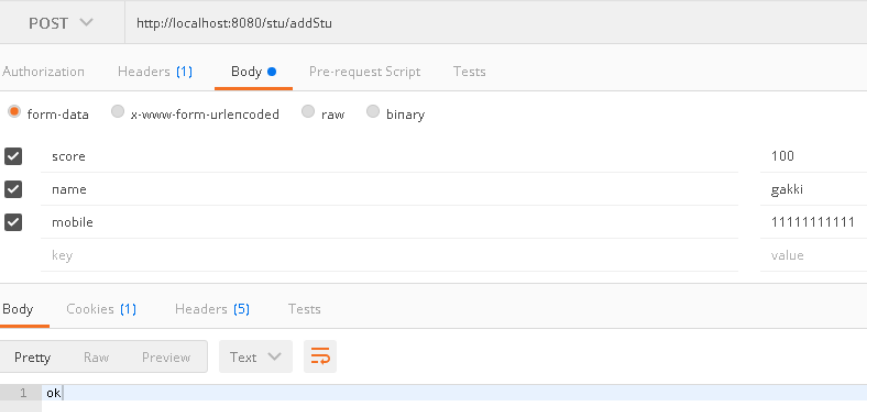
        return "ok";
    }
}
import org.hibernate.validator.constraints.Length;
import javax.validation.constraints.Max;
import javax.validation.constraints.Min;
import javax.validation.constraints.NotEmpty;
import javax.validation.constraints.NotNull;
public class Student {
@NotNull(message = "傳入的是空值,請傳值")
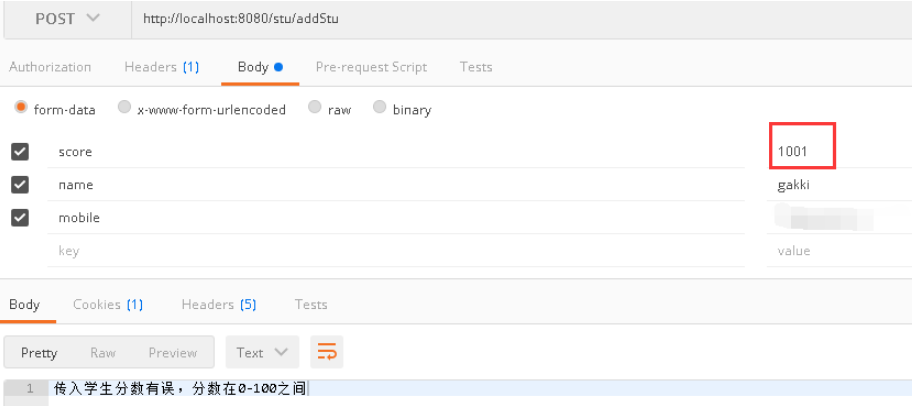
@Min(value = 0,message = "傳入學生分數有誤,分數在0-100之間")
@Max(value = 100,message = "傳入學生分數有誤,分數在0-100之間")
private Integer score;
@NotEmpty(message = "傳入的是空字符串,請傳值")
@NotNull(message = "傳入的是空值,請傳值")
private String name;
@NotNull(message = "傳入的是空值,請傳值")
@NotEmpty(message = "傳入的是空字符串,請傳值")
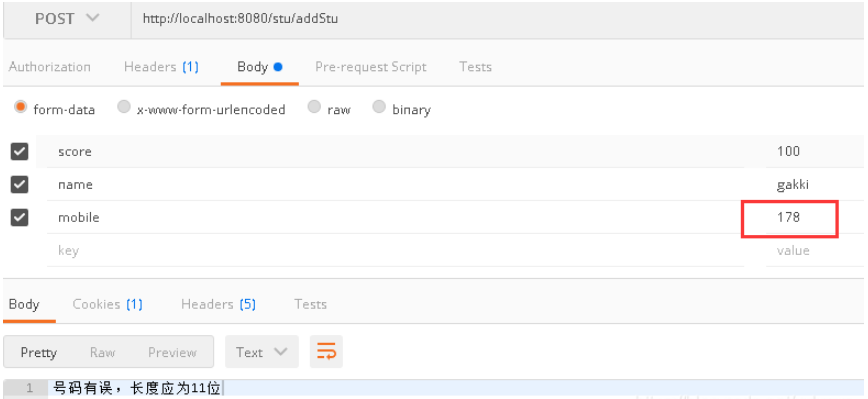
@Length(min = 11,max = 11,message = "號碼有誤,長度應為11位")
private String mobile;
public Integer getScore() {
return score;
}
public void setScore(Integer score) {
this.score = score;
}
public String getName() {
return name;
}
public void setName(String name) {
this.name = name;
}
public String getMobile() {
return mobile;
}
public void setMobile(String mobile) {
this.mobile = mobile;
}
@Override
public String toString() {
return "Student{" +
"score=" + score +
", name='" + name + '\'' +
", mobile='" + mobile + '\'' +
'}';
}
}import org.springframework.validation.BindException;
import org.springframework.web.bind.annotation.ControllerAdvice;
import org.springframework.web.bind.annotation.ExceptionHandler;
import org.springframework.web.bind.annotation.ResponseBody;
@ControllerAdvice
public class GlobalExceptionInterceptor {
@ExceptionHandler(value = Exception.class)
@ResponseBody
public String exceptionHandler(Exception e){
String failMessage=null;
if(e instanceof BindException){
failMessage=((BindException) e).getBindingResult().getFieldError().getDefaultMessage();
}
return failMessage;
}
}

當我們傳入的參數有誤時,就會被異常攔截器捕獲,返回給我們錯誤信息。

到此,關于“如何使用@Valid+BindingResult進行controller參數校驗”的學習就結束了,希望能夠解決大家的疑惑。理論與實踐的搭配能更好的幫助大家學習,快去試試吧!若想繼續學習更多相關知識,請繼續關注億速云網站,小編會繼續努力為大家帶來更多實用的文章!
免責聲明:本站發布的內容(圖片、視頻和文字)以原創、轉載和分享為主,文章觀點不代表本網站立場,如果涉及侵權請聯系站長郵箱:is@yisu.com進行舉報,并提供相關證據,一經查實,將立刻刪除涉嫌侵權內容。