溫馨提示×
您好,登錄后才能下訂單哦!
點擊 登錄注冊 即表示同意《億速云用戶服務條款》
您好,登錄后才能下訂單哦!
這篇文章主要介紹android如何實現簡單的活動轉盤,文中介紹的非常詳細,具有一定的參考價值,感興趣的小伙伴們一定要看完!
具體內容如下
頁面
public class CircleTurntableActivity extends AppCompatActivity {

    private Animation mStartAnimation;
    private ImageView mLuckyTurntable;
    private boolean   isRunning;

    private boolean mIsLucky = false;

    @Override
    protected void onCreate(Bundle savedInstanceState) {
        super.onCreate(savedInstanceState);
        setContentView(R.layout.activity_circle_turntable);

        mLuckyTurntable = (ImageView) findViewById(R.id.id_lucky_turntable);
        ImageView mStartBtn = (ImageView) findViewById(R.id.id_start_btn);
        mStartBtn.setOnClickListener(new View.OnClickListener() {
            @Override
            public void onClick(View v) {
                if (!isRunning) {
                    isRunning = true;
                    mIsLucky = !mIsLucky;
                    startAnimation();
                }
            }
        });
    }

    /**
     * 開啟動畫
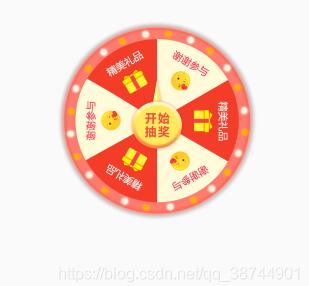
     * 5秒旋轉5圈+中獎所在位置角度
     */
    private void startAnimation() {
        float toDegree;//結束角度(以實際轉盤圖為準計算角度)
        if (mIsLucky) {
            toDegree = 360 * 5 + 30f;
        } else {
            toDegree = 360 * 5 + 90f;
        }

        if (mStartAnimation != null) {
            mStartAnimation.reset();
        }

        // 按中心點旋轉 toDegree度
        // 參數:旋轉的開始角度、旋轉的結束角度、X軸的伸縮模式、X坐標的伸縮值、Y軸的伸縮模式、Y坐標的伸縮值
        mStartAnimation = new RotateAnimation(0, toDegree, Animation.RELATIVE_TO_SELF, 0.5f, Animation.RELATIVE_TO_SELF, 0.5f);
        mStartAnimation.setDuration(5000); // 設置旋轉時間
        mStartAnimation.setRepeatCount(0); // 設置重復次數
        mStartAnimation.setFillAfter(true);// 動畫執行完后是否停留在執行完的狀態
        mStartAnimation.setInterpolator(new AccelerateDecelerateInterpolator()); // 動畫播放的速度
        mStartAnimation.setAnimationListener(new Animation.AnimationListener() {
            @Override
            public void onAnimationStart(Animation animation) {
            }

            @Override
            public void onAnimationEnd(Animation animation) {
                isRunning = false;
                Toast.makeText(CircleTurntableActivity.this, mIsLucky ? "精美禮品" : "謝謝參與", Toast.LENGTH_SHORT).show();
            }

            @Override
            public void onAnimationRepeat(Animation animation) {

            }
        });
        mLuckyTurntable.startAnimation(mStartAnimation);
    }

}
頁面布局
<?xml version="1.0" encoding="utf-8"?>
<RelativeLayout xmlns:android="http://schemas.android.com/apk/res/android"
    xmlns:tools="http://schemas.android.com/tools"
    android:layout_width="match_parent"
    android:layout_height="match_parent">
<!--轉盤-->
    <ImageView
        android:id="@+id/id_lucky_turntable"
        android:layout_width="613.33px"
        android:layout_height="613.33px"
        android:layout_centerInParent="true"
        android:src="@mipmap/lucky_turntable_bg" />
<!--指針-->
    <ImageView
        android:paddingBottom="40px"
        android:id="@+id/id_start_btn"
        android:layout_width="266.66px"
        android:layout_height="266.66px"
        android:layout_centerInParent="true"
        android:src="@mipmap/lucky_start_icon" />

</RelativeLayout>
效果:

以上是“android如何實現簡單的活動轉盤”這篇文章的所有內容,感謝各位的閱讀!希望分享的內容對大家有幫助,更多相關知識,歡迎關注億速云行業資訊頻道!
免責聲明:本站發布的內容(圖片、視頻和文字)以原創、轉載和分享為主,文章觀點不代表本網站立場,如果涉及侵權請聯系站長郵箱:is@yisu.com進行舉報,并提供相關證據,一經查實,將立刻刪除涉嫌侵權內容。