您好,登錄后才能下訂單哦!
您好,登錄后才能下訂單哦!
這篇文章主要介紹了Java中單例模式與多線程的示例分析,具有一定借鑒價值,感興趣的朋友可以參考下,希望大家閱讀完這篇文章之后大有收獲,下面讓小編帶著大家一起了解一下。
單例模式就是全局唯一但是所有程序都可以使用的對象
寫單例模式步驟:
1.將構造函數設置為私有的
2.創建一個靜態的類變量
3.提供獲取單例的方法
/**
 * user:ypc;
 * date:2021-06-13;
 * time: 21:02;
 */
//餓漢方式實現單例模式
public class Singleton {
    //1.將構造函數設置為私有的,不然外部可以創建
    private Singleton(){
    }
    //2.創建靜態的類變量(讓第三步的方法進行返回)
    private static Singleton singleton = new Singleton();
    //給外部接口提供的獲取單例的方法
    public static Singleton getInstance(){
        return singleton;
    }
}
測試餓漢的單例模式
//測試餓漢方式實現的單例模式,創建兩個線程,看是不是得到了一個實列對象,如果為true就說明餓漢的單例模式沒有問題
    static Singleton singleton1 = null;
    static Singleton singleton2 = null;
    public static void main(String[] args) throws InterruptedException {
        Thread thread1 = new Thread(() -> {
            singleton1 = Singleton.getInstance();
        });
        Thread thread2 = new Thread(() -> {
            singleton2 = Singleton.getInstance();
        });
        thread1.start();
        thread2.start();
        thread1.join();
        thread2.join();
        System.out.println(singleton1 == singleton2);
    }
不會隨著程序的啟動而啟動,而是等到有人調用它的時候,它才會初始化
/**
 * user:ypc;
 * date:2021-06-13;
 * time: 21:22;
 */
//懶漢方式實現單例模式
public class Singleton2 {
    static class Singleton {
        //1.設置私有的構造函數
        private Singleton() {
        }
        //2.提供一個私有的靜態變量
        private static Singleton singleton = null;
        //3.提供給外部調用,返回一個單例對象給外部
        public static Singleton getInstance() {
            if (singleton == null) {
                singleton = new Singleton();
            }
            return singleton;
        }
    }
}
那么這樣寫有什么問題呢?我們來看看多線程情況下的懶漢方式實現單例模式:
/**
 * user:ypc;
 * date:2021-06-13;
 * time: 21:22;
 */
//懶漢方式實現單例模式
public class Singleton2 {
    static class Singleton {
        //1.設置私有的構造函數
        private Singleton() {
        }
        //2.提供一個私有的靜態變量
        private static Singleton singleton = null;
        //3.提供給外部調用,返回一個單例對象給外部
        public static Singleton getInstance() throws InterruptedException {
            if (singleton == null) {
                Thread.sleep(100);
                singleton = new Singleton();
            }
            return singleton;
        }
    }
    static Singleton singleton1 = null;
    static Singleton singleton2 = null;
    public static void main(String[] args) throws InterruptedException {
        Thread thread1 = new Thread(() -> {
            try {
                singleton1 = Singleton.getInstance();
            } catch (InterruptedException e) {
                e.printStackTrace();
            }
        });
        Thread thread2 = new Thread(() -> {
            try {
                singleton2 = Singleton.getInstance();
            } catch (InterruptedException e) {
                e.printStackTrace();
            }
        });
        thread1.start();
        thread2.start();
        thread1.join();
        thread2.join();
        System.out.println(singleton1 == singleton2);
    }
}
結果:
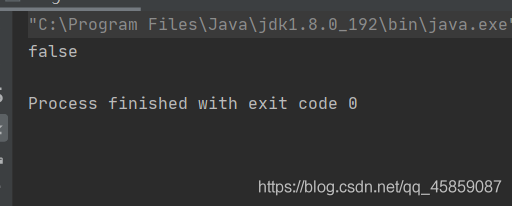
所以發生了線程不安全的問題
那么要如何更改呢?
加鎖:?

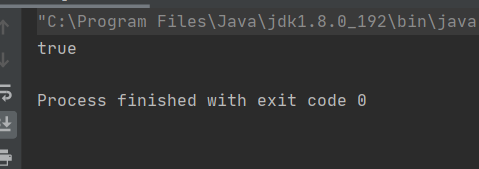
結果就是true了:

給方法加鎖可以實現線程安全,但是所鎖的粒度太大。
使用雙重校驗鎖優化后:
static class Singleton {
        //1.設置私有的構造函數
        private Singleton() {
        }
        //2.提供一個私有的靜態變量
        private static Singleton singleton = null;
        //3.提供給外部調用,返回一個單例對象給外部
        public static Singleton getInstance() {
            if (singleton == null) {
                synchronized (Singleton.class) {
                    if (singleton == null) {
                        singleton = new Singleton();
                    }
                }
            }
            return singleton;
        }
    }
那么這樣寫就沒有問題了嗎?
不是的:有可能還會發生指令重排的問題
當有線程在進行第一次初始化的時候,就有可能發生問題?
先來看初始化的過程
1.先分配內存空間
2.初始化
3.將singleton指向內存
有可能指令重排序之后:
線程1執行的順序變成了 1 --> 3 --> 2
在線程1執行完1、3之后時間片使用完了
線程2再來執行,線程2得到了未初始化的singleton,也就是的到了一個空的對象
也就發生了線程不安全的問題
那么要如何解決指令重排序的問題呢?那就是使用volatile關鍵字?:
/**
 * user:ypc;
 * date:2021-06-13;
 * time: 21:22;
 */
//懶漢方式實現單例模式
public class Singleton2 {
    static class Singleton {
        //1.設置私有的構造函數
        private Singleton() {
        }
        //2.提供一個私有的靜態變量
        private static volatile Singleton singleton = null;
        //3.提供給外部調用,返回一個單例對象給外部
        public static Singleton getInstance() {
            if (singleton == null) {
                synchronized (Singleton.class) {
                    if (singleton == null) {
                        singleton = new Singleton();
                    }
                }
            }
            return singleton;
        }
    }
這樣就沒有問題了
餓漢方式: 優點:實現簡單,不存在線程安全的問題,因為餓漢的方式是隨著程序的啟動而初始化的,因為類加載是線程安全的,所以它是線程安全的。缺點:隨著程序的啟動而啟動,有可能在整個程序的運行周期都沒有用到,這樣就帶來了不必要的開銷。
import java.util.Random;
/**
 * user:ypc;
 * date:2021-06-14;
 * time: 8:57;
 */
public class MyBlockingQueue {
    private int[] values;
    private int first;
    private int last;
    private int size;
    MyBlockingQueue(int maxSize) {
        this.values = new int[maxSize];
        this.first = 0;
        this.last = 0;
        this.size = 0;
    }
    public void offer(int val) throws InterruptedException {
        synchronized (this) {
            if (this.size == values.length) {
                this.wait();
            }
            this.values[last++] = val;
            size++;
            //變為循環隊列
            if (this.last == values.length) {
                this.last = 0;
            }
            //喚醒消費者
            this.notify();
        }
    }
    public int poll() throws InterruptedException {
        int result = 0;
        synchronized (this) {
            if (size == 0) {
                this.wait();
            }
            result = this.values[first++];
            this.size--;
            if (first == this.values.length) {
                this.first = 0;
            }
            //喚醒生產者開生產數據
            this.notify();
        }
        return result;
    }
    public static void main(String[] args) {
        MyBlockingQueue myBlockingQueue = new MyBlockingQueue(100);
        //生產者
        Thread thread1 = new Thread(() -> {
            while (true) {
                try {
                    int num = new Random().nextInt(100);
                    myBlockingQueue.offer(num);
                    System.out.println("生產者生產數據:" + num);
                    Thread.sleep(100);
                } catch (InterruptedException e) {
                    e.printStackTrace();
                }
            }
        });

        //消費者
        Thread thread2 = new Thread(new Runnable() {
            @Override
            public void run() {
                try {
                    while (true) {
                        int res = myBlockingQueue.poll();
                        System.out.println("消費者消費數據:" + res);
                    }
                } catch (InterruptedException e) {
                    e.printStackTrace();
                }
            }
        });
        thread1.start();
        thread2.start();
    }
}
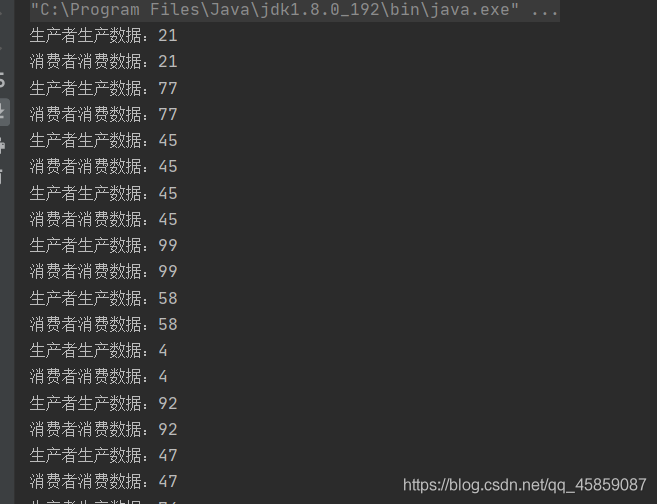
可以看到生產者每生產一個數據都會被取走:
它認為程序在一般的情況下不會發生問題,所以他在使用的時候不會加鎖,只有在數據修改的時候才會判斷有沒有鎖競爭,如果沒有就會直接修改數據,如果有就會返回失敗信息給用戶自行處理。
樂觀鎖的經典實現 Compare and Swap
CAS 實現的三個重要的屬性:
(V,A,B)
V:內存中的值
A:預期的舊值
B:新值
V == A? V -> B : 修改失敗
修改失之后:
自旋對比和替換
CAS 的底層實現:
CAS在Java中是通過unsafe來實現的,unsafe時本地類和本地方法,它是c/c++實現的原生方法,通過調用操作系統Atomic::cmpxchg原子指令來實現的
i++、i–問題
可以使用加鎖、ThreadLocal 解決問題
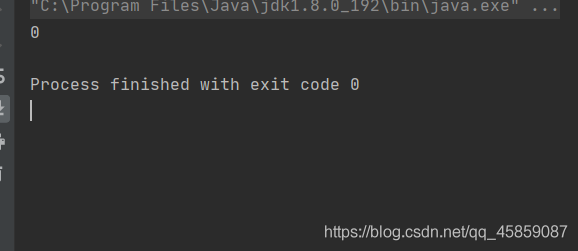
也可以使用atomic.AtomicInteger來解決問題,底層也使用了樂觀鎖。
import java.util.concurrent.atomic.AtomicInteger;
/**
 * user:ypc;
 * date:2021-06-14;
 * time: 10:12;
 */
public class ThreadDemo1 {
    private static AtomicInteger count  = new AtomicInteger(0);
    private static final int MaxSize = 100000;
    public static void main(String[] args) throws InterruptedException {
        Thread thread1 = new Thread(new Runnable() {
            @Override
            public void run() {
                for (int i = 0; i < MaxSize; i++) {
                    count.getAndIncrement();//i++
                }
            }
        });
        thread1.start();
        Thread thread2 = new Thread(()->{
            for (int i = 0; i < MaxSize; i++) {
             count.getAndDecrement();//i--
            }
        });
        thread2.start();
        thread1.join();
        thread2.join();
        System.out.println(count);
    }
}
當有多個線程對一個原子類進行操作的時候,某個線程在短時間內將原子類的值A修改為B,又馬上將其修改為A,此時其他線程不感知,還是會修改成功。
來看:
import java.util.concurrent.atomic.AtomicInteger;
/**
 * user:ypc;
 * date:2021-06-14;
 * time: 10:43;
 */
public class ThreadDemo2 {
    //線程操作資源,原子類ai的初始值為4
    static AtomicInteger ai = new AtomicInteger(4);
    public static void main(String[] args) {
        new Thread(() -> {
            //利用CAS將ai的值改成5
            boolean b = ai.compareAndSet(4, 5);
            System.out.println(Thread.currentThread().getName()+"是否成功將ai的值修改為5:"+b);
            //休眠一秒
            try {Thread.sleep(1000);} catch (InterruptedException e) {e.printStackTrace();}
            //利用CAS將ai的值改回4
            b = ai.compareAndSet(5,4);
            System.out.println(Thread.currentThread().getName()+"是否成功將ai的值修改為4:"+b);
        },"A").start();
        new Thread(() -> {
            //模擬此線程執行較慢的情況
            try {Thread.sleep(5000);} catch (InterruptedException e) {e.printStackTrace();}
            //利用CAS將ai的值從4改為10
            boolean b = ai.compareAndSet(4, 10);
            System.out.println(Thread.currentThread().getName()+"是否成功將ai的值修改為10:"+b);
        },"B").start();
        //等待其他線程完成,為什么是2,因為一個是main線程,一個是后臺的GC線程
        while (Thread.activeCount() > 2) {
            Thread.yield();
        }
        System.out.println("ai最終的值為:"+ai.get());
    }
}
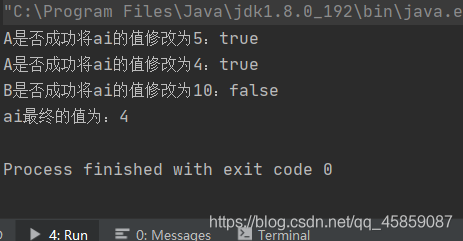
上面例子模擬的是A、B兩個線程操作一個資源ai,A的執行速度比B的快,在B執行前,A就已經將ai的值改為5之后馬上又把ai的值改回為4,但是B不感知,所以最后B就修改成功了。
那么會造成會有什么問題呢?
假設A現在有100元,要給B轉賬100元,點擊了兩次轉賬按鈕,第一次B只會得到100元,A現在剩余0元。第二次A是0元,預期的舊值是100,不相等,就不會執行轉賬操作。
如果點擊第二次按鈕之前,A又得到了100元,B不能感知的到,此時A得到了轉賬100元,預期的舊值就是100,又會轉給B100元。
那么如何解決這個問題呢??
我們可以給操作加上版本號,每次修改的時候判斷版本號和預期的舊值,如果不一樣就不會執行操作了。
即是預期的舊值和V值相等,但是版本號不一樣,也不會執行操作。
在Java中的實現:
import java.util.concurrent.atomic.AtomicStampedReference;
/**
 * user:ypc;
 * date:2021-06-14;
 * time: 11:05;
 */
public class ThreadDemo3 {
    static AtomicStampedReference<Integer> ai = new AtomicStampedReference<>(4,0);
    public static void main(String[] args) {
        new Thread(() -> {
            //四個參數分別是預估內存值,更新值,預估版本號,初始版本號
            //只有當預估內存值==實際內存值相等并且預估版本號==實際版本號,才會進行修改
            boolean b = ai.compareAndSet(4, 5,0,1);
            System.out.println(Thread.currentThread().getName()+"是否成功將ai的值修改為5:"+b);
            try {Thread.sleep(1000);} catch (InterruptedException e) {e.printStackTrace();}
            b = ai.compareAndSet(5,4,1,2);
            System.out.println(Thread.currentThread().getName()+"是否成功將ai的值修改為4:"+b);
        },"A").start();
        new Thread(() -> {
            try {Thread.sleep(5000);} catch (InterruptedException e) {e.printStackTrace();}
            boolean b = ai.compareAndSet(4, 10,0,1);
            System.out.println(Thread.currentThread().getName()+"是否成功將ai的值修改為10:"+b);
        },"B").start();
        while (Thread.activeCount() > 2) {
            Thread.yield();
        }
        System.out.println("ai最終的值為:"+ai.getReference());
    }
}
注意:里面的舊值對比的是引用。
如果范圍在-128 - 127 里,會使用緩存的值,如果超過了這個范圍,就會重新來new對象
可以將Integer 的高速緩存的值的邊界調整
悲觀鎖認為只要執行多線程的任務,就會發生線程不安全的問題,所以正在進入方法之后會直接加鎖。
直接使用synchronzied關鍵字給方法加鎖就可以了
獨占鎖:指的是這一把鎖只能被一個線程所擁有
比如:synchronzied、Lock
共享鎖: 指的是一把鎖可以被多個線程同時擁有
ReadWriterLock讀寫鎖就是共享鎖
讀鎖就是共享的,將鎖的粒度更加的細化
import java.util.Date;
import java.util.concurrent.LinkedBlockingDeque;
import java.util.concurrent.ThreadPoolExecutor;
import java.util.concurrent.TimeUnit;
import java.util.concurrent.locks.ReentrantReadWriteLock;
/**
 * user:ypc;
 * date:2021-06-14;
 * time: 11:42;
 */
public class ThreadDemo4 {
    //創建讀寫鎖
    public static void main(String[] args) {
        ReentrantReadWriteLock readWriteLock = new ReentrantReadWriteLock();
        //讀鎖
        ReentrantReadWriteLock.ReadLock readLock = readWriteLock.readLock();
        //寫鎖
        ReentrantReadWriteLock.WriteLock writeLock = readWriteLock.writeLock();
        ThreadPoolExecutor threadPoolExecutor = new ThreadPoolExecutor(10, 10, 1000,
                TimeUnit.MILLISECONDS, new LinkedBlockingDeque<>(100), new ThreadPoolExecutor.DiscardPolicy());

        //任務一:讀鎖演示
        threadPoolExecutor.execute(new Runnable() {
            @Override
            public void run() {
                readLock.lock();
                try {
                    System.out.println(Thread.currentThread().getName() + "進入了讀鎖,時間:" + new Date());
                    Thread.sleep(1000);
                } catch (InterruptedException e) {
                    e.printStackTrace();
                } finally {
                    readLock.unlock();
                }
            }
        });
        //任務二:讀鎖演示
        threadPoolExecutor.execute(new Runnable() {
            @Override
            public void run() {
                readLock.lock();
                try {
                    System.out.println(Thread.currentThread().getName() + "進入了讀鎖,時間:" + new Date());
                    Thread.sleep(1000);
                } catch (InterruptedException e) {
                    e.printStackTrace();
                } finally {
                    readLock.unlock();
                }
            }
        });
        //任務三:寫鎖

        threadPoolExecutor.execute(new Runnable() {
            @Override
            public void run() {
                writeLock.lock();
                try {
                    System.out.println(Thread.currentThread().getName() + "進入了寫鎖,時間:" + new Date());
                    Thread.sleep(1000);
                } catch (InterruptedException e) {
                    e.printStackTrace();
                } finally {
                    writeLock.unlock();
                }
            }
        });
        //任務四:寫鎖

        threadPoolExecutor.execute(new Runnable() {
            @Override
            public void run() {
                writeLock.lock();
                try {
                    System.out.println(Thread.currentThread().getName() + "進入了寫鎖,時間:" + new Date());
                    Thread.sleep(1000);
                } catch (InterruptedException e) {
                    e.printStackTrace();
                } finally {
                    writeLock.unlock();
                }
            }
        });

    }
}
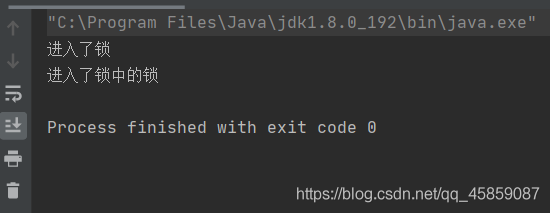
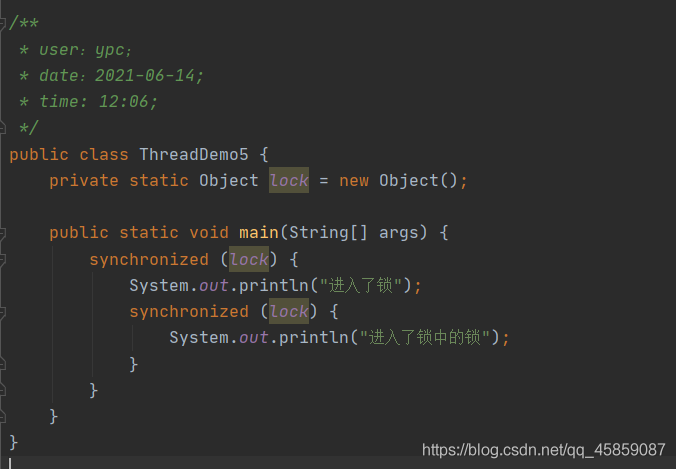
可重入鎖:
當一個線程擁有了鎖之后,可以重復的進入,就叫可重入鎖。
synchronzied就是典型的可重入鎖的代表
讀鎖的時間在一秒內,所以兩個線程讀到的鎖是一把鎖,即讀鎖是共享鎖
而寫鎖的時間剛好是一秒,所以寫鎖是獨占鎖。
自旋鎖:相當于死循環,一直嘗試獲取鎖
synchroized加鎖的整個過程,都是依賴于Monitor(監視器鎖)實現的,監視器鎖在虛擬機中又是根據操作系統的Metux Lock(互斥量)來實現的,這就導致在加鎖的過程中需要頻繁的在操作系統的內核態和和JVM級別的用戶態進行切換,并且涉及到線程上下文的切換,是比較消耗性能的。所以后來有一位大佬Doug Lea基于java實現了一個AQS的框架,提供了Lock鎖,性能遠遠高于synchroized。這就導致Oracle公司很沒有面子,因此他們在JDK1.6對synchroized做了優化,引入了偏向鎖和輕量級鎖。存在一個從無鎖-》偏向鎖–》輕量級鎖–》重量級鎖的升級過程,優化后性能就可以和Lock鎖的方式持平了。
對象頭
HotSpot虛擬機中,對象在內存中分為三塊區域:對象頭、實例數據和對齊填充。

對象頭包括兩部分:Mark Word 和 類型指針。類型指針是指向該對象所屬類對象的指針,我們不關注。mark word用于存儲對象的HashCode、GC分代年齡、鎖狀態等信息。在32位系統上mark word長度為32bit,64位系統上長度為64bit。他不是一個固定的數據結構,是和對象的狀態緊密相關,有一個對應關系的,具體如下表所示:
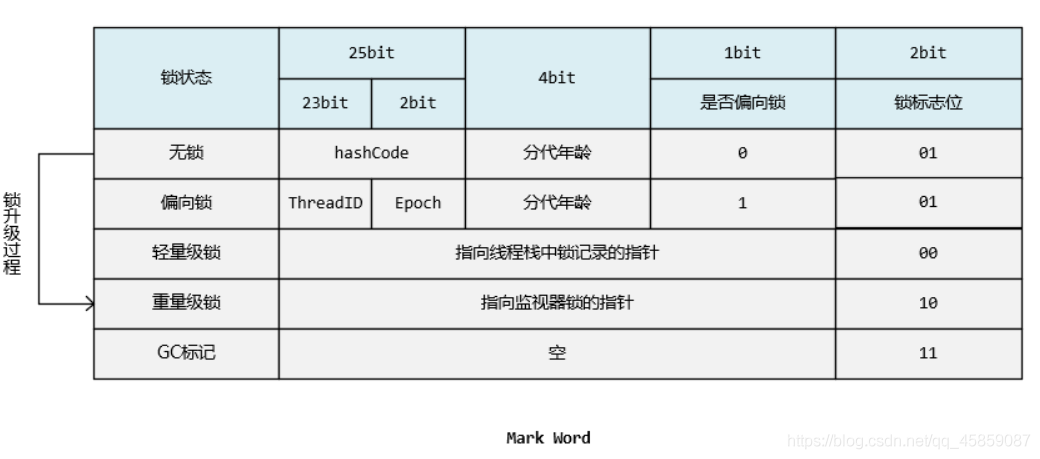
當某一線程第一次獲得鎖的時候,虛擬機會把對象頭中的鎖標志位設置為“01”,把偏向模式設置為“1”,表示進入偏向鎖模式。同時使用CAS操作將獲取到這個鎖的線程的ID記錄在對象的Mark Word中。如果CAS操作成功,持有偏向鎖的線程每次進入這個鎖的相關的同步塊的時候。虛擬機都可以不在進行任何的同步操作。
當其他線程進入同步塊時,發現已經有偏向的線程了,偏向模式馬上結束。根據鎖對象目前是否處于被鎖定的狀態決定是否撤銷偏向,也就是將偏向模式設置為“0”,撤銷后標志位恢復到“01”,也就是未鎖定的狀態或者輕量級鎖定,標志位為“00”的狀態,后續的同步操作就按照下面的輕量級鎖那樣去執行
1、在線程進入同步塊的時候,如果同步對象狀態為無鎖狀態(鎖標志為 01),虛擬機首先將在當前線程的棧幀中建立一個名為鎖記錄的空間,用來存儲鎖對象目前的 Mark Word 的拷貝。拷貝成功后,虛擬機將使用 CAS 操作嘗試將對象的 Mark Word 更新為指向 Lock Record 的指針,并將 Lock Record 里的 owner 指針指向鎖對象的 Mark Word。如果更新成功,則執行 2,否則執行 3。

2、如果這個更新動作成功了,那么這個線程就擁有了該對象的鎖,并且鎖對象的 Mark Word 中的鎖標志位設置為 “00”,即表示此對象處于輕量級鎖定狀態,這時候虛擬機線程棧與堆中鎖對象的對象頭的狀態如圖所示。
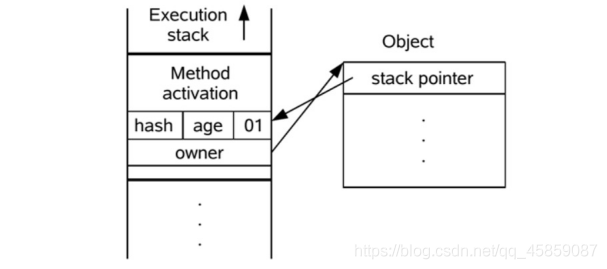
3、如果這個更新操作失敗了,虛擬機首先會檢查鎖對象的 Mark Word 是否指向當前線程的棧幀,如果是就說明當前線程已經擁有了這個對象的鎖,那就可以直接進入同步塊繼續執行。否則說明多個線程競爭鎖,輕量級鎖就要膨脹為重要量級鎖,鎖標志的狀態值變為 “10”,Mark Word 中存儲的就是指向重量級鎖的指針,后面等待鎖的線程也要進入阻塞狀態。而當前線程便嘗試使用自旋來獲取鎖。自旋失敗后膨脹為重量級鎖,被阻塞。
在java中,使用了synchronized關鍵字和Lock鎖實現了資源的并發訪問控制,在同一時間只允許唯一了線程進入臨界區訪問資源(讀鎖除外),這樣子控制的主要目的是為了解決多個線程并發同一資源造成的數據不一致的問題。也就是做限流的作用
Semaphore是用來保護一個或者多個共享資源的訪問,Semaphore內部維護了一個計數器,其值為可以訪問的共享資源的個數。一個線程要訪問共享資源,先獲得信號量,如果信號量的計數器值大于1,意味著有共享資源可以訪問,則使其計數器值減去1,再訪問共享資源。
如果計數器值為0,線程進入休眠。當某個線程使用完共享資源后,釋放信號量,并將信號量內部的計數器加1,之前進入休眠的線程將被喚醒并再次試圖獲得信號量。
就好比一個廁所管理員,站在門口,只有廁所有空位,就開門允許與空側數量等量的人進入廁所。多個人進入廁所后,相當于N個人來分配使用N個空位。為避免多個人來同時競爭同一個側衛,在內部仍然使用鎖來控制資源的同步訪問。
Semaphore使用時需要先構建一個參數來指定共享資源的數量,Semaphore構造完成后即是獲取Semaphore、共享資源使用完畢后釋放Semaphore。
使用Semaphore 來模擬有四輛車同時到達了停車場的門口,但是停車位只有兩個,也就是只能停兩輛車,這就可以使用信號量來實現。?:
import java.util.concurrent.LinkedBlockingDeque;
import java.util.concurrent.Semaphore;
import java.util.concurrent.ThreadPoolExecutor;
import java.util.concurrent.TimeUnit;
/**
 * user:ypc;
 * date:2021-06-14;
 * time: 14:00;
 */
public class ThreadDemo6 {
    public static void main(String[] args) {
        Semaphore semaphore = new Semaphore(2);
        ThreadPoolExecutor threadPoolExecutor = new ThreadPoolExecutor(10, 10, 200,
                TimeUnit.MILLISECONDS, new LinkedBlockingDeque<>(100), new ThreadPoolExecutor.DiscardPolicy());

        threadPoolExecutor.execute(new Runnable() {
            @Override
            public void run() {
                System.out.println(Thread.currentThread().getName() + "到達了停車場");
                try {
                    Thread.sleep(1000);
                    semaphore.acquire();
                    System.out.println(Thread.currentThread().getName() + "進入了停車場");
                } catch (InterruptedException e) {
                    e.printStackTrace();
                }

                try {
                    Thread.sleep(1000);

                } catch (InterruptedException e) {
                    e.printStackTrace();
                }
                System.out.println(Thread.currentThread().getName() + "出了了停車場");
                semaphore.release();
            }
        });
        threadPoolExecutor.execute(new Runnable() {
            @Override
            public void run() {
                System.out.println(Thread.currentThread().getName() + "到達了停車場");
                try {
                    Thread.sleep(1000);
                    semaphore.acquire();
                    System.out.println(Thread.currentThread().getName() + "進入了停車場");
                } catch (InterruptedException e) {
                    e.printStackTrace();
                }
                try {
                    Thread.sleep(2000);

                } catch (InterruptedException e) {
                    e.printStackTrace();
                }
                System.out.println(Thread.currentThread().getName() + "出了了停車場");
                semaphore.release();

            }
        });
        threadPoolExecutor.execute(new Runnable() {
            @Override
            public void run() {
                System.out.println(Thread.currentThread().getName() + "到達了停車場");
                try {
                    Thread.sleep(1000);
                    semaphore.acquire();
                    System.out.println(Thread.currentThread().getName() + "進入了停車場");
                } catch (InterruptedException e) {
                    e.printStackTrace();
                }

                try {
                    Thread.sleep(500);

                } catch (InterruptedException e) {
                    e.printStackTrace();
                }
                System.out.println(Thread.currentThread().getName() + "出了了停車場");
                semaphore.release();
            }
        });
        threadPoolExecutor.execute(new Runnable() {
            @Override
            public void run() {
                System.out.println(Thread.currentThread().getName() + "到達了停車場");
                try {
                    Thread.sleep(1000);
                    semaphore.acquire();
                    System.out.println(Thread.currentThread().getName() + "進入了停車場");
                } catch (InterruptedException e) {
                    e.printStackTrace();
                }

                try {
                    Thread.sleep(1500);

                } catch (InterruptedException e) {
                    e.printStackTrace();
                }
                System.out.println(Thread.currentThread().getName() + "出了了停車場");
                semaphore.release();
            }
        });
        threadPoolExecutor.shutdown();
    }
}
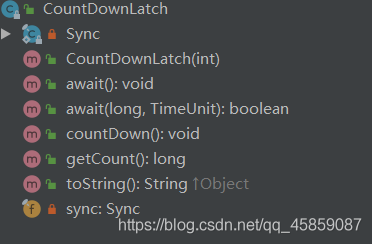
一個可以用來協調多個線程之間的同步,或者說起到線程之間的通信作用的工具類。
它能夠使一個線程在等待另外一些線程完成各自工作之后,再繼續執行。使用一個計數器進行實現。計數器初始值為線程的數量。當每一個線程完成自己任務后,計數器的值就會減一。當計數器的值為0時,表示所有的線程都已經完成了任務,然后在CountDownLatch上等待的線程就可以恢復執行任務。
某一線程在開始運行前等待n個線程執行完畢。
將CountDownLatch的計數器初始化為n:new CountDownLatch(n) ,每當一個任務線程執行完畢,就將計數器減1,
countdownlatch.countDown(),當計數器的值變為0時,在CountDownLatch上 await() 的線程就會被喚醒。一個典型應用場景就是啟動一個服務時,主線程需要等待多個組件加載完畢,之后再繼續執行。
實現多個線程開始執行任務的最大并行性。注意是并行性,不是并發,強調的是多個線程在某一時刻同時開始執行。做法是初始化一個共享的CountDownLatch(1),將其計數器初始化為1,多個線程在開始執行任務前首先 coundownlatch.await(),當主線程調用 countDown() 時,計數器變為0,多個線程同時被喚醒。
CountDownLatch是一次性的,計數器的值只能在構造方法中初始化一次,之后沒有任何機制再次對其設置值,當CountDownLatch使用完畢后,它不能再次被使用。
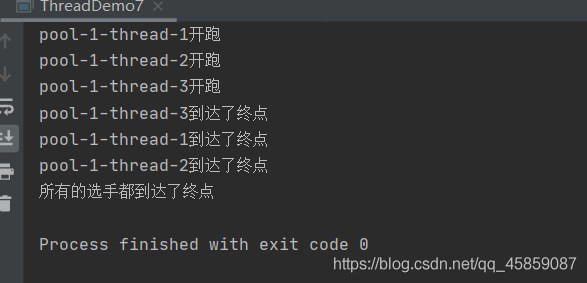
模擬賽跑:當三個運動員都到達終點的時候宣布比賽結束
import java.util.Random;
import java.util.concurrent.*;
/**
* user:ypc;
* date:2021-06-14;
* time: 14:27;
*/
public class ThreadDemo7 {
public static void main(String[] args) throws InterruptedException {
CountDownLatch countDownLatch = new CountDownLatch(3);
ThreadPoolExecutor threadPoolExecutor = new ThreadPoolExecutor(10, 10, 200,
TimeUnit.MILLISECONDS, new LinkedBlockingDeque<>(100));
threadPoolExecutor.execute(new Runnable() {
@Override
public void run() {
System.out.println(Thread.currentThread().getName() + "開跑");
int num = new Random().nextInt(4);
num += 1;
try {
Thread.sleep(1000*num);
} catch (InterruptedException e) {
e.printStackTrace();
}
System.out.println(Thread.currentThread().getName() + "到達了終點");
countDownLatch.countDown();
}
});
countDownLatch.await();
System.out.println("所有的選手都到達了終點");
threadPoolExecutor.shutdown();
}
}
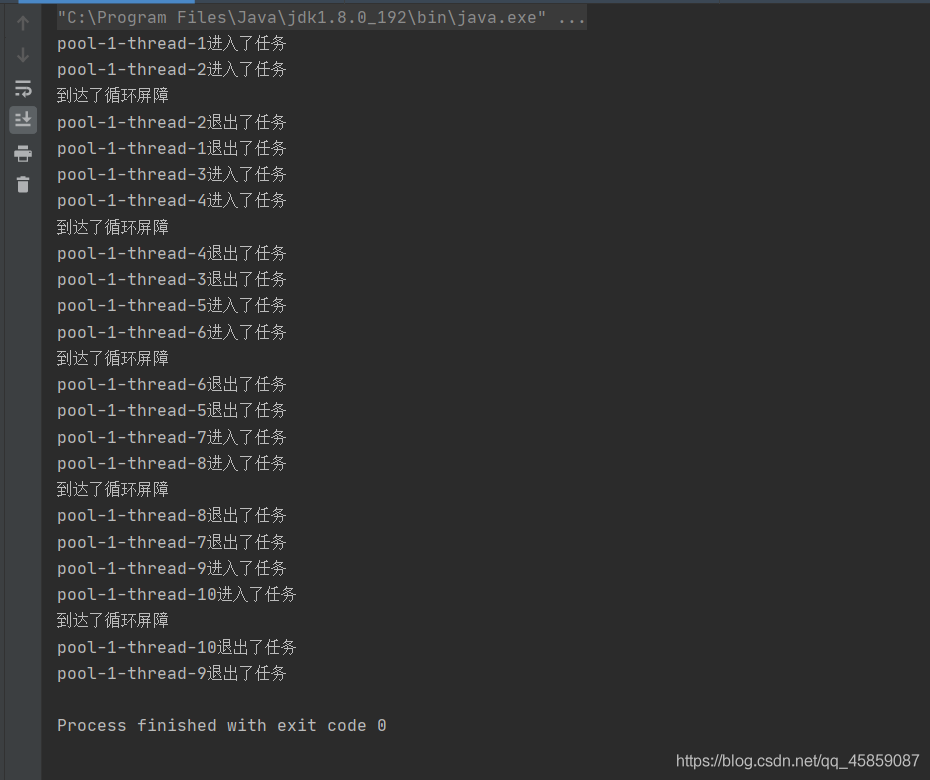
CyclicBarrier 的字面意思是可循環(Cyclic)使用的屏障(Barrier)。它要做的事情是,讓一組線程到達一個屏障(也可以叫同步點)時被阻塞,直到最后一個線程到達屏障時,屏障才會開門,所有被屏障攔截的線程才會繼續干活。線程進入屏障通過CyclicBarrier的await()方法。
CyclicBarrier默認的構造方法是CyclicBarrier(int parties),其參數表示屏障攔截的線程數量,每個線程調用await方法告訴CyclicBarrier我已經到達了屏障,然后當前線程被阻塞。
import java.util.concurrent.*;
/**
 * user:ypc;
 * date:2021-06-14;
 * time: 15:03;
 */
public class ThreadDemo8 {
    public static void main(String[] args) {
        CyclicBarrier cyclicBarrier = new CyclicBarrier(2, new Runnable() {
            @Override
            public void run() {
                System.out.println("到達了循環屏障");
            }
        });
        ThreadPoolExecutor threadPoolExecutor = new ThreadPoolExecutor(10, 10, 200,
                TimeUnit.MILLISECONDS, new LinkedBlockingDeque<>(100));
        for (int i = 0; i < 10; i++) {
            int finalI = i;
            threadPoolExecutor.execute(new Runnable() {
                @Override
                public void run() {
                    try {
                        Thread.sleep(finalI * 1000);
                    } catch (InterruptedException e) {
                        e.printStackTrace();
                    }
                    System.out.println(Thread.currentThread().getName() + "進入了任務");
                    try {
                        cyclicBarrier.await();
                    } catch (InterruptedException e) {
                        e.printStackTrace();
                    } catch (BrokenBarrierException e) {
                        e.printStackTrace();
                    }
                    System.out.println(Thread.currentThread().getName() + "退出了任務");
                }
            });
        }

        threadPoolExecutor.shutdown();
    }
}
每當線程執行await,內部變量count減1,如果count!= 0,說明有線程還未到屏障處,則在鎖條件變量trip上等待。
當count == 0時,說明所有線程都已經到屏障處,執行條件變量的signalAll方法喚醒等待的線程。
其中 nextGeneration方法可以實現屏障的循環使用:
重新生成Generation對象
恢復count值
CyclicBarrier可以循環的使用。
來看?JDK1.7 hashMap transfer的源碼
void transfer(Entry[] newTable, boolean rehash) {
        int newCapacity = newTable.length;
        for (Entry<K,V> e : table) {
            while(null != e) {
                Entry<K,V> next = e.next;
                if (rehash) {
                    e.hash = null == e.key ? 0 : hash(e.key);
                }
                int i = indexFor(e.hash, newCapacity);
                e.next = newTable[i];
                newTable[i] = e;
                e = next;
            }
        }
    }
來看多線程情況下的問題:
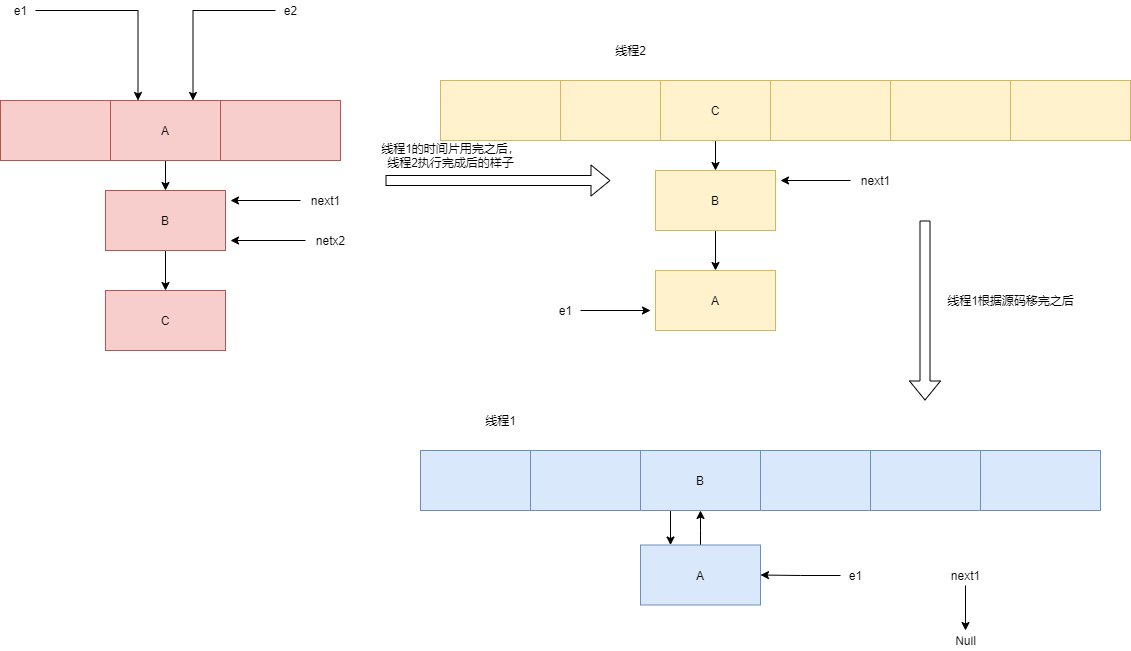
這樣就會造成死循環。
hashmap在JDK1.8中值覆蓋問題
在JDK1.8的時候使用的是尾插法來看?:
final V putVal(int hash, K key, V value, boolean onlyIfAbsent,
                   boolean evict) {
        Node<K,V>[] tab; Node<K,V> p; int n, i;
        if ((tab = table) == null || (n = tab.length) == 0)
            n = (tab = resize()).length;
        if ((p = tab[i = (n - 1) & hash]) == null) // 如果沒有hash碰撞則直接插入元素
            tab[i] = newNode(hash, key, value, null);
        else {
            Node<K,V> e; K k;
            if (p.hash == hash &&
                ((k = p.key) == key || (key != null && key.equals(k))))
                e = p;
            else if (p instanceof TreeNode)
                e = ((TreeNode<K,V>)p).putTreeVal(this, tab, hash, key, value);
            else {
                for (int binCount = 0; ; ++binCount) {
                    if ((e = p.next) == null) {
                        p.next = newNode(hash, key, value, null);
                        if (binCount >= TREEIFY_THRESHOLD - 1) // -1 for 1st
                            treeifyBin(tab, hash);
                        break;
                    }
                    if (e.hash == hash &&
                        ((k = e.key) == key || (key != null && key.equals(k))))
                        break;
                    p = e;
                }
            }
            if (e != null) { // existing mapping for key
                V oldValue = e.value;
                if (!onlyIfAbsent || oldValue == null)
                    e.value = value;
                afterNodeAccess(e);
                return oldValue;
            }
        }
        ++modCount;
        if (++size > threshold)
            resize();
        afterNodeInsertion(evict);
        return null;
    }
在多線程的情況下:
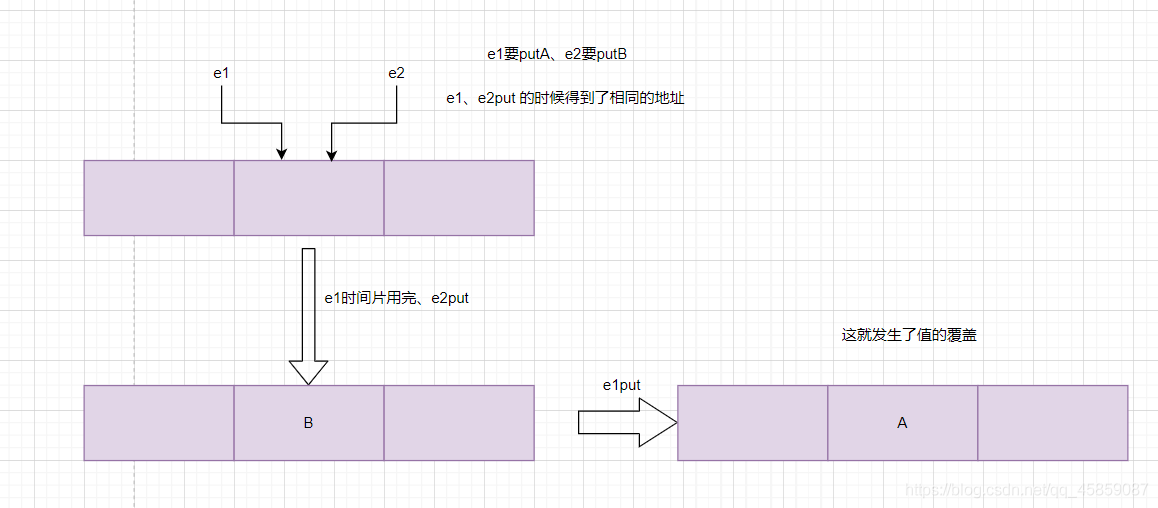
其中第六行代碼是判斷是否出現hash碰撞,假設兩個線程1、2都在進行put操作,并且hash函數計算出的插入下標是相同的,當線程1執行完第六行代碼后由于時間片耗盡導致被掛起,而線程2得到時間片后在該下標處插入了元素,完成了正常的插入,然后線程A獲得時間片,由于之前已經進行了hash碰撞的判斷,所有此時不會再進行判斷,而是直接進行插入,這就導致了線程2插入的數據被線程1覆蓋了,從而線程不安全。
除此之前,還有就是代碼的第38行處有個++size,我們這樣想,還是線程1、2,這兩個線程同時進行put操作時,假設當前HashMap的zise大小為10,當線程1執行到第38行代碼時,從主內存中獲得size的值為10后準備進行+1操作,但是由于時間片耗盡只好讓出CPU,線程2快樂的拿到CPU還是從主內存中拿到size的值10進行+1操作,完成了put操作并將size=11寫回主內存,然后線程1再次拿到CPU并繼續執行(此時size的值仍為10),當執行完put操作后,還是將size=11寫回內存,此時,線程1、2都執行了一次put操作,但是size的值只增加了1,所有說還是由于數據覆蓋又導致了線程不安全。
感謝你能夠認真閱讀完這篇文章,希望小編分享的“Java中單例模式與多線程的示例分析”這篇文章對大家有幫助,同時也希望大家多多支持億速云,關注億速云行業資訊頻道,更多相關知識等著你來學習!
免責聲明:本站發布的內容(圖片、視頻和文字)以原創、轉載和分享為主,文章觀點不代表本網站立場,如果涉及侵權請聯系站長郵箱:is@yisu.com進行舉報,并提供相關證據,一經查實,將立刻刪除涉嫌侵權內容。