您好,登錄后才能下訂單哦!
您好,登錄后才能下訂單哦!
本篇內容主要講解“將google/pprof集成在已有服務中的方法”,感興趣的朋友不妨來看看。本文介紹的方法操作簡單快捷,實用性強。下面就讓小編來帶大家學習“將google/pprof集成在已有服務中的方法”吧!
寫一個監控服務 monitor server,用于分析 etcd 中注冊的服務的狀態。項目中的大多數服務都已經引入了 pprof 庫,想要查看這些服務的 /debug/pprof 只需要走一層代理即可,這里用官方 httputil 庫中的 httputil.NewSingleHostReverseProxy。
func proxy(w http.ResponseWriter, r *http.Request) {

	_ = r.ParseForm()

	URL := r.Form.Get("url")
	profile := r.Form.Get("profile")

	target, _ := url.Parse("http://" + URL + "/debug/pprof/" + profile + "?debug=1")

	proxy := httputil.NewSingleHostReverseProxy(target)

	proxy.Director = func(req *http.Request) {
		req.URL.Scheme = target.Scheme
		req.URL.Host = target.Host
		req.URL.Path = target.Path
		req.URL.RawQuery = target.RawQuery
		if _, ok := req.Header["User-Agent"]; !ok {
			// explicitly disable User-Agent so it's not set to default value
			req.Header.Set("User-Agent", "")
		}
	}

	r.Host = r.URL.Host
	proxy.ServeHTTP(w, r)
}
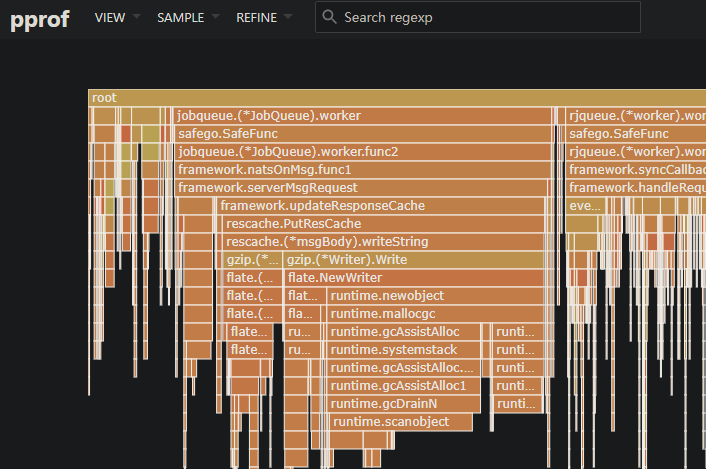
到這里這個需求已經完成了 90%,可是到目前為止想要看火焰圖就一定要先把 profile 文件下載到本地,再使用 pprof 或者 go tool pprof。
那么有沒有辦法將 pprof 集成到現有服務中呢?當然有,我們先從 pprof 的 main 函數開始,注意是 google/pprof 庫。
func main() {
	if err := driver.PProf(&driver.Options{UI: newUI()}); err != nil {
		fmt.Fprintf(os.Stderr, "pprof: %v\n", err)
		os.Exit(2)
	}
}
可以看到官方提供了 option,完整的 option 包括:
// Options groups all the optional plugins into pprof.
type Options struct {
	Writer        Writer
	Flagset       FlagSet
	Fetch         Fetcher
	Sym           Symbolizer
	Obj           ObjTool
	UI            UI
	HTTPServer    func(*HTTPServerArgs) error
	HTTPTransport http.RoundTripper
}
這些 option 并不需要全部更改,我們分開來講。
UI 接口 UI: newUI() 直接去掉,它主要用于終端交互控制。
// A FlagSet creates and parses command-line flags.
// It is similar to the standard flag.FlagSet.
type FlagSet interface {

	Bool(name string, def bool, usage string) *bool
	Int(name string, def int, usage string) *int
	Float64(name string, def float64, usage string) *float64
	String(name string, def string, usage string) *string

	BoolVar(pointer *bool, name string, def bool, usage string)
	IntVar(pointer *int, name string, def int, usage string)
	Float64Var(pointer *float64, name string, def float64, usage string)
	StringVar(pointer *string, name string, def string, usage string)

	StringList(name string, def string, usage string) *[]*string

	ExtraUsage() string

	AddExtraUsage(eu string)

	Parse(usage func()) []string
}
正如字面意思,這個接口用來解析 flag。由于我們不想將 flag 寫在現有服務的執行腳本中,所以我們需要實現一個自定義的 Flagset 結構體。同時,還要解決 go 不支持重復定義 flag 的問題。
結構體的內容根據所需要傳入的參數為準,不同的項目可能不一樣。
// GoFlags implements the plugin.FlagSet interface.
type GoFlags struct {
	UsageMsgs []string
	Profile   string
	Http      string
	NoBrowser bool
}需要改動的參數通過結構體內的變量傳入,不需要的可以直接寫死。
// Bool implements the plugin.FlagSet interface.
func (f *GoFlags) Bool(o string, d bool, c string) *bool {

	switch o {
	case "no_browser":
		return &f.NoBrowser
	case "trim":
		t := true
		return &t
	case "flat":
		t := true
		return &t
	case "functions":
		t := true
		return &t
	}

	return new(bool)
}參數的默認值可以在 google/pprof/internal/driver/commands.go 中查找。
// Int implements the plugin.FlagSet interface.
func (*GoFlags) Int(o string, d int, c string) *int {

	switch o {
	case "nodecount":
		t := -1
		return &t
	}

	return new(int)
}// Float64 implements the plugin.FlagSet interface.
func (*GoFlags) Float64(o string, d float64, c string) *float64 {
switch o {
case "divide_by":
t := 1.0
return &t
case "nodefraction":
t := 0.005
return &t
case "edgefraction":
t := 0.001
return &t
}
return new(float64)
}注意有一些默認值是必須賦值的,否則無法正常展示圖片。
// String implements the plugin.FlagSet interface.
func (f *GoFlags) String(o, d, c string) *string {

	switch o {
	case "http":
		return &f.Http
	case "unit":
		t := "minimum"
		return &t

	}

	return new(string)
}Parse 方法返回文件名即可,不需要解析參數。
// Parse implements the plugin.FlagSet interface.
func (f *GoFlags) Parse(usage func()) []string {
	// flag.Usage = usage
	// flag.Parse()
	// args := flag.Args()
	// if len(args) == 0 {
	// 	usage()
	// }
	return []string{f.Profile}
}// StringList implements the plugin.FlagSet interface.
func (*GoFlags) StringList(o, d, c string) *[]*string {
return &[]*string{new(string)}
}到此為止,第一個 option 改動完成。
if err := driver.PProf(&driver.Options{
		Flagset: &internal.GoFlags{
			Profile:   profilePath + profile,
			Http:      "127.0.0.1:" + strconv.Itoa(internal.ListenPort),
			NoBrowser: true,
		}}); err != nil {
    fmt.Fprintf(os.Stderr, "pprof: %v\n", err)
    os.Exit(2)
}如果不注冊 HTTPServer 函數,pprof 會使用默認的 defaultWebServer。
func defaultWebServer(args *plugin.HTTPServerArgs) error {
	ln, err := net.Listen("tcp", args.Hostport)
	if err != nil {
		return err
	}
	isLocal := isLocalhost(args.Host)
	handler := http.HandlerFunc(func(w http.ResponseWriter, req *http.Request) {
		if isLocal {
			// Only allow local clients
			host, _, err := net.SplitHostPort(req.RemoteAddr)
			if err != nil || !isLocalhost(host) {
				http.Error(w, "permission denied", http.StatusForbidden)
				return
			}
		}
		h := args.Handlers[req.URL.Path]
		if h == nil {
			// Fall back to default behavior
			h = http.DefaultServeMux
		}
		h.ServeHTTP(w, req)
	})

	mux := http.NewServeMux()
	mux.Handle("/ui/", http.StripPrefix("/ui", handler))
	mux.Handle("/", redirectWithQuery("/ui"))
	s := &http.Server{Handler: mux}
	return s.Serve(ln)
}可以看到,在默認情況下,pprof 會自動監聽。然而我們的服務已經啟動監聽,這些代碼可以直接刪掉,包括路由部分,建議寫成項目同樣的形式。
handler 首先判斷請求是否為本地請求,然后根據 path 注冊對應的 handler。由于我們在上一步刪除了路由部分 mux.Handle(),這些代碼同樣可以刪除。
需要注意的是,handler 是不可以重復注冊的,為此我們需要加一個標志位。
到此為止,第二個 option 完成。
var switcher bool
if err := driver.PProf(&driver.Options{
		Flagset: &internal.GoFlags{
			Profile:   profilePath + profile,
			Http:      "127.0.0.1:" + strconv.Itoa(internal.ListenPort),
			NoBrowser: true,
        },
        HTTPServer: func(args *driver.HTTPServerArgs) error {

			if switcher {
				return nil
			}

			for k, v := range args.Handlers {
				http.Handle("/ui"+k, v)
			}
			switcher = true

			return nil
		}}); err != nil {
    fmt.Fprintf(os.Stderr, "pprof: %v\n", err)
    os.Exit(2)
}我們對以上得到的代碼打包,將其寫入 http 接口中。
func readProfile(w http.ResponseWriter, r *http.Request) {

	_ = r.ParseForm()

	go pprof("profile")

	time.Sleep(time.Second * 3)

	http.Redirect(w, r, "/ui/", http.StatusTemporaryRedirect)

	return

}
在啟動 pprof 后,延遲三秒再重定向到 pprof 界面。
表面上,這個需求已經做完了,但是。。。
以上 pprof 是一次性的,在更換 profile 后重新讀取生成的 webInterface 并不會重新注冊到 handler 中。
為了解決最后的這個問題,我們不得不更改 pprof 源碼。對此我是抗拒的,不是不會改,也不是不好改,主要是 pprof 放在公司通用的 vendor 庫中,我害怕影響到別的項目(為此我提交了一個 feature 給官方庫,希望能有更好的解決方法)。
在 internal/driver/webui.go 下進行如下改動,使 webI 可以被復用。
var webI = new(webInterface)

func makeWebInterface(p *profile.Profile, opt *plugin.Options) *webInterface {
	templates := template.New("templategroup")
	addTemplates(templates)
	report.AddSourceTemplates(templates)

	webI.prof = p
	webI.options = opt
	webI.help = make(map[string]string)
	webI.templates = templates

	return webI
}
至此,我們終于可以順爽的看到火焰圖啦。

到此,相信大家對“將google/pprof集成在已有服務中的方法”有了更深的了解,不妨來實際操作一番吧!這里是億速云網站,更多相關內容可以進入相關頻道進行查詢,關注我們,繼續學習!
免責聲明:本站發布的內容(圖片、視頻和文字)以原創、轉載和分享為主,文章觀點不代表本網站立場,如果涉及侵權請聯系站長郵箱:is@yisu.com進行舉報,并提供相關證據,一經查實,將立刻刪除涉嫌侵權內容。