您好,登錄后才能下訂單哦!
您好,登錄后才能下訂單哦!
本篇內容主要講解“微信小程序模擬下拉菜單開發的方法”,感興趣的朋友不妨來看看。本文介紹的方法操作簡單快捷,實用性強。下面就讓小編來帶大家學習“微信小程序模擬下拉菜單開發的方法”吧!
一.知識點
1.實現動態顯示和隱藏某個控件
<view class="{{open?'display_show':'display_none'}}">列表1</view>
  data:{
    open:false
  },
  showitem:function(){
      this.setData({
          open:!this.data.open
      })
  },
.display_show{
display: block;
}
.display_none{
display: none;
}2.通過 data-* 和 e.target.dateset 傳遞參數
<view class="phone_personal">{{firstPerson}}</view>
<view class="select_one" bindtap="mySelect" data-me="吃">吃</view>
    this.setData({
             firstPerson:e.target.dataset.me,
       })
這時:firstPerson=吃
3.彈性盒字:display:flex;
<view class="phone_one" bindtap="clickPerson">
    <view class="phone_personal">{{firstPerson}}</view>
    <image src="../../image/i.png" class="personal_image {{selectArea ? 'rotateRight' :''}}"></image>
</view>
在父級:
display:flex;
justify-content:space-between;
這樣子集就會并列。justify-content:space-between;這樣子集就會分別在在倆頭
二.事列
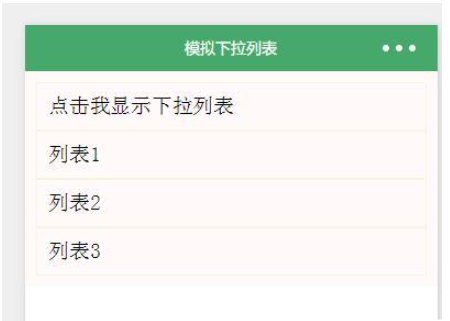
(1).下拉列表
1.wxml
<view class="page">
    <view class="page_bd">
        <view class="body_head" bindtap="showitem">點擊我顯示下拉列表</view>
        <navigator url="pages/list/list">
        	<view class="{{open?'display_show':'display_none'}}">列表1</view>
        </navigator>
        <navigator url="pages/scroll-view/index">
        	<view class="{{open?'display_show':'display_none'}}">列表2</view>
        </navigator>
        <navigator url="pages/scroll-view/index">
        	<view class="{{open?'display_show':'display_none'}}">列表3</view>
        </navigator>
    </view>
</view>
2.wxss
.page_bd{
    padding: 10px;
    background-color: snow;
}
.body_head{
    border: 1px solid;
    border-color: beige;
    padding: 10px;
}
.display_show{
    display: block;
    border: 1px solid;
    border-color: beige;
    padding: 10px;
}
.display_none{
    display: none;
}
3.js
Page({
  data:{
    open:false
  },
  showitem:function(){
      this.setData({
          open:!this.data.open
      })
  },
  onLoad:function(options){
    // 頁面初始化 options為頁面跳轉所帶來的參數
  },
  onReady:function(){
    // 頁面渲染完成
  },
  onShow:function(){
    // 頁面顯示
  },
  onHide:function(){
    // 頁面隱藏
  },
  onUnload:function(){
    // 頁面關閉
  }
})
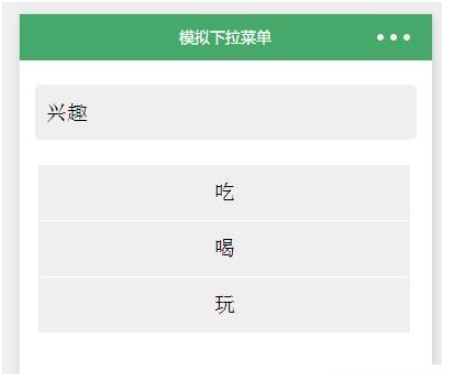
(2).下拉菜單
1.wxml
<view class="phone_one" bindtap="clickPerson">
    <view class="phone_personal">{{firstPerson}}</view>
    <image src="../../image/i.png" class="personal_image {{selectArea ? 'rotateRight' :''}}"></image>
</view>
<view class="person_box">
    <view class="phone_select" hidden="{{selectPerson}}">
        <view class="select_one" bindtap="mySelect" data-me="吃">吃</view>
        <view class="select_one" bindtap="mySelect" data-me="喝">喝</view>
        <view class="select_one" bindtap="mySelect" data-me="玩">玩</view>
    </view>
 </view>
2.wxss
phone_personal{
  width: 100%;
  color:rgb(34, 154, 181);
  height:100rpx;
  line-height:100rpx;
  text-align: center;
}
.phone_one{
    display:flex;
    position:relative;
    justify-content:space-between;
    background-color:rgb(239, 239, 239);
    width:90%;
    height:100rpx;
    margin:22px auto;
    border-radius:10rpx;
    border-bottom:2rpx solid rgb(255, 255, 255);
    line-height:51px;
    padding-left:10px;
}
.person_box{
  position: relative;
}
.phone_select{
  margin-top:0;
  z-index: 100;
  position: absolute;
}
.select_one{
  text-align: center;
  background-color:rgb(239, 239, 239);
  width:676rpx;
  height:100rpx;
  line-height:100rpx;
  margin:0 5%;
  border-bottom:2rpx solid rgb(255, 255, 255);
}
.personal_image{
  z-index: 100;
  position: absolute;
  right:2.5%;
  width: 34rpx;
  height: 20rpx;
  margin:40rpx 20rpx 40rpx 0;
  transition: All 0.4s ease;
  -webkit-transition: All 0.4s ease;
}
.rotateRight{
  transform: rotate(180deg);
}
3.js
Page({
  data:{
    selectPerson:true,
    firstPerson:'興趣',
    selectArea:false,
  },
  //點擊選擇類型
  clickPerson:function(){
    var selectPerson = this.data.selectPerson;
    if(selectPerson == true){
        this.setData({
        selectArea:true,
        selectPerson:false,
      })
    }else{
      this.setData({
        selectArea:false,
        selectPerson:true,
      })
    }
  } ,
  //點擊切換
  mySelect:function(e){
    this.setData({
      firstPerson:e.target.dataset.me,
      selectPerson:true,
      selectArea:false,
    })
  },
  onLoad:function(options){
  // 頁面初始化 options為頁面跳轉所帶來的參數
  },
  onReady:function(){
  // 頁面渲染完成
  },
  onShow:function(){
  // 頁面顯示
  },
  onHide:function(){
  // 頁面隱藏
  },
  onUnload:function(){
  // 頁面關閉
  }
})
到此,相信大家對“微信小程序模擬下拉菜單開發的方法”有了更深的了解,不妨來實際操作一番吧!這里是億速云網站,更多相關內容可以進入相關頻道進行查詢,關注我們,繼續學習!
免責聲明:本站發布的內容(圖片、視頻和文字)以原創、轉載和分享為主,文章觀點不代表本網站立場,如果涉及侵權請聯系站長郵箱:is@yisu.com進行舉報,并提供相關證據,一經查實,將立刻刪除涉嫌侵權內容。