您好,登錄后才能下訂單哦!
您好,登錄后才能下訂單哦!
本文小編為大家詳細介紹“Vue中如何全局注冊組件并引用”,內容詳細,步驟清晰,細節處理妥當,希望這篇“Vue中如何全局注冊組件并引用”文章能幫助大家解決疑惑,下面跟著小編的思路慢慢深入,一起來學習新知識吧。
1、正則判斷路徑以及文件名,獲取全部組件并全局注冊(可以直接在main.js里寫,但是為了規范以及后期可維護性,我們新建個單獨的的js文件寫入)
(1)main.js引入所有自定義封裝的組件
import Vue from 'vue';
import echarts from 'echarts';
import App from './App.vue';
import router from './router';
import store from './store';
import './plugins/element';
// 引入時間戳序列化
import './plugins/dateFormat';
// 引入公共樣式
import Public from './assets/css/public.css';
// 引入所有自定義封裝的組件
import './components/CommonCommponts/GlobalComponents';
import startup from './startup';

// 使用公共樣式
Vue.use(Public);

Vue.config.productionTip = false;
Vue.prototype.$echarts = echarts;

function vue() {
 new Vue({
 router,
 store,
 render: h => h(App)
 }).$mount('#app');
}
startup(vue, router);
(2)全局組件的GlobalComponents.js
這里需要安裝2個插件upperFirst和camelCase
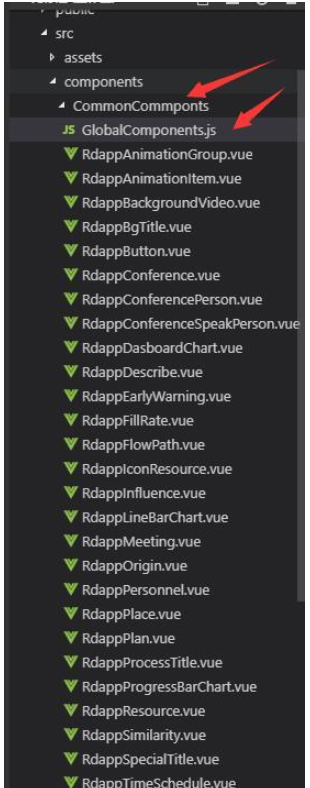
下面是組件相對于這個文件的路徑,因為我的封裝組件和這個js文件在同一級,所以直接 . 就可以了。
然后是是否查詢子目錄,即這個路徑下你又新建了文件夾,把各個組件區分開,那么就會嵌套很多層,查詢子目錄可以方便的使我們找到它們。
然后是正則表達式,因為我的所有組件名都是Rdapp開頭的,這里看大家的文件命名,不需要的話刪除前面的Rdapp即可。
然后下面的部分就可以不用動了。
import Vue from 'vue';
import upperFirst from 'lodash/upperFirst';
import camelCase from 'lodash/camelCase';

const requireComponent = require.context(
 // 其組件目錄的相對路徑
 '.',
 // 是否查詢其子目錄
 true,
 // 匹配基礎組件文件名的正則表達式
 /Rdapp[A-Z]\w+\.(vue|js)$/,
);

requireComponent.keys().forEach((fileName) => {
 // 獲取組件配置
 const componentConfig = requireComponent(fileName);

 // 獲取組件的 PascalCase 命名
 const componentName = upperFirst(
 camelCase(
  // 獲取和目錄深度無關的文件名
  fileName
  .split('/')
  .pop()
  .replace(/\.\w+$/, ''),
 ),
 );

 // 全局注冊組件
 Vue.component(
 componentName,
 // 如果這個組件選項是通過 `export default` 導出的,
 // 那么就會優先使用 `.default`,
 // 否則回退到使用模塊的根。
 componentConfig.default || componentConfig,
 );
});
2、組件封裝以及命名
這里新建了一個文件夾,其中js文件是上面的配置文件,用于全局注冊并引用的,然后下面是封裝的組件,請使用駝峰命名法。

3、組件引入
組件引入使用 - 語法,以每個駝峰為標記,例如AccBdd的命名,引入就是<acc-bdd></acc-bdd>即可
<template>
 <div class="ER-left-box">
 <rdapp-animation-group animationType="leftToRight">
  <!-- 標題一 -->
  <rdapp-animation-item speed="fast">
  <rdapp-title
   :textStyle="leftData.LeftTitle1"
   class="header-title"
  ></rdapp-title>
  </rdapp-animation-item>
  <!-- 火災警告 -->
  <rdapp-animation-item speed="slow">
  <rdapp-early-warning :textStyle="HandleEventInfo"></rdapp-early-warning>
  </rdapp-animation-item>
  <!-- 標題二 -->
  <rdapp-animation-item speed="fast">
  <rdapp-title
   :textStyle="leftData.LeftTitle2"
   class="header-title"
  ></rdapp-title>
  </rdapp-animation-item>
  <!-- 描述 -->
  <rdapp-animation-item speed="normal">
  <rdapp-describe
   :textStyle="{ description: HandleEventInfo.description }"
  ></rdapp-describe>
  </rdapp-animation-item>
  <!-- 視頻 -->
  <rdapp-animation-item speed="slow">
  <rdapp-video ref="video" :cameraNum="0"></rdapp-video>
  </rdapp-animation-item>
 </rdapp-animation-group>
 </div>
</template>
這樣我們就完成了組件的封裝以及所有組件的全局注冊和使用,便于我們的開發以及后期可維護性。
這里附帶一個組件的封裝寫法:
這里封裝的是一個標題的組件,為了方便用戶傳參,使用了對象作為參數,通過計算屬性以及Object.assign方法,可以更方便的合并用戶傳遞的參數,即如果用戶只在對象中傳入了text屬性,那么其他屬性就會使用默認值,這樣無疑提高了組件的豐富性。
<template>
 <div class="BgTitle-box" :>
 {{getStyle.text}}
 </div>
</template>

<script>
export default {
 name: 'RdappBgTitle',
 props: {
 textStyle: Object,
 },
 computed: {
 getStyle() {
  return Object.assign({
  text: '基本信息',
  width: '300px',
  height: '54px',
  lineHeight: '54px',
  textAlign: 'center',
  fontSize: '16px',
  fontColor: '#fff',
  }, this.textStyle);
 },
 },
};
</script>

<style scoped>
 .BgTitle-box{
 background: url("../../static/img/PreliminaryJudge/assess.png") no-repeat center center;
 }
</style>
讀到這里,這篇“Vue中如何全局注冊組件并引用”文章已經介紹完畢,想要掌握這篇文章的知識點還需要大家自己動手實踐使用過才能領會,如果想了解更多相關內容的文章,歡迎關注億速云行業資訊頻道。
免責聲明:本站發布的內容(圖片、視頻和文字)以原創、轉載和分享為主,文章觀點不代表本網站立場,如果涉及侵權請聯系站長郵箱:is@yisu.com進行舉報,并提供相關證據,一經查實,將立刻刪除涉嫌侵權內容。