您好,登錄后才能下訂單哦!
您好,登錄后才能下訂單哦!
這篇文章主要介紹“怎么使用nginx+tomcat實現靜態和動態頁面的分離”,在日常操作中,相信很多人在怎么使用nginx+tomcat實現靜態和動態頁面的分離問題上存在疑惑,小編查閱了各式資料,整理出簡單好用的操作方法,希望對大家解答”怎么使用nginx+tomcat實現靜態和動態頁面的分離”的疑惑有所幫助!接下來,請跟著小編一起來學習吧!
實驗環境:windows
實驗工具:nginx、tomcat
windows下安裝nginx非常簡單,去官網下載壓縮包解壓后并且雙擊解壓目錄下的nginx.exe程序即可。然后在瀏覽器輸入localhost可出現下圖,即表示nginx已經在工作。

nginx的工作流程是:對外,nginx是一個服務器,所有的請求都先請求到nginx,然后再由nginx對內網進行請求的分發到tomcat,然后tomcat處理完請求后將數據發送給nginx,然后由nginx發送給用戶,整個過程對用戶的感覺就是nginx在處理用戶請求。既然這樣子,nginx肯定需要進行配置,主要的配置文件是conf文件夾下的nginx.conf,因為我主要是進行了靜態與動態分離,所以沒有進行靜態文件緩存,也沒有進行負載均衡的配置。
#user nobody;
worker_processes 2;

#error_log logs/error.log;
#error_log logs/error.log notice;
#error_log logs/error.log info;

#pid    logs/nginx.pid;


events {
  #nginx默認最大并發數是1024個用戶線程
  worker_connections 1024;
}


http {
  include    mime.types;
  default_type application/octet-stream;

  #log_format main '$remote_addr - $remote_user [$time_local] "$request" '
  #         '$status $body_bytes_sent "$http_referer" '
  #         '"$http_user_agent" "$http_x_forwarded_for"';

  #access_log logs/access.log main;

  sendfile    on;
  #tcp_nopush   on;

  #keepalive_timeout 0;
  #http1.1在請求完之后還會保留一段時間的連接,所以這里的timeout時長不能太大,也不能太小,
  #太小每次都要建立連接,太大會浪費系統資源(用戶不再請求服務器)
  keepalive_timeout 65;

  #gzip on;

  server {
  #nginx監聽80端口
    listen    80;
    server_name localhost;

    #charset koi8-r;

    #access_log logs/host.access.log main;
  #這里的/表示所有的請求
    #location / {
    #將80端口的所有請求都轉發到8080端口去處理,proxy_pass代表的是代理路徑
   #  proxy_pass http://localhost:8080;
     # root  html;
      # index index.html index.htm;
    #}

  #對項目名進行訪問就去訪問tomcat服務
  location /student_vote {
      proxy_pass http://localhost:8080;
  }

  #對jsp和do結尾的url也去訪問tomcat服務
  location ~ \.(jsp|do)$ {
      proxy_pass http://localhost:8080;
  }

  #對js、css、png、gif結尾的都去訪問根目錄下查找
  location ~ \.(js|css|png|gif)$ {
      root f:/javaweb;
  }


    #error_page 404       /404.html;

    # redirect server error pages to the static page /50x.html
    #
    error_page  500 502 503 504 /50x.html;
    location = /50x.html {
      root  html;
    }

    # proxy the php scripts to apache listening on 127.0.0.1:80
    #
    #location ~ \.php$ {
    #  proxy_pass  http://127.0.0.1;
    #}

    # pass the php scripts to fastcgi server listening on 127.0.0.1:9000
    #
    #location ~ \.php$ {
    #  root      html;
    #  fastcgi_pass  127.0.0.1:9000;
    #  fastcgi_index index.php;
    #  fastcgi_param script_filename /scripts$fastcgi_script_name;
    #  include    fastcgi_params;
    #}

    # deny access to .htaccess files, if apache's document root
    # concurs with nginx's one
    #
    #location ~ /\.ht {
    #  deny all;
    #}
  }


  # another virtual host using mix of ip-, name-, and port-based configuration
  #
  #server {
  #  listen    8000;
  #  listen    somename:8080;
  #  server_name somename alias another.alias;

  #  location / {
  #    root  html;
  #    index index.html index.htm;
  #  }
  #}


  # https server
  #
  #server {
  #  listen    443 ssl;
  #  server_name localhost;

  #  ssl_certificate   cert.pem;
  #  ssl_certificate_key cert.key;

  #  ssl_session_cache  shared:ssl:1m;
  #  ssl_session_timeout 5m;

  #  ssl_ciphers high:!anull:!md5;
  #  ssl_prefer_server_ciphers on;

  #  location / {
  #    root  html;
  #    index index.html index.htm;
  #  }
  #}

}
上面的配置中我把默認的location /給注釋掉了,因為它會攔截所有的請求,無論是動態還是靜態,還有一個就是對靜態文件的配置我配置成了javaweb的工作區間,接下來會說明為什么。
因為之前寫的項目一直以來都是使用jsp內置對象來進行目錄的文件訪問,但是使用了nginx一切都需要改變,當我使用了nginx,并且項目沒有進行路徑的修改的時候,總是無法加載靜態文件,查看日志發現這樣的錯誤:2016/05/20 18:27:30 [error] 6748#6936: *225 createfile() "f:/javaweb/student_vote/lib/images/username.png" failed (3: the system cannot find the path specified), client: 127.0.0.1, server: localhost, request: "get /student_vote/lib/images/username.png http/1.1", host: "localhost", referrer: "http://localhost/student_vote/index.jsp",大致信息是根據jsp中文件的配置,nginx將會從/stdent_vote(這是我的項目名)/lib/images包中查找靜態文件,而我又不想對項目文件做太大變化,其實還有一種方法是不使用jsp的內置對象,直接使用http://localhost/username.png來代替內置對象訪問靜態文件,但是這樣改要改很多的地方,所以我就直接將web-inf文件夾下的lib文件夾拷到上一個文件夾,也就是該文件夾和web-inf文件夾是兄弟文件夾的關系。
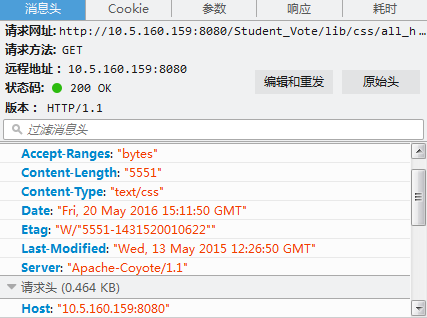
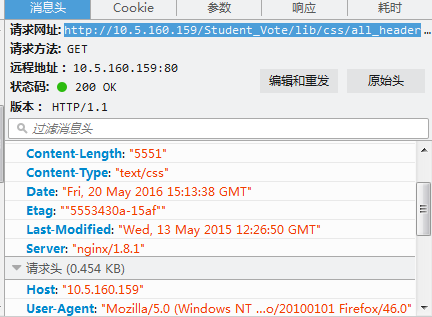
通過上述操作,就實現了動態與靜態的分離了,無圖無真相,下面展示效果圖。

上圖可以看到server是“apache-coyote/1.1”。tomcat的連接器就是這個。

而上面的server可以看到是nginx,說明對外而言接收請求的服務器是nginx。
到此,關于“怎么使用nginx+tomcat實現靜態和動態頁面的分離”的學習就結束了,希望能夠解決大家的疑惑。理論與實踐的搭配能更好的幫助大家學習,快去試試吧!若想繼續學習更多相關知識,請繼續關注億速云網站,小編會繼續努力為大家帶來更多實用的文章!
免責聲明:本站發布的內容(圖片、視頻和文字)以原創、轉載和分享為主,文章觀點不代表本網站立場,如果涉及侵權請聯系站長郵箱:is@yisu.com進行舉報,并提供相關證據,一經查實,將立刻刪除涉嫌侵權內容。