溫馨提示×
您好,登錄后才能下訂單哦!
點擊 登錄注冊 即表示同意《億速云用戶服務條款》
您好,登錄后才能下訂單哦!
這篇文章主要講解了“執行linux命令清理服務器緩存并返回結果怎么實現”,文中的講解內容簡單清晰,易于學習與理解,下面請大家跟著小編的思路慢慢深入,一起來研究和學習“執行linux命令清理服務器緩存并返回結果怎么實現”吧!
1、準備環境 idea spingboot 2.0
<dependencies> <dependency> <groupId>org.springframework.boot</groupId> <artifactId>spring-boot-starter</artifactId> </dependency> <dependency> <groupId>org.springframework.boot</groupId> <artifactId>spring-boot-devtools</artifactId> <scope>runtime</scope> <optional>true</optional> </dependency> <dependency> <groupId>org.apache.commons</groupId> <artifactId>commons-lang3</artifactId> <version>3.3.2</version> </dependency> <dependency> <groupId>ch.ethz.ganymed</groupId> <artifactId>ganymed-ssh3</artifactId> <version>build210</version> </dependency> <dependency> <groupId>org.projectlombok</groupId> <artifactId>lombok</artifactId> <optional>true</optional> </dependency> <dependency> <groupId>org.springframework.boot</groupId> <artifactId>spring-boot-starter-test</artifactId> <scope>test</scope> <exclusions> <exclusion> <groupId>org.junit.vintage</groupId> <artifactId>junit-vintage-engine</artifactId> </exclusion> </exclusions> </dependency></dependencies>
2.創建Boot啟動類
@SpringBootApplication
// 開啟定時任務
@EnableSchedulingpublic class SshtimedtaskApplication {public static void main(String[] args) {
        SpringApplication.run(SshtimedtaskApplication.class, args);    }

}
3、創建邏輯類
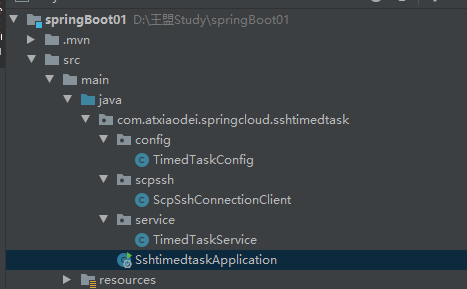
目錄結構化

根據spring ioc將定時任務注入容器,啟動即開啟
@Component@Slf4jpublic class TimedTaskConfig {

   @Resource   TimedTaskService timedTaskService;   //“0 15 10 ? * *” 測試 每天上午10:15觸發成功   @Scheduled(cron="0 0 23 * * ?") //每晚凌晨 23點觸發   public void clearLinuxProcess(){      log.info("獲取遠程服務器進程號開始:"+new Date());      String proceStr=timedTaskService.execGrepResult();//    String pro[]=proceStr.split(" ");      log.info("執行遠程服務器結束掉進程 kill -9 "+proceStr);      timedTaskService.execKileProcess(proceStr);   }

}
TimedTaskService 定時任務 邏輯類
@Slf4j@Servicepublic class TimedTaskService {
   // ps -ef | grep xxx.log | grep -v grep | awk '{print $2}' 查詢服務器上某個進程的進程號 這個我的是一個推送流的進程號   private static final String execFindGrep="ps -aux|grep rtsp_transport | grep -v grep | awk '{print $2}'";      private static final String killProcess="kill -9 ";
      public String execGrepResult(){      log.info("準備執行命令:"+execFindGrep);      return ScpSshConnectionClient.execute(execFindGrep);// 查詢返回的進程號   }
   public void execKileProcess(String cmd){      log.info("準備執行命令:"+killProcess+cmd);      ScpSshConnectionClient.execute(killProcess+cmd);// 這里批量處理   }


}
ssh連接服務器
/**
 * ClassName:ScpSshConnectionClient <br/>
 * Function: TODO ADD java操作 實現scp上傳和下載文件. <br/>
 * Reason:   TODO ADD 服務器相關. <br/>
 * Date:     2020年8月28日 上午9:55:43 <br/>
 * @author   wangmeng
 * @version
 * @since    JDK 1.8
 * @see
 */@Slf4jpublic class ScpSshConnectionClient {
   private static final String IP="172.XXXXXXXX";// 遠程服務器地址   private static final String USR="XXXX";// 遠程服務器用戶名      private static final String PSWORD="XXXXXXXX"; // 遠程服務器密碼    private static String  DEFAULTCHART="UTF-8";       private static Connection connection = new Connection(IP);// 創建對象
   /**    *
    * login:ssh用戶登錄驗證,使用用戶名和密碼來認證. <br/>
    * @author wangmeng
    * @return  boolean    * @since JDK 1.8    */   public static boolean login(){      //創建遠程連接,默認連接端口為22,如果不使用默認,可以使用方法      try {         connection.connect();         //使用用戶名和密碼登錄 有秘鑰可以使用authenticateWithPublicKey驗證         return connection.authenticateWithPassword(USR,PSWORD);      } catch (IOException e) {
         log.error("用戶%s密碼%s登錄服務器%s失敗!",USR,PSWORD,IP,e);     }     return false;   }
   /**     * 遠程執行shll腳本或者命令     * @param cmd     *      即將執行的命令     * @return     *      命令執行完后返回的結果值     */    public static String execute(String cmd){
        String result="";        try {           boolean isAuthed =login();            if(isAuthed && connection !=null){
                Session session= connection.openSession();//打開一個會話                session.execCommand(cmd);//執行命令                result=processStdout(session.getStdout(),DEFAULTCHART);                //如果為得到標準輸出為空,說明腳本執行出錯了                if(StringUtils.isBlank(result)){log.info("得到標準輸出為空,鏈接connection:"+connection+",執行的命令:"+cmd);                    result=processStdout(session.getStderr(),DEFAULTCHART);                }else{log.info("執行命令成功,鏈接connection:"+connection+",執行的命令:"+cmd);                }connection.close();                session.close();            }
        } catch (IOException e) {log.error("執行命令失敗,鏈接connection:"+connection+",執行的命令:"+cmd+"  "+e.getMessage());            e.printStackTrace();        }return result;    }/**     * 解析腳本執行返回的結果集     * @param in 輸入流對象     * @param charset 編碼     * @return     *       以純文本的格式返回     */    private static String processStdout(InputStream in, String charset){
        InputStream  stdout = new StreamGobbler(in);        StringBuffer buffer = new StringBuffer();;        try {
            BufferedReader br = new BufferedReader(new InputStreamReader(stdout,charset));            String line=null;            while((line=br.readLine()) != null){
                buffer.append(line+" ");            }
        } catch (UnsupportedEncodingException e) {log.error("解析腳本出錯:"+e.getMessage());            e.printStackTrace();        } catch (IOException e) {log.error("解析腳本出錯:"+e.getMessage());            e.printStackTrace();        }return buffer.toString();    }

}
感謝各位的閱讀,以上就是“執行linux命令清理服務器緩存并返回結果怎么實現”的內容了,經過本文的學習后,相信大家對執行linux命令清理服務器緩存并返回結果怎么實現這一問題有了更深刻的體會,具體使用情況還需要大家實踐驗證。這里是億速云,小編將為大家推送更多相關知識點的文章,歡迎關注!
免責聲明:本站發布的內容(圖片、視頻和文字)以原創、轉載和分享為主,文章觀點不代表本網站立場,如果涉及侵權請聯系站長郵箱:is@yisu.com進行舉報,并提供相關證據,一經查實,將立刻刪除涉嫌侵權內容。