您好,登錄后才能下訂單哦!
您好,登錄后才能下訂單哦!
本篇內容介紹了“如何結合線程池理解FutureTask及Future源碼”的有關知識,在實際案例的操作過程中,不少人都會遇到這樣的困境,接下來就讓小編帶領大家學習一下如何處理這些情況吧!希望大家仔細閱讀,能夠學有所成!

多線程Runnable和Callable接口這里就不多說了,Callable有返回值,Runnable無返回值。
public class FutureTaskTest { public static void main(String[] args) { ExecutorService executor = null; try { //線程池提交Runnable接口任務 executor.execute(new MyRunnable()); //線程池提交Callable接口任務 executor = Executors.newFixedThreadPool(2); Future f = executor.submit(new MyCallLable<Integer>()); System.out.println(f.get()); //單線程方式 FutureTask ft = new FutureTask(new MyCallLable<Integer>()); Thread t = new Thread(ft); t.start(); System.out.println(ft.get()); } catch (InterruptedException e) { e.printStackTrace(); } catch (ExecutionException e) { e.printStackTrace(); } finally { if (executor != null) { executor.shutdown(); } } } static class MyCallLable<Integer> implements Callable { @Override public Object call() throws Exception { return 1; } } static class MyRunnable implements Runnable { @Override public void run() { System.out.println(2); } }}public static ExecutorService newFixedThreadPool(int nThreads) { return new ThreadPoolExecutor(nThreads, nThreads, 0L, TimeUnit.MILLISECONDS, new LinkedBlockingQueue<Runnable>());}該方法創建了一個核心線程和最大線程數一樣的線程池,使用LinkedBlockingQueue這種無界隊列存儲多余的任務,也就是說,如果我們使用這種jdk自帶的線程提交任務的時候,由于隊列是無界的,當任務達到一定數量會造成內存溢出。這里不再分析ThreadPoolExecutor代碼,有興趣的可以看我的另一篇博文專門分析ThreadPoolExecutor源碼的。該方法返回一個ExecutorService。
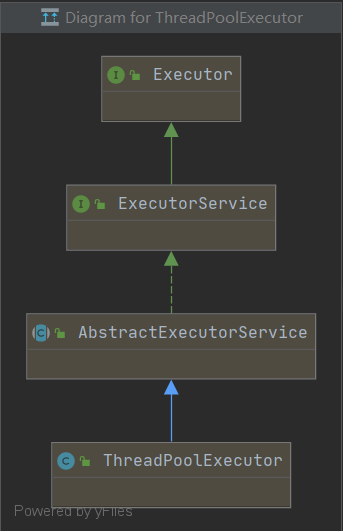
ThreadPoolExecutor繼承體系如下圖:

該方法實際調用的是實現類AbstractExecutorService.submit方法
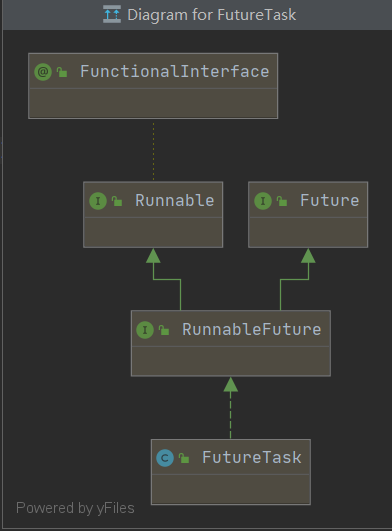
public <T> Future<T> submit(Callable<T> task) { if (task == null) throw new NullPointerException(); RunnableFuture<T> ftask = newTaskFor(task); execute(ftask); return ftask;}這里的newTaskFor方法就會將Callable任務傳遞到FutureTask類中,并封裝到其Callable屬性中
protected <T> RunnableFuture<T> newTaskFor(Callable<T> callable) { return new FutureTask<T>(callable);}/* 線程狀態可能的轉換: * NEW -> COMPLETING -> NORMAL * NEW -> COMPLETING -> EXCEPTIONAL * NEW -> CANCELLED * NEW -> INTERRUPTING -> INTERRUPTED *///當前任務狀態private volatile int state;//新創建private static final int NEW = 0;//即將結束,但還沒有結束private static final int COMPLETING = 1;//正常結束private static final int NORMAL = 2;//異常狀態:Callable接口的Call方法中具體業務邏輯出現異常private static final int EXCEPTIONAL = 3;//任務被取消private static final int CANCELLED = 4;//任務處于中斷中private static final int INTERRUPTING = 5;//任務被中斷private static final int INTERRUPTED = 6;//任務提交傳入的Callable,用來調用call方法private Callable<V> callable;//Call方法返回值//1.如果任務正常結束,返回call方法的返回值//2.如果call方法發生異常,返回具體的異常信息private Object outcome;//當前執行的線程private volatile Thread runner;//一個棧結構的數據類型,存儲被get方法阻塞的線程的引用private volatile WaitNode waiters;
public FutureTask(Callable<V> callable) { //外部需要傳入Callable接口的實現 if (callable == null) throw new NullPointerException(); this.callable = callable; //將線程狀態設置為先創建 this.state = NEW;}
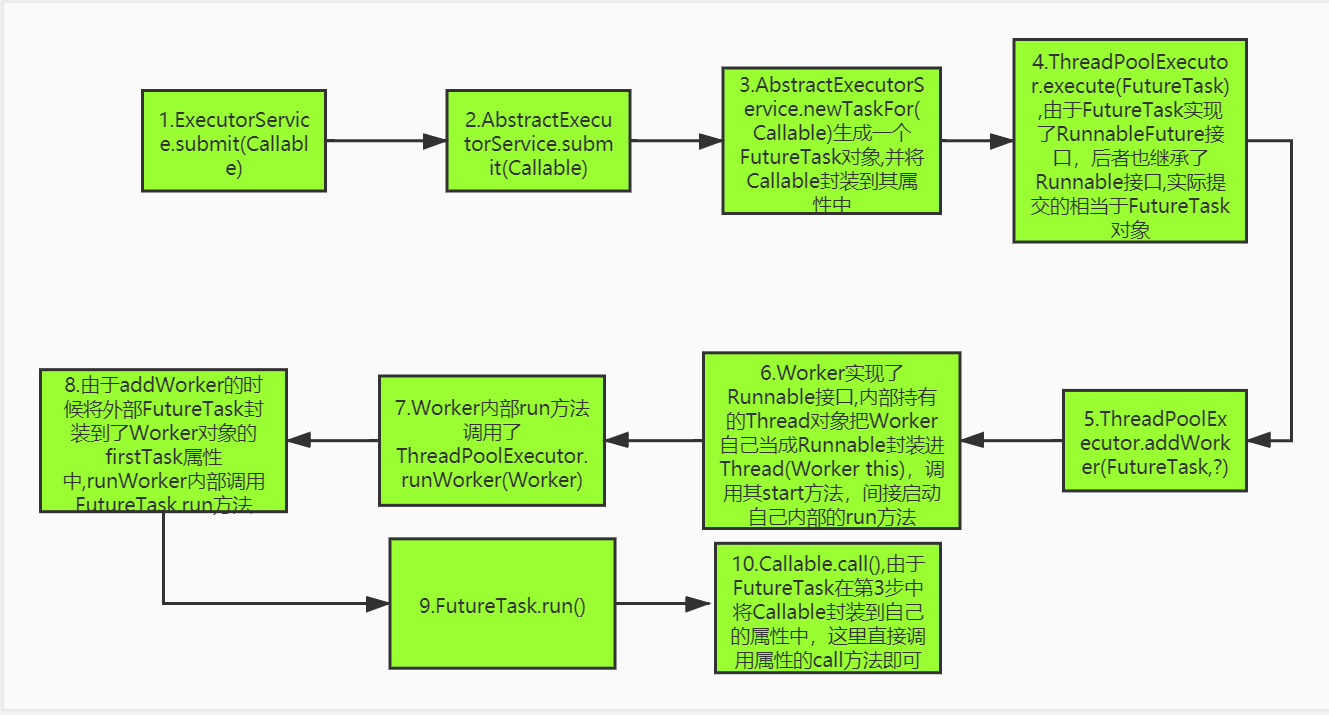
從示例的線程池提交Calllable接口的案例中一步步分析:1.executor.submit(new MyCallLable<Integer>())方法提交一個Callable實現;2.第一步實際會調用AbstractExecutorService.submit方法;3.AbstractExecutorService.submit內部調用newTaskFor方法生成一個FutureTask對象,并將MyCallLable任務封裝到其Calllable屬性中;4.AbstractExecutorService.submit方法內部調用ThreadPoolExecutor.execute方法提交FutureTask對象到線程池;5-6-7-8.實際就是線程池提交一個任務的執行過程,具體源碼可以看我的另一篇博客,這里比較復雜,概況的說了下;9-10.線程池execute實際會執行FutureTask的run方法,在run方法中調用Callable.call,這就是線程池提交Callable執行的流程;
public void run() { //條件1:當前任務狀態不是新建狀態 //條件2:當前線程不是FutureTask持有的線程 if (state != NEW || !UNSAFE.compareAndSwapObject(this, runnerOffset, null, Thread.currentThread())) //退出執行 return; try { //當前FutureTask持有的callable Callable<V> c = callable; //條件1:當前提交的Callable不能為空 //條件2:當前線程任務狀態為新創建 if (c != null && state == NEW) { //Callable的返回值 V result; //任務是否成功執行 boolean ran; try { //調用用戶自定義call方法的邏輯 result = c.call(); //任務成功執行 ran = true; } catch (Throwable ex) { //發生異常 result = null; ran = false; setException(ex); } //任務成功執行設置返回值 if (ran) set(result); } } finally { //run方法結束持有線程設置為空,help gc //這里可能正常執行完run方法也可能出現異常退出 runner = null; //當前任務執行狀態 int s = state; //如果處于中斷的狀態,包含中斷中和已中斷,釋放cpu資源 if (s >= INTERRUPTING) handlePossibleCancellationInterrupt(s); }}該方法設置任務成功執行后的執行結果狀態和返回值,將返回值封裝到outcome屬性中,由于get方法是阻塞的,還需要喚醒阻塞的線程。
protected void set(V v) { //將狀態從新建設置為結束中 if (UNSAFE.compareAndSwapInt(this, stateOffset, NEW, COMPLETING)) { //返回值賦值 outcome = v; //設置任務狀態為正常結束 UNSAFE.putOrderedInt(this, stateOffset, NORMAL); //喚醒被get方法阻塞的線程 finishCompletion(); }}在分析finishCompletion方法前,先介紹下WaitNode類。為什么會有這個類?我們知道FutureTask.get方法是阻塞的,如果我們在一個線程內多次調用get方法,這個從理論上考慮其實不需要WaitNode的;如果我們又多次創建了線程在其他線程內部調用get方法呢?由于FutureTask.get方法內部會調用LockSupport.park(Thread)或LockSupport.parkNanos阻塞線程,所以就需要喚醒;而LockSupport.unpark(Thread)解除線程阻塞也需要指定線程,所以這里就需要一種數據結構來存儲當前線程的引用了。這里就設計了WaitNode這個類,它是一個單鏈表,而且采用的是頭插法,在遍歷的時候也是從前往后遍歷的,這就是一個典型的棧的結構,先進后出,后進先出。這里為什么又是一個單鏈表結構呢?這是為了方便在任務結束的時候遍歷。
static final class WaitNode { //當前線程的引用 volatile Thread thread; //指向下一個節點 volatile WaitNode next; WaitNode() { thread = Thread.currentThread(); }}用于喚醒被get方法阻塞的線程
private void finishCompletion() { // assert state > COMPLETING; //從頭開始遍歷 for (WaitNode q; (q = waiters) != null;) { //使用cas方式設置當前waiters為空,防止外部線程調用cancel導致finishCompletion該方法被調用 if (UNSAFE.compareAndSwapObject(this, waitersOffset, q, null)) { for (;;) { //獲取當前WaitNode對應的線程 Thread t = q.thread; if (t != null) { q.thread = null; //help gc //喚醒當前節點對應的線程 LockSupport.unpark(t); } //獲取當前節點的下一個節點 WaitNode next = q.next; if (next == null) break; q.next = null;//help gc //將q指向下要給節點 q = next; } break; } } done(); //將callable置為空,help gc callable = null; }該方法將返回值設置為拋出的異常,將任務狀態設置為EXCEPTIONAL狀態,并調用finishCompletion方法喚醒被get阻塞的線程。
protected void setException(Throwable t) { if (UNSAFE.compareAndSwapInt(this, stateOffset, NEW, COMPLETING)) { outcome = t; UNSAFE.putOrderedInt(this, stateOffset, EXCEPTIONAL); // final state finishCompletion(); }}3.5.9.FutureTask.handlePossibleCancellationInterrupt方法分析
private void handlePossibleCancellationInterrupt(int s) { //如果任務狀態處于中斷中,釋放cpu資源 if (s == INTERRUPTING) while (state == INTERRUPTING) Thread.yield(); // wait out pending interrupt}兩個方法區別不大,唯一的區別是阻塞線程的時候使用的LockSupport.parkNanos(this, nanos)和LockSupport.park(this),當有時間條件的時候LockSupport.parkNanos(this, nanos)會在指定時間內結束后自動喚醒線程。
這里講講sleep和LockSupport.parkNanos區別:sleep在指定時間到期后會判斷中斷狀態,根據中斷狀態來判斷是否需要拋出異常,而LockSupport.parkNanos不會根據中斷狀態做出響應。
public V get() throws InterruptedException, ExecutionException { int s = state; if (s <= COMPLETING) s = awaitDone(false, 0L); return report(s);}public V get(long timeout, TimeUnit unit) throws InterruptedException, ExecutionException, TimeoutException { if (unit == null) throw new NullPointerException(); int s = state; //unit.toNanos(timeout)將指定時間格式轉化為對應的毫微秒 if (s <= COMPLETING && (s = awaitDone(true, unit.toNanos(timeout))) <= COMPLETING) throw new TimeoutException(); return report(s);}t.interrupted()也是可以喚醒被LockSupport.park()阻塞的線程的
private int awaitDone(boolean timed, long nanos) throws InterruptedException { final long deadline = timed ? S ystem.nanoTime() + nanos : 0L; WaitNode q = null; boolean queued = false; //自旋 for (;;) { //條件成立說明當前線程是被其他線程調用t.interrupted()這種中斷方式喚醒 if (Thread.interrupted()) { //從隊列中移除線程被中斷的節點 removeWaiter(q); throw new InterruptedException(); } int s = state; //(4).s>COMPLETING成立,說明當前任務已經執行完,結果可能有好有壞 if (s > COMPLETING) { if (q != null) q.thread = null; //返回當前任務狀態 return s; } else if (s == COMPLETING) // cannot time out yet Thread.yield(); //(1).第一次自旋,q=null,創建當前線程對應的WaitNode對象 else if (q == null) q = new WaitNode(); //(2).第二次自旋,queued為false,q.next = waiters采用頭插法將當前節點入棧 else if (!queued) queued = UNSAFE.compareAndSwapObject(this, waitersOffset, q.next = waiters, q); //(3).第三次自旋,會走到這里,將線程阻塞,等待后續喚醒后繼續自旋調用,也可能因為超時后自動喚醒 else if (timed) { nanos = deadline - System.nanoTime(); if (nanos <= 0L) { //從隊列中移除get超時的節點 removeWaiter(q); return state; } LockSupport.parkNanos(this, nanos); } else LockSupport.park(this); }}每次調用get方法都會將線程封裝成WaitNode入棧,當調用get方法的線程由于被中斷喚醒或者超時自動喚醒的都需要從隊列中移除, 并重新組裝棧結構。
一張圖概況該方法做的事情:

private void removeWaiter(WaitNode node) { if (node != null) { node.thread = null; retry: for (;;) { // restart on removeWaiter race for (WaitNode pred = null, q = waiters, s; q != null; q = s) { s = q.next; if (q.thread != null) pred = q; else if (pred != null) { pred.next = s; if (pred.thread == null) // check for race continue retry; } else if (!UNSAFE.compareAndSwapObject(this, waitersOffset, q, s)) continue retry; } break; } }}將返回值封裝到outcome屬性中返回,可能是正常的值也可能是一個異常信息
private V report(int s) throws ExecutionException { Object x = outcome; if (s == NORMAL) return (V)x; if (s >= CANCELLED) throw new CancellationException(); throw new ExecutionException((Throwable)x);}public boolean cancel(boolean mayInterruptIfRunning) { //條件1:說明當前任務處于運行中 //條件2:任務狀態修改 //條件1和條件2成立則執行下面cancel的核心處理邏輯,否則返回false代表取消失敗 //可能會有多個線程調用cancel方法導致cancel失敗的情況 if (!(state == NEW && UNSAFE.compareAndSwapInt(this, stateOffset, NEW, mayInterruptIfRunning ? INTERRUPTING : CANCELLED))) return false; try { // in case call to interrupt throws exception //mayInterruptIfRunning是否中斷線程 if (mayInterruptIfRunning) { try { Thread t = runner; if (t != null) //中斷線程 t.interrupt(); } finally { // final state //設置任務為中斷狀態 UNSAFE.putOrderedInt(this, stateOffset, INTERRUPTED); } } } finally { //喚醒所有get阻塞的線程 finishCompletion(); } return true;}“如何結合線程池理解FutureTask及Future源碼”的內容就介紹到這里了,感謝大家的閱讀。如果想了解更多行業相關的知識可以關注億速云網站,小編將為大家輸出更多高質量的實用文章!
免責聲明:本站發布的內容(圖片、視頻和文字)以原創、轉載和分享為主,文章觀點不代表本網站立場,如果涉及侵權請聯系站長郵箱:is@yisu.com進行舉報,并提供相關證據,一經查實,將立刻刪除涉嫌侵權內容。