您好,登錄后才能下訂單哦!
您好,登錄后才能下訂單哦!
這篇文章主要講解了“如何防止請求繞過網關直接訪問后端服務”,文中的講解內容簡單清晰,易于學習與理解,下面請大家跟著小編的思路慢慢深入,一起來研究和學習“如何防止請求繞過網關直接訪問后端服務”吧!
我覺得防止繞過網關直接請求后端服務的解決方案主要有三種:
使用Kubernetes部署
在使用Kubernetes部署SpringCloud架構時我們給網關的Service配置NodePort,其他后端服務的Service使用ClusterIp,這樣在集群外就只能訪問到網關了。
網絡隔離
后端普通服務都部署在內網,通過防火墻策略限制只允許網關應用訪問后端服務。
應用層攔截
請求后端服務時通過攔截器校驗請求是否來自網關,如果不來自網關則提示不允許訪問。
這里我們著重關注在應用層攔截這種解決方案。
實現思路其實也很簡單,在請求經過網關的時候給請求頭中增加一個額外的Header,在后端服務中寫一個攔截器,判斷請求頭是否與在網關設置的請求Header一致,如果不一致則不允許訪問并給出提示。
當然為了防止在每個后端服務都需要編寫這個攔截器,我們可以將其寫在一個公共的starter中,讓后端服務引用即可。而且為了靈活,可以通過配置決定是否只允許后端服務訪問。
接下來我們看看核心代碼。(代碼中涉及 SpringBoot 編寫公共Starter的套路,相信看過我博客的同學肯定是會的,因為之前文章有詳細說過。)
cloud-gateway模塊編寫網關過濾器@Component
@Order(0)
public class GatewayRequestFilter implements GlobalFilter {
@Override
public Mono<Void> filter(ServerWebExchange exchange, GatewayFilterChain chain) {
byte[] token = Base64Utils.encode((CloudConstant.GATEWAY_TOKEN_VALUE).getBytes());
String[] headerValues = {new String(token)};
ServerHttpRequest build = exchange.getRequest()
.mutate()
.header(CloudConstant.GATEWAY_TOKEN_HEADER, headerValues)
.build();
ServerWebExchange newExchange = exchange.mutate().request(build).build();
return chain.filter(newExchange);
}
} 在請求經過網關時添加額外的Header,為了方便這里直接設置成固定值。
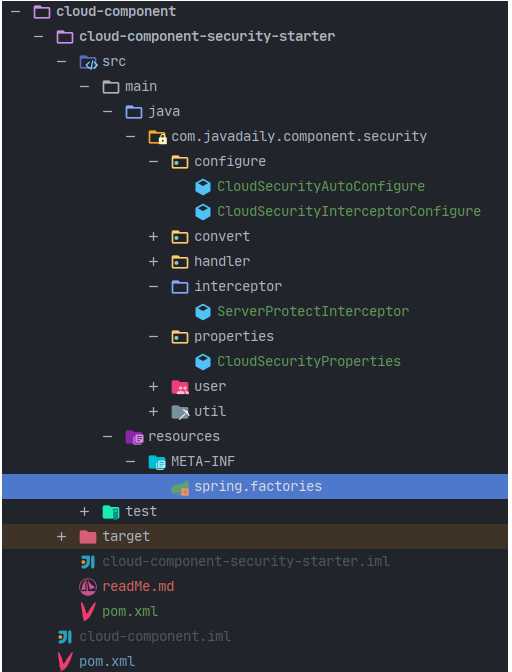
cloud-component-security-starter
@Data
@ConfigurationProperties(prefix = "javadaily.cloud")
public class CloudSecurityProperties {

    /**
     * 是否只能通過網關獲取資源
     * 默認為True
     */
    private Boolean onlyFetchByGateway = Boolean.TRUE;

} public class ServerProtectInterceptor implements HandlerInterceptor {
private CloudSecurityProperties properties;
@Override
public boolean preHandle(@NonNull HttpServletRequest request, @NonNull HttpServletResponse response, @NonNull Object handler){
if (!properties.getOnlyFetchByGateway()) {
return true;
}
String token = request.getHeader(CloudConstant.GATEWAY_TOKEN_HEADER);
String gatewayToken = new String(Base64Utils.encode(CloudConstant.GATEWAY_TOKEN_VALUE.getBytes()));
if (StringUtils.equals(gatewayToken, token)) {
return true;
} else {
ResultData<String> resultData = new ResultData<>();
resultData.setSuccess(false);
resultData.setStatus(HttpServletResponse.SC_FORBIDDEN);
resultData.setMessage("請通過網關訪問資源");
WebUtils.writeJson(response,resultData);
return false;
}
}
public void setProperties(CloudSecurityProperties properties) {
this.properties = properties;
}
} public class CloudSecurityInterceptorConfigure implements WebMvcConfigurer {
private CloudSecurityProperties properties;
@Autowired
public void setProperties(CloudSecurityProperties properties) {
this.properties = properties;
}
@Bean
public HandlerInterceptor serverProtectInterceptor() {
ServerProtectInterceptor interceptor = new ServerProtectInterceptor();
interceptor.setProperties(properties);
return interceptor;
}
@Override
public void addInterceptors(InterceptorRegistry registry) {
registry.addInterceptor(serverProtectInterceptor());
}
} @EnableConfigurationProperties(CloudSecurityProperties.class)
public class CloudSecurityAutoConfigure{
@Bean
public CloudSecurityInterceptorConfigure cloudSecurityInterceptorConfigure() {
return new CloudSecurityInterceptorConfigure();
}
} org.springframework.boot.autoconfigure.EnableAutoConfiguration=\
com.javadaily.component.security.configure.CloudSecurityAutoConfigure javadaily:
cloud:
onlyFetchByGateway: true 經過以上幾步,一個公共的Starter模塊就構建完成了。
account-service為例<dependency>
<groupId>com.jianzh6.cloud</groupId>
<artifactId>cloud-component-security-starter</artifactId>
</dependency>
直接訪問后端服務接口 http://localhost:8010/account/getByCode/jianzh6

返回結果:
{
  "message": "請通過網關訪問資源",
  "status": 403,
  "success": false,
  "timestamp": 1611660015830
}
感謝各位的閱讀,以上就是“如何防止請求繞過網關直接訪問后端服務”的內容了,經過本文的學習后,相信大家對如何防止請求繞過網關直接訪問后端服務這一問題有了更深刻的體會,具體使用情況還需要大家實踐驗證。這里是億速云,小編將為大家推送更多相關知識點的文章,歡迎關注!
免責聲明:本站發布的內容(圖片、視頻和文字)以原創、轉載和分享為主,文章觀點不代表本網站立場,如果涉及侵權請聯系站長郵箱:is@yisu.com進行舉報,并提供相關證據,一經查實,將立刻刪除涉嫌侵權內容。