溫馨提示×
您好,登錄后才能下訂單哦!
點擊 登錄注冊 即表示同意《億速云用戶服務條款》
您好,登錄后才能下訂單哦!
這篇文章主要介紹“bytom中怎么鎖定合約”,在日常操作中,相信很多人在bytom中怎么鎖定合約問題上存在疑惑,小編查閱了各式資料,整理出簡單好用的操作方法,希望對大家解答”bytom中怎么鎖定合約”的疑惑有所幫助!接下來,請跟著小編一起來學習吧!
模板如下:
contract TradeOffer(assetRequested: Asset,
                    amountRequested: Amount,
                    seller: Program,
                    cancelKey: PublicKey) locks offered {
  clause trade() requires payment: amountRequested of assetRequested {
    lock payment with seller
    unlock offered
  }
  clause cancel(sellerSig: Signature) {
    verify checkTxSig(cancelKey, sellerSig)
    unlock offered
  }
}

以下是相關代碼片段:
sendHttpPost("{\"account_id\":\"0IJVD7MNG0A02\"}","create-account-receiver","http://127.0.0.1:9888","");

以下是相關代碼片段:
sendHttpPost("{\"account_id\":\"0IJVD7MNG0A02\"}","list-pubkeys","http://127.0.0.1:9888","");

以下是相關代碼片段:
            JSONObject param=new JSONObject();
            JSONArray agrs=new JSONArray();
            //合約的四個參數值
            JSONObject assetParam=new JSONObject();
            assetParam.put("string","81d097312645696daea84b761d2898d950d8fba0de06c9267d8513b16663dd3a");
            agrs.put(assetParam);
            JSONObject amountParam=new JSONObject();
            amountParam.put("integer",200000000l);
            agrs.put(amountParam);
            JSONObject programParam=new JSONObject();
            programParam.put("string",control_program);
            agrs.put(programParam);
            JSONObject publicKeyParam=new JSONObject();
            publicKeyParam.put("string",pubkey);
            agrs.put(publicKeyParam);
            param.put("agrs",agrs);
            param.put("contract","contract TradeOffer(assetRequested: Asset, amountRequested: Amount, seller: Program, cancelKey: PublicKey) locks offered { clause trade() requires payment: amountRequested of assetRequested { lock payment with seller unlock offered } clause cancel(sellerSig: Signature) { verify checkTxSig(cancelKey, sellerSig) unlock offered } }");
            //調用編譯合約
            sendHttpPost(param.toString(),"list-pubkeys","http://127.0.0.1:9888","");

以下是相關代碼片段:
            param=new JSONObject();
            agrs=new JSONArray();
            JSONObject spendAccount=new JSONObject();
            spendAccount.put("account_id","0H757LPD00A02");
            spendAccount.put("amount",9909099090000l);
            spendAccount.put("asset_id","161b9767b664df907fa926a31f9e835236e57f3e9ccc5f80c12bd97723322652");
            spendAccount.put("type","spend_account");
            agrs.put(spendAccount);
            JSONObject controlAccount=new JSONObject();
            controlAccount.put("control_program",program);
            controlAccount.put("amount",9909099090000l);
            controlAccount.put("asset_id","161b9767b664df907fa926a31f9e835236e57f3e9ccc5f80c12bd97723322652");
            controlAccount.put("type","control_program");
            agrs.put(controlAccount);
            JSONObject spendAccount2=new JSONObject();
            spendAccount2.put("account_id","0H757LPD00A02");
            spendAccount2.put("amount",6000000l);
            spendAccount2.put("asset_id","ffffffffffffffffffffffffffffffffffffffffffffffffffffffffffffffff");
            spendAccount2.put("type","spend_account");
            agrs.put(spendAccount2);
            param.put("actions",agrs);
            param.put("ttl",0);
            sendHttpPost(param.toString(),"build-transaction","http://127.0.0.1:9888","");

以下是相關代碼片段:
            param=new JSONObject();
            param.put("password","xxx");
            param.put("transaction",data);
            sendHttpPost(param.toString(),"sign-transaction","http://127.0.0.1:9888","");
以下是相關代碼片段:
            param=new JSONObject();
            param.put("raw_transaction",raw_transaction);
            sendHttpPost(param.toString(),"submit-transactions","http://127.0.0.1:9888","");
以下是相關代碼片段:
param=new JSONObject();
        param.put("id",outputid);
        param.put("smart_contract",true);
        sendHttpPost(param.toString(),"list-unspent-outputs","http://127.0.0.1:9888","");
以下是相關代碼片段:
param=new JSONObject();
        param.put("program",program);
        sendHttpPost(param.toString(),"decode-program","http://127.0.0.1:9888","");
需要注意的是decode出來的為值是逆序的(后續會有文章詳細介紹)
取消合約的構造參數如下: 
                spendAccountUnspentOutput = arguments: [{
                  type: 'raw_tx_signature',
                  // 生成合約第二步的pubkeylist 詳情
                  raw_data: {
                    derivation_path: pubkeylist.pubkey_infos[0].derivation_path,
                    xpub: pubkeylist.root_xpub
                  }
                }, {
                  type: 'data',
                  raw_data: {
                    // 參數偏移量 在一個合約里是固定的
                    value: '13000000'
                  }
                }],
                output_id: output_id,
                type: 'spend_account_unspent_output'
              }
              const controlAction = {
                type: 'control_program',
                amount: 100000000,
                asset_id: asset_id,
                control_program:control_program
              }
              const gasAction = {
                type: 'spend_account',
                account_id:account_id,
                asset_alias: 'BTM',
                amount: 50000000
              }
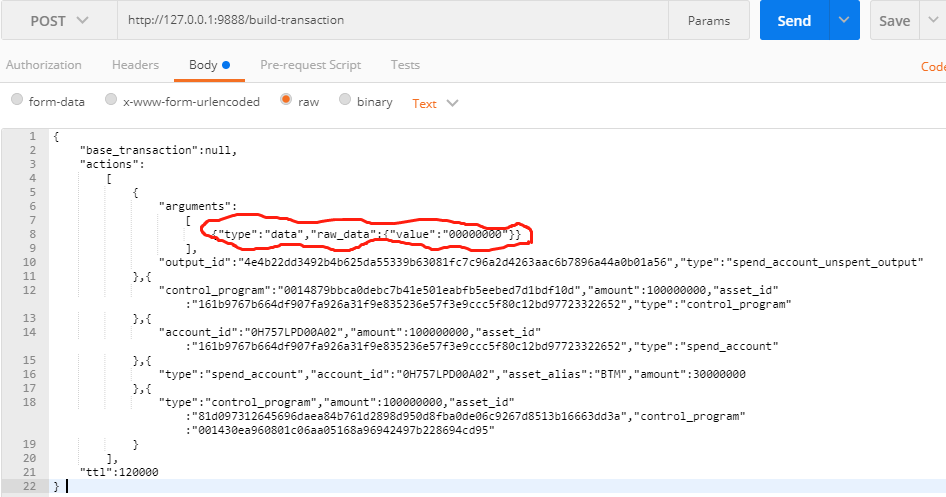
執行合約的參數構造如下: 
           const spendAccountUnspentOutput = {
                arguments: [{
                  type: 'data',
                  raw_data: {
                    //  00000000 指的是第一個 clause,表示直接執行,無需跳轉
                    value: '00000000'
                  }
                }],
                output_id: output_id,
                type: 'spend_account_unspent_output'
              }
              // 合約執行提供的資產
              const issueControlAction = {
                control_program: control_program,
                amount:  100000000,
                asset_id: asset_id,
                type: 'control_program'
              }
              // 合約執行提供的資產
              const issueSpendAction = {
                account_id: account_id,
                amount: 100000000,
                asset_id: asset_id,
                type: 'spend_account'
              }
              // 礦工費
              const gasAction = {
                type: 'spend_account',
                account_id: account_id,
                asset_alias: 'BTM',
                amount: 50000000
              }
              // 合約執行獲得資產對象
              const controlAction = {
                type: 'control_program',
                amount:  100000000,
                asset_id: asset_id,
                control_program: compileData.control_program
              }
build 操作其實就是指定輸入輸出的過程,詳情請查看 官方build文檔 和 官方api文檔
調用比原基于okhttp接口javautil 如下:
    public static String sendHttpPost(String bodyStr,String method,String bytomApiserverUrl,String bytomApiserverToken) throws IOException {
        OkHttpClient client = new OkHttpClient();
        MediaType mediaType = MediaType.parse("application/json");
        RequestBody body = RequestBody.create(mediaType, bodyStr);
        Request request = new Request.Builder()
                .url(bytomApiserverUrl+"/"+method)
                .post(body)
                .addHeader("cache-control", "no-cache")
                .addHeader("Connection", "close")
                .build();
        if (bytomApiserverUrl==null || bytomApiserverUrl.contains("127.0.0.1") || bytomApiserverUrl.contains("localhost")){

        }else {
            byte[] encodedAuth = Base64.encodeBase64(bytomApiserverToken.getBytes(Charset.forName("US-ASCII")));
            String authHeader = "Basic " + new String(encodedAuth);
            request = new Request.Builder()
                    .url(bytomApiserverUrl+"/"+method)
                    .post(body)
                    .addHeader("authorization", authHeader)
                    .addHeader("cache-control", "no-cache")
                    .addHeader("Connection", "close")
                    .build();
        }
        Response response = client.newCall(request).execute();
        return response.body().string();
    }
到此,關于“bytom中怎么鎖定合約”的學習就結束了,希望能夠解決大家的疑惑。理論與實踐的搭配能更好的幫助大家學習,快去試試吧!若想繼續學習更多相關知識,請繼續關注億速云網站,小編會繼續努力為大家帶來更多實用的文章!
免責聲明:本站發布的內容(圖片、視頻和文字)以原創、轉載和分享為主,文章觀點不代表本網站立場,如果涉及侵權請聯系站長郵箱:is@yisu.com進行舉報,并提供相關證據,一經查實,將立刻刪除涉嫌侵權內容。