您好,登錄后才能下訂單哦!
您好,登錄后才能下訂單哦!
這期內容當中小編將會給大家帶來有關使用Flutter怎么實現一個Http網絡請求,文章內容豐富且以專業的角度為大家分析和敘述,閱讀完這篇文章希望大家可以有所收獲。
Http網絡請求方式就是描述了客戶端想對指定的資源或服務器所要執行的操作。開頭簡介里介紹過,Http網絡請求是一門開發語言里比較常用和重要的功能,主要用于資源訪問、接口數據請求和提交、上傳下載文件等等操作。其中主要的請求方式有:GET、POST、HEAD、PUT、DELETE、TRACE、CONNECT、OPTIONS這八種。接下來先簡單介紹它們的特點和作用。
從GET這個單詞上也可以看出,它主要是執行獲取資源操作的,例如通過URL從服務器獲取返回的資源,其中GET可以把請求的一些參數信息拼接在URL上,傳遞給服務器,由服務器端進行參數信息解析,然后返回相應的資源給請求者。注意:GET請求拼接的URL數據大小和長度是有最大限制的,傳輸的數據量一般限制在2KB。
POST主要是執行提交信息、傳輸信息的操作,POST請求的可以攜帶很多的數據,而且格式不限。如JSON、XML、文本等等都支持。并且POST傳遞的一些數據和參數不是直接拼接在URL后的,而是放在Http請求Body里,相對GET來說比較安全。并且傳遞的數據大小和格式是無限制的。POST請求方式是比較重要和常用的一種,POST請求包含兩部分:請求頭(header)和請求體(body)。POST請求常見的請求體(body)有三種傳輸內容類型Content-type:application/x-www-form-urlencoded、application/json、multipart/form-data,當然還有其他的幾種,不過不常用,常用的就是這三種。
HEAD主要是執行給請求的客戶端返回頭信息,而不返回Body主體內容。和GET方式類似,只不過GET方式有Body實體返回,而HEAD只返回頭信息,無Body實體內容返回。主要是用于確認URL的有效性、資源更新的日期時間、查看服務器狀態等等,對于有這方面需求的請求來說,比較不占用資源。
PUT主要是執行傳輸文件操作,類似于FTP的文件上傳一樣,請求里包含文件內容,并將此文件保存到URI指定的服務器位置。和POST方式的主要區別是:PUT請求方式如果前后兩個請求相同,則后一個請求會把前一個請求覆蓋掉,實現了PUT方式的修改資源;而POST請求方式如果前后兩個請求相同,則后一個請求不會把前一個請求覆蓋掉,實現了POST的增加資源。
DELETE主要是執行告訴服務器想要刪除的資源,執行刪除指定資源操作。
OPTIONS主要是執行查詢針對所要請求的URI資源服務器所支持的請求方式,也就是獲取這個URI所支持客戶端提交給服務器端的請求方式有哪些。
TRACE主要是執行追蹤傳輸路徑的操作,例如,我們發起了一個Http請求,在這個過程中這個請求可能會經過很多個路徑和過程,TRACE就是告訴服務器在收到請求后,返回一條響應信息,將它收到的原始Http請求信息返回給客戶端,這樣就可以確認在Http傳輸過程中請求是否被修改過。
CONNECT主要就是執行連接代理操作,例如“翻墻”。客戶端通過CONNECT方式與服務器建立通信隧道,進行TCP通信。主要通過SSL和TLS安全傳輸數據。CONNECT的作用就是告訴服務器讓它代替客戶端去請求訪問某個資源,然后再將數據返回給客戶端,相當于一個媒介中轉。
介紹完了Http幾種請求方式,我們看下Flutter中的Http網絡請求的實現方式。Flutter的Http網絡請求的實現主要分為三種:io.dart里的HttpClient實現、Dart原生http請求庫實現、第三方庫實現。
我們首先看下第一種:io.dart里的HttpClient實現。
io.dart里的HttpClient實現的Http網絡請求主要是實現了基本的網絡請求,復雜一些的網絡請求還無法完成。例如POST里的其他幾種Body請求體傳輸內容類型部分還無法支持,multipart/form-data這個類型傳輸還不支持。所以如果你的一些Http網絡請求可以通過io.dart里的HttpClient實現的話,用這個也可以完成要求。
那么接下來我們就看下io.dart里的HttpClient實現的Http網絡請求實現步驟。
import 'dart:convert';
import 'dart:io';

class IOHttpUtils {
  //創建HttpClient
  HttpClient _httpClient = HttpClient();

  //要用async關鍵字異步請求
  getHttpClient() async {
    _httpClient
        .get('https://abc.com', 8090, '/path2')
        .then((HttpClientRequest request) {
      //在這里可以對request請求添加headers操作,寫入請求對象數據等等
      // Then call close.
      return request.close();
    }).then((HttpClientResponse response) {
      // 處理response響應
      if (response.statusCode == 200) {
        response.transform(utf8.decoder).join().then((String string) {
          print(string);
        });
      } else {
        print("error");
      }
    });
  }

  getUrlHttpClient() async {
    var url = "https://abc.com:8090/path2";
    _httpClient.getUrl(Uri.parse(url)).then((HttpClientRequest request) {
      // Optionally set up headers...
      // Optionally write to the request object...
      // Then call close.
      return request.close();
    }).then((HttpClientResponse response) {
      // Process the response.
      if (response.statusCode == 200) {
        response.transform(utf8.decoder).join().then((String string) {
          print(string);
        });
      } else {
        print("error");
      }
    });
  }

  //進行POST請求
  postHttpClient() async {
    _httpClient
        .post('https://abc.com', 8090, '/path3')
        .then((HttpClientRequest request) {
      //這里添加POST請求Body的ContentType和內容
      //這個是application/json數據類型的傳輸方式
      request.headers.contentType = ContentType("application", "json");
      request.write("{\"name\":\"value1\",\"pwd\":\"value2\"}");
      return request.close();
    }).then((HttpClientResponse response) {
      // Process the response.
      if (response.statusCode == 200) {
        response.transform(utf8.decoder).join().then((String string) {
          print(string);
        });
      } else {
        print("error");
      }
    });
  }

  postUrlHttpClient() async {
    var url = "https://abc.com:8090/path3";
    _httpClient.postUrl(Uri.parse(url)).then((HttpClientRequest request) {
      //這里添加POST請求Body的ContentType和內容
      //這個是application/x-www-form-urlencoded數據類型的傳輸方式
      request.headers.contentType =
          ContentType("application", "x-www-form-urlencoded");
      request.write("name='value1'&pwd='value2'");
      return request.close();
    }).then((HttpClientResponse response) {
      // Process the response.
      if (response.statusCode == 200) {
        response.transform(utf8.decoder).join().then((String string) {
          print(string);
        });
      } else {
        print("error");
      }
    });
  }

  ///其余的HEAD、PUT、DELETE請求用法類似,大同小異,大家可以自己試一下
  ///在Widget里請求成功數據后,使用setState來更新內容和狀態即可
  ///setState(() {
  ///    ...
  ///  });

}
第二種:Dart原生http請求庫實現。
這里推薦這種方式使用,畢竟Dart原生的http請求庫支持的Http請求比較全面,比較復雜的請求都可以實現,如上傳和下載文件等等操作。
Dart目前官方的倉庫里有大量的三方庫和官方庫,引用也非常的方便,Dart PUB官方地址為:https://pub.dartlang.org。
打開后如下圖所示:
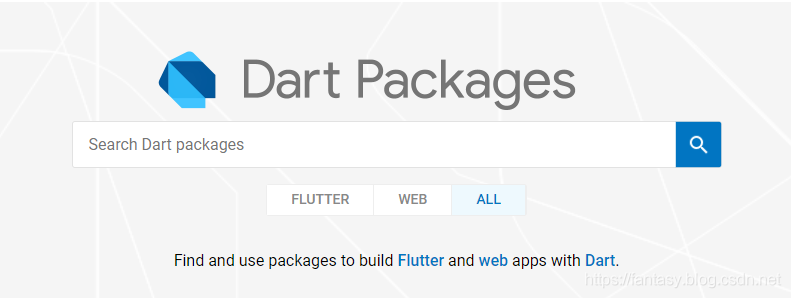
使用Dart原生http庫,我們首先需要在Dart PUB或官方Github里把相關的http庫引用下來。
在Dart PUB里搜索http,便可以查找到我們的http庫,根據說明進行引用和使用即可。
http庫官方Github庫地址為:https://github.com/dart-lang/http
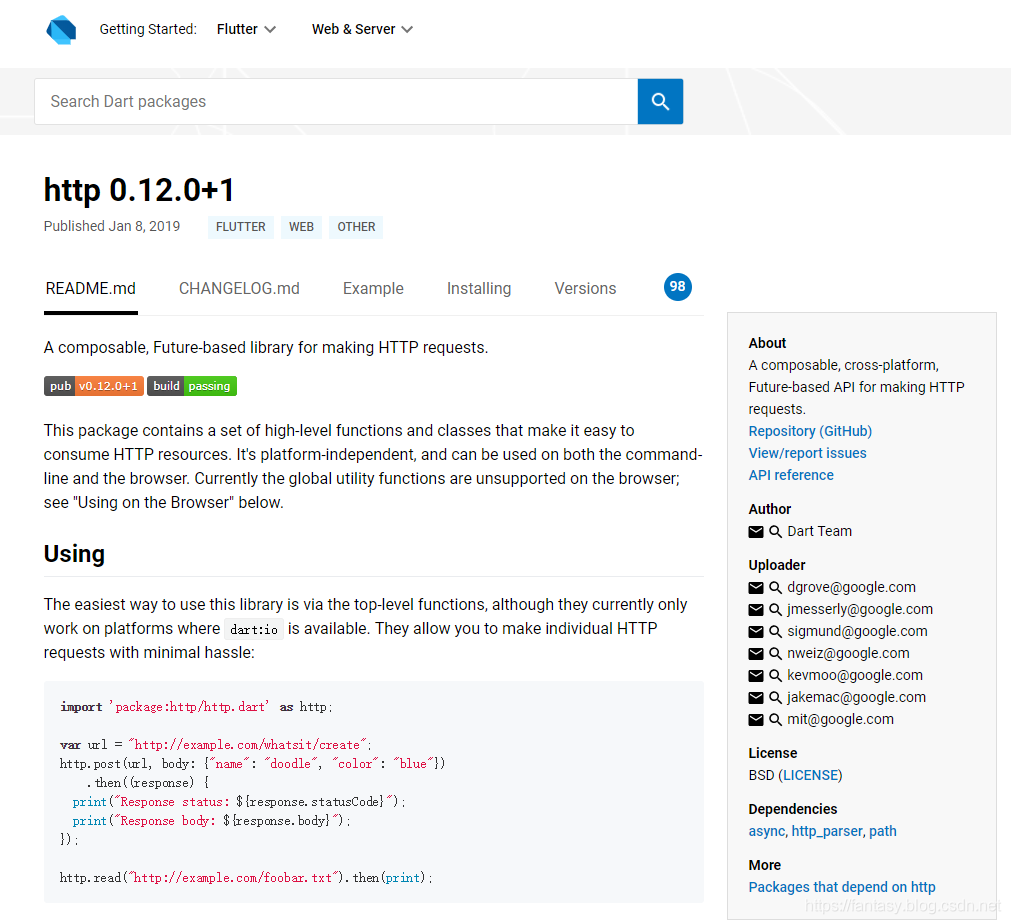
點擊Installing,查看引用方法進行引用即可。
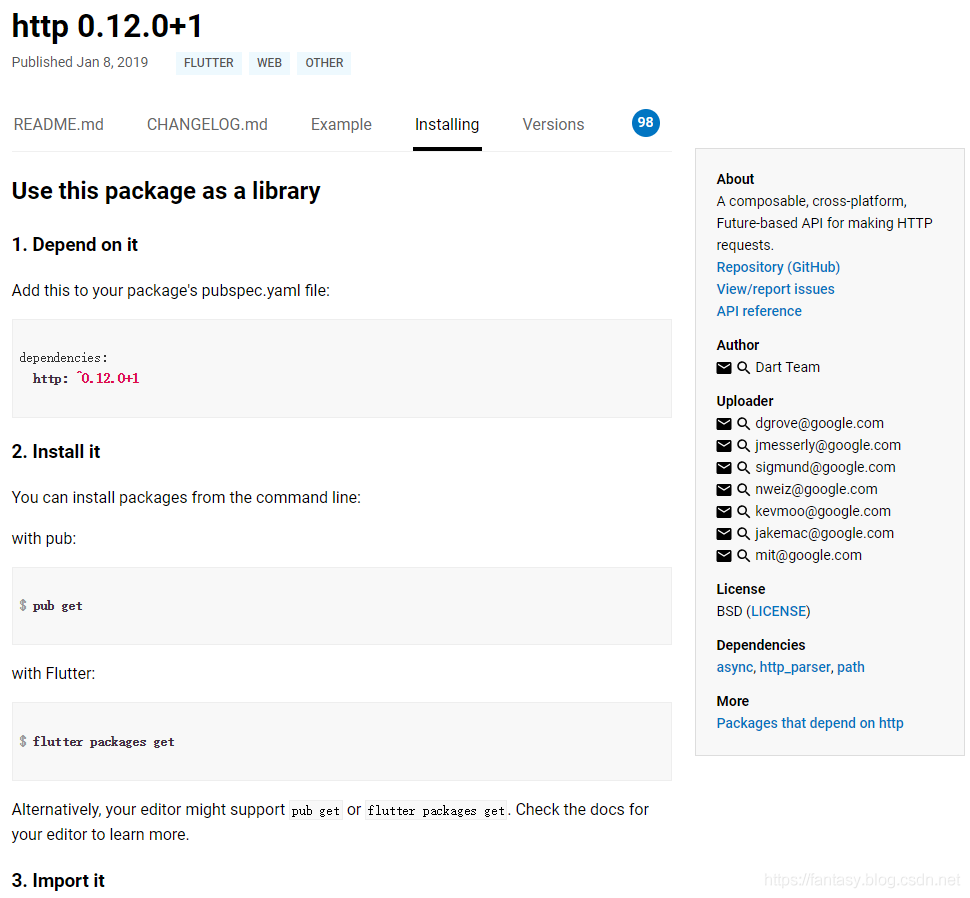
在項目的pubspec.yaml配置文件里加入引用:
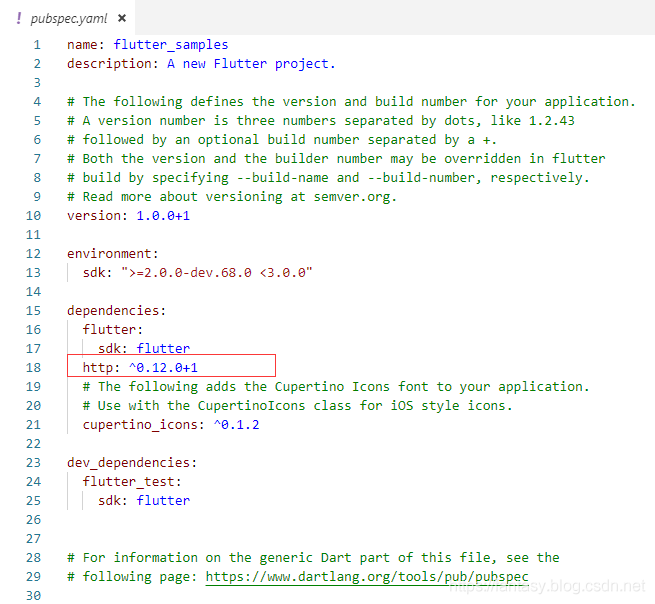
完畢,這樣就可以在dart文件類里直接import使用了。接下來給一個完整的使用例子:
import 'dart:convert';
import 'dart:io';

import 'package:http/http.dart' as http;
import 'package:http_parser/http_parser.dart';

class DartHttpUtils {
  //創建client實例
  var _client = http.Client();

  //發送GET請求
  getClient() async {
    var url = "https://abc.com:8090/path2?name=abc&pwd=123";
    _client.get(url).then((http.Response response) {
      //處理響應信息
      if (response.statusCode == 200) {
        print(response.body);
      } else {
        print('error');
      }
    });
  }

//發送POST請求,application/x-www-form-urlencoded
  postUrlencodedClient() async {
    var url = "https://abc.com:8090/path3";
    //設置header
    Map<String, String> headersMap = new Map();
    headersMap["content-type"] = "application/x-www-form-urlencoded";
    //設置body參數
    Map<String, String> bodyParams = new Map();
    bodyParams["name"] = "value1";
    bodyParams["pwd"] = "value2";
    _client
        .post(url, headers: headersMap, body: bodyParams, encoding: Utf8Codec())
        .then((http.Response response) {
      if (response.statusCode == 200) {
        print(response.body);
      } else {
        print('error');
      }
    }).catchError((error) {
      print('error');
    });
  }

  //發送POST請求,application/json
  postJsonClient() async {
    var url = "https://abc.com:8090/path4";
    Map<String, String> headersMap = new Map();
    headersMap["content-type"] = ContentType.json.toString();
    Map<String, String> bodyParams = new Map();
    bodyParams["name"] = "value1";
    bodyParams["pwd"] = "value2";
    _client
        .post(url,
            headers: headersMap,
            body: jsonEncode(bodyParams),
            encoding: Utf8Codec())
        .then((http.Response response) {
      if (response.statusCode == 200) {
        print(response.body);
      } else {
        print('error');
      }
    }).catchError((error) {
      print('error');
    });
  }

  // 發送POST請求,multipart/form-data
  postFormDataClient() async {
    var url = "https://abc.com:8090/path5";
    var client = new http.MultipartRequest("post", Uri.parse(url));
    client.fields["name"] = "value1";
    client.fields["pwd"] = "value2";
    client.send().then((http.StreamedResponse response) {
      if (response.statusCode == 200) {
        response.stream.transform(utf8.decoder).join().then((String string) {
          print(string);
        });
      } else {
        print('error');
      }
    }).catchError((error) {
      print('error');
    });
  }

// 發送POST請求,multipart/form-data,上傳文件
  postFileClient() async {
    var url = "https://abc.com:8090/path6";
    var client = new http.MultipartRequest("post", Uri.parse(url));
    http.MultipartFile.fromPath('file', 'sdcard/img.png',
            filename: 'img.png', contentType: MediaType('image', 'png'))
        .then((http.MultipartFile file) {
      client.files.add(file);
      client.fields["description"] = "descriptiondescription";
      client.send().then((http.StreamedResponse response) {
        if (response.statusCode == 200) {
          response.stream.transform(utf8.decoder).join().then((String string) {
            print(string);
          });
        } else {
          response.stream.transform(utf8.decoder).join().then((String string) {
            print(string);
          });
        }
      }).catchError((error) {
        print(error);
      });
    });
  }
  ///其余的HEAD、PUT、DELETE請求用法類似,大同小異,大家可以自己試一下
  ///在Widget里請求成功數據后,使用setState來更新內容和狀態即可
  ///setState(() {
  ///    ...
  ///  });
}
第三種:第三方庫實現。
Flutter第三方庫有很多可以實現Http網絡請求,例如國內開發者開發的dio庫,dio支持多個文件上傳、文件下載、并發請求等復雜的操作。在Dart PUB上可以搜索dio。
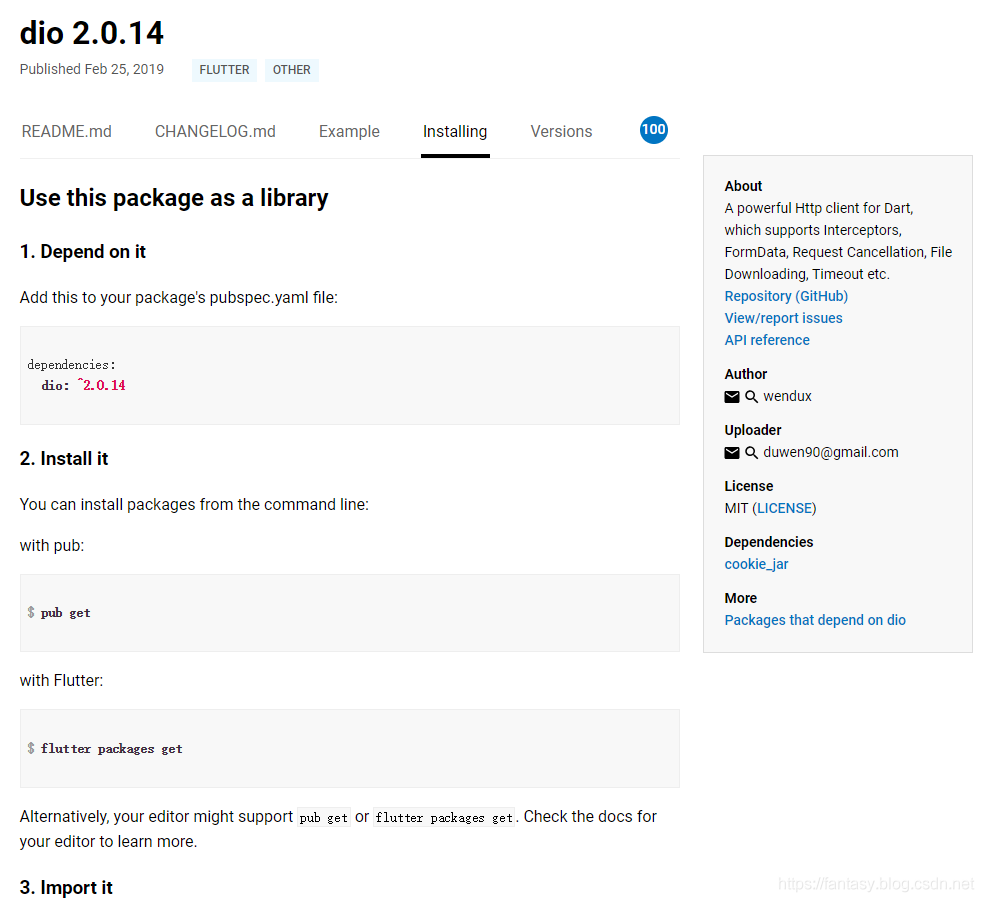
在項目的pubspec.yaml配置文件里加入引用:
dependencies:
  dio: ^2.0.14
這樣就可以引用dio的API庫來實現Http網絡請求了。給一個完整的dio用法例子:
import 'dart:io';

import 'package:dio/dio.dart';

class DartHttpUtils {
  //配置dio,通過BaseOptions
  Dio _dio = Dio(BaseOptions(
      baseUrl: "https://abc.com:8090/",
      connectTimeout: 5000,
      receiveTimeout: 5000));

  //dio的GET請求
  getDio() async {
    var url = "/path2?name=abc&pwd=123";
    _dio.get(url).then((Response response) {
      if (response.statusCode == 200) {
        print(response.data.toString());
      }
    });
  }

  getUriDio() async {
    var url = "/path2?name=abc&pwd=123";
    _dio.getUri(Uri.parse(url)).then((Response response) {
      if (response.statusCode == 200) {
        print(response.data.toString());
      }
    }).catchError((error) {
      print(error.toString());
    });
  }

//dio的GET請求,通過queryParameters配置傳遞參數
  getParametersDio() async {
    var url = "/path2";
    _dio.get(url, queryParameters: {"name": 'abc', "pwd": 123}).then(
        (Response response) {
      if (response.statusCode == 200) {
        print(response.data.toString());
      }
    }).catchError((error) {
      print(error.toString());
    });
  }

//發送POST請求,application/x-www-form-urlencoded
  postUrlencodedDio() async {
    var url = "/path3";
    _dio
        .post(url,
            data: {"name": 'value1', "pwd": 123},
            options: Options(
                contentType:
                    ContentType.parse("application/x-www-form-urlencoded")))
        .then((Response response) {
      if (response.statusCode == 200) {
        print(response.data.toString());
      }
    }).catchError((error) {
      print(error.toString());
    });
  }

  //發送POST請求,application/json
  postJsonDio() async {
    var url = "/path4";
    _dio
        .post(url,
            data: {"name": 'value1', "pwd": 123},
            options: Options(contentType: ContentType.json))
        .then((Response response) {
      if (response.statusCode == 200) {
        print(response.data.toString());
      }
    }).catchError((error) {
      print(error.toString());
    });
  }

  // 發送POST請求,multipart/form-data
  postFormDataDio() async {
    var url = "/path5";
    FormData _formData = FormData.from({
      "name": "value1",
      "pwd": 123,
    });
    _dio.post(url, data: _formData).then((Response response) {
      if (response.statusCode == 200) {
        print(response.data.toString());
      }
    }).catchError((error) {
      print(error.toString());
    });
  }

  // 發送POST請求,multipart/form-data,上傳文件
  postFileDio() async {
    var url = "/path6";
    FormData _formData = FormData.from({
      "description": "descriptiondescription",
      "file": UploadFileInfo(File("./example/upload.txt"), "upload.txt")
    });
    _dio.post(url, data: _formData).then((Response response) {
      if (response.statusCode == 200) {
        print(response.data.toString());
      }
    }).catchError((error) {
      print(error.toString());
    });
  }

  //dio下載文件
  downloadFileDio() {
    var urlPath = "https://abc.com:8090/";
    var savePath = "./abc.html";
    _dio.download(urlPath, savePath).then((Response response) {
      if (response.statusCode == 200) {
        print(response.data.toString());
      }
    }).catchError((error) {
      print(error.toString());
    });
  }

  ///其余的HEAD、PUT、DELETE請求用法類似,大同小異,大家可以自己試一下
  ///在Widget里請求成功數據后,使用setState來更新內容和狀態即可
  ///setState(() {
  ///    ...
  ///  });
}
上述就是小編為大家分享的使用Flutter怎么實現一個Http網絡請求了,如果剛好有類似的疑惑,不妨參照上述分析進行理解。如果想知道更多相關知識,歡迎關注億速云行業資訊頻道。
免責聲明:本站發布的內容(圖片、視頻和文字)以原創、轉載和分享為主,文章觀點不代表本網站立場,如果涉及侵權請聯系站長郵箱:is@yisu.com進行舉報,并提供相關證據,一經查實,將立刻刪除涉嫌侵權內容。