您好,登錄后才能下訂單哦!
您好,登錄后才能下訂單哦!
本篇內容主要講解“HTML5 canvas的基本語法介紹”,感興趣的朋友不妨來看看。本文介紹的方法操作簡單快捷,實用性強。下面就讓小編來帶大家學習“HTML5 canvas的基本語法介紹”吧!
創建 canvas 的方法很簡單,只需要在 HTML 頁面中添加 <canvas> 元素:
<canvas id="myCanvas" width="300" height="150">
Fallback content, in case the browser does not support Canvas.
</canvas>
為了能在 JavaScript 中引用元素,最好給元素設置 ID ;也需要給 canvas 設定高度和寬度。
創建好了畫布后,讓我們來準備畫筆。要在畫布中繪制圖形需要使用 JavaScript 。首先通過 getElementById 函數找到 canvas
元素,然后初始化上下文。之后可以使用上下文 API 繪制各種圖形。下面的腳本在 canvas 中繪制一個矩形 (點擊此處查看效果):
// Get a reference to the element.
var elem = document.getElementById('myCanvas');

// Always check for properties 和 methods, to make sure your code doesn't break
// in other browsers.
if (elem && elem.getContext) {
  // Get the 2d context.
  // Remember: you can only initialize one context per element.
  var context = elem.getContext('2d');
  if (context) {
    // You are done! Now you can draw your first rectangle.
    // You only need to provide the (x,y) coordinates, followed by the width and
    // height dimensions.
    context.fillRect(0, 0, 150, 100);
  }
}
可以把上面代碼放置在文檔 head 部分中,或者放在外部文件中。
介紹了如何創建 canvas 后,讓我們來看看 2D canvas API,看看能用這些函數做些什么。
上面的例子中展示了繪制矩形是多么簡單。
通過fillStyle和strokeStyle屬性可以輕松的設置矩形的填充和線條。顏色值使用方法和 十六進制數、()、() 和 ()( 若瀏覽器支持,如 Opera10 和 Firefox 3)。十六進制數、()、() 和 ()( 若瀏覽器支持,如 Opera10 和 Firefox 3)。
通過 fillRect 可以繪制帶填充的矩形。使用 strokeRect 可以繪制只有邊框沒有填充的矩形。如果想清除部分 canvas 可以使用 clearRect。上述三個方法的參數相同:x,y,width,height。前兩個參數設定 (x,y) 坐標,后兩個參數設置矩形的高度和寬度。
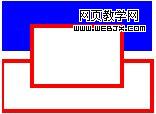
可以使用lineWidth屬性改變線條粗細。讓我們看看使用了fillRect,strokeRect clearRect 和其他的例子:
context.fillStyle   = '#00f'; // blue
context.strokeStyle = '#f00'; // red
context.lineWidth   = 4;

// Draw some rectangles.
context.fillRect  (0,   0, 150, 50);
context.strokeRect(0,  60, 150, 50);
context.clearRect (30, 25,  90, 60);
context.strokeRect(30, 25,  90, 60);
此例子效果圖見圖1.

圖 1: fillRect, strokeRect 和
clearRect效果圖
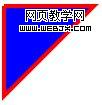
通過 canvas 路徑(path)可以繪制任意形狀。可以先繪制輪廓,然后繪制邊框和填充。創建自定義形狀很簡單,使用 beginPath()開始繪制,然后使用直線、曲線和其他圖形繪制你的圖形。繪制完畢后調用 fill 和 stroke 即可添加填充或者設置邊框。調用 closePath() 結束自定義圖形繪制。
下面是一個繪制三角形的例子:
// Set the style properties.
context.fillStyle   = '#00f';
context.strokeStyle = '#f00';
context.lineWidth   = 4;

context.beginPath();
// Start from the top-left point.
context.moveTo(10, 10); // give the (x,y) coordinates
context.lineTo(100, 10);
context.lineTo(10, 100);
context.lineTo(10, 10);

// Done! Now fill the shape, 和 draw the stroke.
// Note: your shape will not be visible until you call any of the two methods.
context.fill();
context.stroke();
context.closePath();
其效果圖見圖2.

圖 2: 三角形
另一個較負責的例子中使用了直線、曲線和圓弧。
drawImage 方法允許在 canvas 中插入其他圖像
( img 和 canvas 元素) 。在 Opera 中可以再 canvas 中繪制 SVG 圖形。此方法比較復雜,可以有3個、5個或9個參數:
3個參數:最基本的 drawImage 使用方法。一個參數指定圖像位置,另兩個參數設置圖像在 canvas中的位置。
5個參數:中級的 drawImage 使用方法,包括上面所述3個參數,加兩個參數指明插入圖像寬度和高度 (如果你想改變圖像大小)。
9個參數:最復雜 drawImage 雜使用方法,包含上述5個參數外,另外4個參數設置源圖像中的位置和高度寬度。這些參數允許你在顯示圖像前動態裁剪源圖像。
下面是上述三個使用方法的例子:
// Three arguments: the element, destination (x,y) coordinates.
context.drawImage(img_elem,dx,dy);

// Five arguments: the element, destination (x,y) coordinates, and destination
// width and height (if you want to resize the source image).
context.drawImage(img_elem,dx,dy,dw,dh);

// Nine arguments: the element, source (x,y) coordinates, source width and
// height (for cropping), destination (x,y) coordinates, and destination width
// and height (resize).
context.drawImage(img_elem,sx,sy,sw,sh,dx,dy,dw,dh);
其效果見圖3.

圖 3: drawImage 效果圖。
2D Context API 提供了三個方法用于像素級操作:createImageData, getImageData, 和putImageData。
ImageData對象保存了圖像像素值。每個對象有三個屬性:width,height和
data。data屬性類型為CanvasPixelArray,用于儲存width*height*4個像素值。每一個像素有RGB值和透明度alpha值(其值為 0 至
255,包括alpha在內!)。像素的順序從左至右,從上到下,按行存儲。
為了更好的理解其原理,讓我們來看一個例子——繪制紅色矩形
// Create an ImageData object.
var imgd = context.createImageData(50,50);
var pix = imgd.data;

// Loop over each pixel 和 set a transparent red.
for (var i = 0; n = pix.length, i < n; i += 4) {
  pix[i  ] = 255; // red channel
  pix[i+3] = 127; // alpha channel
}

// Draw the ImageData object at the given (x,y) coordinates.
context.putImageData(imgd, 0,0);
注意: 不是所有瀏覽器都實現了 createImageData。在支持的瀏覽器中,需要通過 getImageData 方法獲取 ImageData 對象。請參考示例代碼。
通過 ImageData 可以完成很多功能。如可以實現圖像濾鏡,或可以實現數學可視化 (如分形和其他特效)。下面特效實現了簡單的顏色反轉濾鏡:
// Get the CanvasPixelArray from the given coordinates and dimensions.
var imgd = context.getImageData(x,y,width,height);
var pix = imgd.data;

// Loop over each pixel and invert the color.
for (var i = 0, n = pix.length; i < n; i += 4) {
  pix[i  ] = 255 - pix[i  ]; // red
  pix[i+1] = 255 - pix[i+1]; // green
  pix[i+2] = 255 - pix[i+2]; // blue
  // i+3 is alpha (the fourth element)
}

// Draw the ImageData at the given (x,y) coordinates.
context.putImageData(imgd,x,y);
圖 4 顯示了使用此濾鏡后的 Opera
圖像 (圖 3是原圖)。

圖 4: 顏色反轉濾鏡
雖然最近的 WebKit 版本和 Firefox 3.1 nightly build 才開始支持 Text API ,為了保證文章完整性我決定仍在這里介紹文字 API 。
context 對象可以設置以下 text 屬性:
font:文字字體,同屬性屬性
textAlign:文字水平對齊方式。可取屬性值: start, end, left,right, center。默認值:start.
textBaseline:文字豎直對齊方式。可取屬性值:top, hanging, middle,alphabetic, ideographic, bottom。默認值:alphabetic.
有兩個方法可以繪制文字: fillText 和 strokeText。第一個繪制帶fillStyle填充的文字,后者繪制只有strokeStyle邊框的文字。兩者的參數相同:要繪制的文字和文字的位置(x,y) 坐標。還有一個可選選項——最大寬度。如果需要的話,瀏覽器會縮減文字以讓它適應指定寬度。
文字對齊屬性影響文字與設置的
(x,y) 坐標的相對位置。
下面是一個在 canvas 中繪制"hello world" 文字的例子
context.fillStyle    = '#00f';
context.font         = 'italic 30px sans-serif';
context.textBaseline = 'top';
context.fillText  ('Hello world!', 0, 0);
context.font         = 'bold 30px sans-serif';
context.strokeText('Hello world!', 0, 50);
圖 5 是其效果圖。

圖 5: 文字效果
目前只有 Konqueror 和 Firefox 3.1 nightly build 支持 Shadows API 。API 的屬性為:
shadowColor:陰影顏色。其值和 CSS 顏色值一致。
shadowBlur:設置陰影模糊程度。此值越大,陰影越模糊。其效果和 Photoshop 的高斯模糊濾鏡相同。
shadowOffsetX 和 shadowOffsetY:陰影的 x 和 y 偏移量,單位是像素。
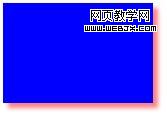
下面是 canvas 陰影的例子:
context.shadowOffsetX = 5;
context.shadowOffsetY = 5;
context.shadowBlur    = 4;
context.shadowColor   = 'rgba(255, 0, 0, 0.5)';
context.fillStyle     = '#00f';
context.fillRect(20, 20, 150, 100);
其效果見圖 6。

圖 6: canvas 陰影效果——藍色矩形,紅色陰影
除了 CSS 顏色, fillStyle 和 strokeStyle 屬性可以設置為 CanvasGradient 對象。——通過 CanvasGradient可以為線條和填充使用顏色漸變。
欲創建 CanvasGradient 對象,可以使用兩個方法:createLinearGradient 和 createRadialGradient。前者創建線性顏色漸變,后者創建圓形顏色漸變。
創建顏色漸變對象后,可以使用對象的 addColorStop 方法添加顏色中間值。
下面的代碼演示了顏色漸變使用方法:
// You need to provide the source 和 destination (x,y) coordinates
// for the gradient (from where it starts 和 where it ends).
var gradient1 = context.createLinearGradient(sx,sy,dx,dy);

// Now you can add colors in your gradient.
// The first argument tells the position for the color in your gradient. The
// accepted value range is from 0 (gradient start) to 1 (gradient end).
// The second argument tells the color you want, using the CSS color format.
gradient1.addColorStop(0,   '#f00'); // red
gradient1.addColorStop(0.5, '#ff0'); // yellow
gradient1.addColorStop(1,   '#00f'); // blue

// For the radial gradient you also need to provide source
// 和 destination circle radius.
// The (x,y) coordinates define the circle center points (start 和
// destination).
var gradient2 = context.createRadialGradient(sx,sy,sr,dx,dy,dr);

// Adding colors to a radial gradient is the same as adding colors to linear
// gradients.
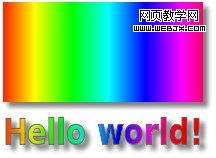
我也準備了一個更復雜的例子,使用了線性顏色漸變、陰影和文字。其效果見圖 7。

圖 7: 使用線性顏色漸變的例子
到此,相信大家對“HTML5 canvas的基本語法介紹”有了更深的了解,不妨來實際操作一番吧!這里是億速云網站,更多相關內容可以進入相關頻道進行查詢,關注我們,繼續學習!
免責聲明:本站發布的內容(圖片、視頻和文字)以原創、轉載和分享為主,文章觀點不代表本網站立場,如果涉及侵權請聯系站長郵箱:is@yisu.com進行舉報,并提供相關證據,一經查實,將立刻刪除涉嫌侵權內容。