您好,登錄后才能下訂單哦!
您好,登錄后才能下訂單哦!
這篇文章給大家介紹怎么在Angular項目中利用socket.io實現一個通信功能,內容非常詳細,感興趣的小伙伴們可以參考借鑒,希望對大家能有所幫助。
在終端輸入以下命令為我們的angular項目安裝express、socket.io、socket.io-client
npm install express socket.io socket.io-client
本人安裝的各版本信息如下:
"express": "^4.17.1",
"socket.io": "^3.0.4",
"socket.io-client": "^3.0.4",
可以在項目中新建一個server文件夾,用來存放我們的后臺服務,然后新建文件
const app = require('express')();
const http = require('http').createServer(app);

const io = require('socket.io')(http, {
 cors: {  // 處理跨域問題
  origin: "http://localhost:4300", // angular項目的啟動端口,默認4200,本人項目的啟動端口為4300,大家根據自己情況修改
  methods: ["GET", "POST"],
  credentials: true
 }
});

io.on('connection', (socket) => {
 console.log('user connected');

 socket.on('add-message', (message) => {
  io.emit('message', {type: 'new-message', text: message});
 });
})

http.listen(4000, () => { // 后臺服務啟動端口
 console.log('start on 4000....');
})import { Injectable } from '@angular/core';
import { Observable, Subject } from 'rxjs';
import { io } from 'socket.io-client';
@Injectable()
export class ChatService {
private url = 'http://localhost:4000'; // 后臺服務端口
private socket: any;
sendMessage(message: any) {
this.socket.emit('add-message', message);
}
getMessages(): Observable<any> {
return new Observable(observer => {
this.socket = io(this.url, {withCredentials: true});
this.socket.on('message', (data) => {
observer.next(data);
});
return () => {
this.socket.disconnect();
}
})
}
}這里我們創建了兩個方法,sendMessage用于將客戶端的信息發送給服務端,getMessages用于建立連接,監聽服務端事件并返回一個可觀察的對象。
import { Component, OnInit, OnDestroy } from '@angular/core';
import { ChatService } from './chat.service';

@Component({
 selector: 'test-chat',
 template: `<div *ngFor="let message of messages">
        {{message.text}}
       </div>
       <input [(ngModel)]="message" />
       <button (click)="sendMessage()">Send</button>`,
 providers: [ChatService] // 注入依賴
})
export class TestChatComponent implements OnInit, OnDestroy {
 messages = [];
 connection: any;
 message: any;

 constructor(private chatService: ChatService) {
 }

 sendMessage() {
  this.chatService.sendMessage(this.message);
  this.message = '';
 }

 ngOnInit() {
  this.connection = this.chatService.getMessages()
   .subscribe(message => {  // 組件初始化時訂閱信息
    this.messages.push(message);
   });
 }

 ngOnDestroy() {
  this.connection.unsubscribe();  // 組件銷毀取消訂閱
 }
}
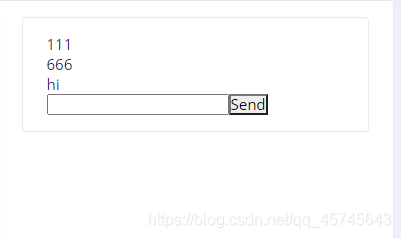
這樣一個簡單的socket通信就完成了,效果圖如下:
啟動服務

前端頁面


如果遇到跨域問題,大概率是沒有處理跨域,檢查自己的代碼和端口號是否正確,詳情參考handing-cors
另外,如果遇到(本人遇到了,愣是在網上找了半天依然未果)
POST http://localhost:4000/socket.io/?EIO=3&transport=polling&t=NQtz_E3 400 (Bad Request)
這類的報錯,npm安裝socket.io-client(這也是為什么我在文章一開始就安裝它),在service.ts文件引入
import { io } from 'socket.io-client';在網上看到很多人是這樣寫的 import * as io from ‘socket.io-client',這種寫法在typescript中是會報錯的,改成上面的寫法即可。
關于怎么在Angular項目中利用socket.io實現一個通信功能就分享到這里了,希望以上內容可以對大家有一定的幫助,可以學到更多知識。如果覺得文章不錯,可以把它分享出去讓更多的人看到。
免責聲明:本站發布的內容(圖片、視頻和文字)以原創、轉載和分享為主,文章觀點不代表本網站立場,如果涉及侵權請聯系站長郵箱:is@yisu.com進行舉報,并提供相關證據,一經查實,將立刻刪除涉嫌侵權內容。