您好,登錄后才能下訂單哦!
您好,登錄后才能下訂單哦!
這篇文章給大家分享的是有關docker中pod生命周期的示例分析的內容。小編覺得挺實用的,因此分享給大家做個參考,一起跟隨小編過來看看吧。
[root@master manifests]# kubectl explain pods.spec.containers #查看幫助
自主式pod資源:
資源的清單格式:
一級字段:apiVersion(group/version組成),kind,metadata(包括name,namespace,labels,annotations),spec ,status。
- name:pod名字
image:鏡像名字
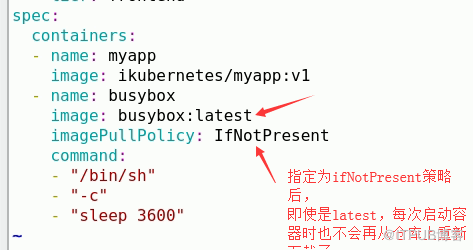
imagePullPolicy:表示從哪拉鏡像,Always(不管本地有沒有鏡像,都要從倉庫中下載鏡像,也就是說,即使本地有鏡像了,也不使用本地鏡像,而是從倉庫下載), Never(從來不從倉庫下載鏡像,也就是說本地有鏡像就用,沒有就算了), IfNotPresent(如果本地存在就直接使用,不存在才從倉庫下載)。默認的策略是:當鏡像標簽版本是latest,默認策略就是Always;如果指定特定版本默認拉取策略就是IfNotPresent。

如上圖,指定ImagePullPolicy策略為ifNotPresent后,即使image指定的版本未latest,這樣每次啟動容器,也不會從倉庫重新下載鏡像了。
ports:指定暴露容器端口號,可以指定多個端口,如下:
[root@master manifests]# cat pod-demo.yaml
apiVersion: v1
kind: Pod
metadata:
  name: pod-demo
  namespace: default
  labels:
    app: myapp  #kv格式的,也可以用花括號表示
    tier: frontend #定義所屬的層次
spec:
  containers:
  - name: myapp  #前面的-號表示這是一個列表格式的,也可以用中括號表示
    image: tomcat
    ports:
    - name: http
      containerPort: 80
    - name: https
      containerPort: 443
  - name: busybox
    image: busybox:latest
    imagePullPolicy: IfNotPresent #指定ImagePullPolicy策略為ifNotPresent后,即使image指定的版本未latest,以后每次啟動容器,也不會從倉庫重新下載鏡像了
    command:
    - "/bin/sh"
    - "-c"
    - "echo $(date) >> /usr/share/nginx/html/index.html; sleep 5"
   #以上命令也可以寫作:command: ["/bin/sh","-c","sleep 3600"]
args:相當于dockerfile里面的cmd
command:相當于docker里面的Entrypoint
如果既沒有指定args,也沒有指定command,那么會默認使用dockfile的cmd和entrypoint。
如果指定了command,但沒有提供args,那么就直接運行command。
如果指定了args,但是沒指定command,那么將使用鏡像中的entrypoint命令,把我們寫的args當做參數傳遞給鏡像中的entrypoint。
如果既用來command,又用了args,那么鏡像中的cmd和entrypoint將被忽略,而使用K8s提供的command with args。

參考文檔:https://kubernetes.io/docs/tasks/inject-data-application/define-command-argument-container/
標簽是k8s極具特色的管理方式。一個標簽可以對應多個資源,一個資源也可以有多個標簽,它們是多對多的關系。
一個資源擁有多個標簽,可以實現不同維度的管理。
標簽是key=value格式的,key最大63個字符,只能是字母、數字、_、-、.五種類型的組合。只能以字母或數字開頭結尾。
我們也可以使用標簽選擇器來指定能使用哪些標簽。
可以使用如下命令看標簽:
[root@master manifests]# kubectl get pods --show-labels
NAME                          READY     STATUS             RESTARTS   AGE       LABELS
pod-demo                      1/2       CrashLoopBackOff   24         1h        app=myapp,tier=frontend
可以用-l來過濾包含app標簽的pod
[root@master manifests]# kubectl get pods -l app --show-labels
NAME       READY     STATUS             RESTARTS   AGE       LABELS
pod-demo   1/2       CrashLoopBackOff   25         1h        app=myapp,tier=frontend
給資源對象打標簽,我們再給前面創建的pod-demo pod打個release=canary的標簽:
[root@master manifests]# kubectl label pods pod-demo release=canary
pod/pod-demo labeled
[root@master manifests]# kubectl get pods -l app --show-labels
NAME       READY     STATUS             RESTARTS   AGE       LABELS
pod-demo   1/2       CrashLoopBackOff   27         1h        app=myapp,release=canary,tier=frontend
修改標簽的值:
[root@master manifests]# kubectl label pods pod-demo release=stable --overwrite
pod/pod-demo labeled
[root@master manifests]# kubectl get pods -l app --show-labels
NAME       READY     STATUS             RESTARTS   AGE       LABELS
pod-demo   1/2       CrashLoopBackOff   27         1h        app=myapp,release=stable,tier=frontend
查找既有release標簽,又擁有app標簽的:
[root@master manifests]# kubectl get pods -l app,release --show-labels
NAME       READY     STATUS             RESTARTS   AGE       LABELS
pod-demo   1/2       CrashLoopBackOff   27         2h        app=myapp,release=stable,tier=frontend
標簽選擇器分為:等值關系的標簽選擇器和集合關系的標簽選擇器。
等值關系的標簽選擇器:可以用=或者==表示等于,!=表示不等于:
[root@master manifests]# kubectl get pods -l release=stable --show-labels
NAME       READY     STATUS             RESTARTS   AGE       LABELS
pod-demo   1/2       CrashLoopBackOff   29         2h        app=myapp,release=stable,tier=frontend
[root@master manifests]# kubectl get pods -l release=stable,app=myapp --show-labels
NAME       READY     STATUS             RESTARTS   AGE       LABELS
pod-demo   1/2       CrashLoopBackOff   30         2h        app=myapp,release=stable,tier=frontend
[root@master manifests]# kubectl get pods -l release!=stable --show-labels
NAME                          READY     STATUS             RESTARTS   AGE       LABELS
client                        1/1       Running            0          1d        run=client
myapp-fcc5f7f7c-4x2p7         0/1       ImagePullBackOff   0          1d        pod-template-hash=977193937,run=myapp
myapp-fcc5f7f7c-dnkdq         0/1       ImagePullBackOff   0          1d        pod-template-hash=977193937,run=myapp
mytomcat-5f8c6fdcb-7t5s2      1/1       Running            0          1d        pod-template-hash=194729876,run=mytomcat
mytomcat-5f8c6fdcb-lhcsc      1/1       Running            0          1d        pod-template-hash=194729876,run=mytomcat
mytomcat-5f8c6fdcb-rntrg      1/1       Running            0          1d        pod-template-hash=194729876,run=mytomcat
nginx-deploy-5b595999-fpm8x   1/1       Running            0          1d        pod-template-hash=16151555,release=canary,run=nginx-deploy
集合關系的標簽選擇器:key in (value1,value2...),key notin (value1,value2...),!key
[root@master ~]# kubectl get pods -l "release in (canary,beta,alpha)" --show-labels
NAME                          READY     STATUS    RESTARTS   AGE       LABELS
nginx-deploy-5b595999-fpm8x   1/1       Running   0          1d        pod-template-hash=16151555,release=canary,run=nginx-deploy
[root@master ~]# kubectl get pods -l "release notin (canary,beta,alpha)" --show-labels
NAME                       READY     STATUS             RESTARTS   AGE       LABELS
client                     1/1       Running            0          1d        run=client
myapp-fcc5f7f7c-4x2p7      0/1       ImagePullBackOff   0          1d        pod-template-hash=977193937,run=myapp
myapp-fcc5f7f7c-dnkdq      0/1       ImagePullBackOff   0          1d        pod-template-hash=977193937,run=myapp
我們知道pod控制器和service都是要通過標簽來進行關聯,通常使用matchLabels,matchExpressions。許多資源支持內嵌字段定義其使用的標簽選擇器。
matchLabels:直接給定鍵值,相當于使用等值關系一樣;
matchExpressions:基于給定的表達式來定義使用標簽選擇器,格式為{key!"KEY",operator:"OPERATOR",values:[VAL1,VAL2,....]},常用的操作符有:
1)In,NotIn,:values字段的值必須為非空列表
2)Exists,NotExists:values字段的值必須為空列表
不光pods有標簽,nodes等對象都有標簽,如下:
[root@master ~]# kubectl get nodes --show-labels
NAME      STATUS    ROLES     AGE       VERSION   LABELS
master    Ready     master    4d        v1.11.2   beta.kubernetes.io/arch=amd64,beta.kubernetes.io/os=linux,kubernetes.io/hostname=master,node-role.kubernetes.io/master=
node1     Ready     <none>    4d        v1.11.2   beta.kubernetes.io/arch=amd64,beta.kubernetes.io/os=linux,kubernetes.io/hostname=node1
node2     Ready     <none>    4d        v1.11.2   beta.kubernetes.io/arch=amd64,beta.kubernetes.io/os=linux,kubernetes.io/hostname=node2
上面的標簽是內建的標簽,其中beta.kubernetes.io這部分是能在dns中解析的,該部分字符長度不能超過253個字符。
同樣,我們也可以給nodes打標簽,比如我們下面給node1節點打個disktype=ssd的標簽
[root@master ~]# kubectl label nodes node1 disktype=ssd
node/node1 labeled
[root@master ~]# kubectl get nodes --show-labels
NAME      STATUS    ROLES     AGE       VERSION   LABELS
master    Ready     master    4d        v1.11.2   beta.kubernetes.io/arch=amd64,beta.kubernetes.io/os=linux,kubernetes.io/hostname=master,node-role.kubernetes.io/master=
node1     Ready     <none>    4d        v1.11.2   beta.kubernetes.io/arch=amd64,beta.kubernetes.io/os=linux,disktype=ssd,kubernetes.io/hostname=node1
node2     Ready     <none>    4d        v1.11.2   beta.kubernetes.io/arch=amd64,beta.kubernetes.io/os=linux,kubernetes.io/hostname=node2
nodeSelector:可以使pod運行在指定的node節點上,我們如下舉例演示該功能。
[root@master ~]# kubectl get pods -o wide
NAME                          READY     STATUS             RESTARTS   AGE       IP            NODE
client                        1/1       Running            0          2d        10.244.2.4    node2
myapp-fcc5f7f7c-4x2p7         0/1       ImagePullBackOff   0          1d        10.244.1.9    node1
myapp-fcc5f7f7c-dnkdq         0/1       ImagePullBackOff   0          1d        10.244.2.6    node2
mytomcat-5f8c6fdcb-7t5s2      1/1       Running            0          1d        10.244.2.8    node2
mytomcat-5f8c6fdcb-lhcsc      1/1       Running            0          1d        10.244.2.7    node2
mytomcat-5f8c6fdcb-rntrg      1/1       Running            0          1d        10.244.1.10   node1
nginx-deploy-5b595999-fpm8x   1/1       Running            0          1d        10.244.1.7    node1
pod-demo                      1/2       CrashLoopBackOff   303        1d        10.244.2.11   node2
上面我們看到pod-demo運行在node2節點上,下面我們讓它運行在node1節點上。我們剛才在node1上打了個disktype=ssd的標簽,所以我們用nodeSelector在資源清單中如下定義:
[root@master manifests]# cat pod-demo.yaml
apiVersion: v1
kind: Pod
metadata:
  name: pod-demo
  namespace: default
  labels:
    app: myapp  #kv格式的,也可以用花括號表示
    tier: frontend #定義所屬的層次
spec:
  containers:
  - name: myapp  #前面的-號表示這是一個列表格式的,也可以用中括號表示
    image: tomcat
    ports:
    - name: http
      containerPort: 80
    - name: https
      containerPort: 443
  - name: busybox
    image: busybox:latest
    imagePullPolicy: IfNotPresent #指定ImagePullPolicy策略為ifNotPresent后,即使image指定的版本未latest,以后每次啟動容器,也不會從倉庫重新下載鏡像了
    command:
    - "/bin/sh"
    - "-c"
    - "echo $(date) >> /usr/share/nginx/html/index.html; sleep 5"
   #以上命令也可以寫作:command: ["/bin/sh","-c","sleep 3600"]
  nodeSelector: #指定該pod運行在有disktype=ssd標簽的node節點上
    disktype: ssd
[root@master manifests]# kubectl delete -f pod-demo.yaml
pod "pod-demo" deleted
[root@master manifests]# kubectl create  -f pod-demo.yaml
pod/pod-demo created
[root@master manifests]# kubectl get pods -o wide
NAME                          READY     STATUS             RESTARTS   AGE       IP            NODE
client                        1/1       Running            0          2d        10.244.2.4    node2
myapp-fcc5f7f7c-4x2p7         0/1       ImagePullBackOff   0          1d        10.244.1.9    node1
myapp-fcc5f7f7c-dnkdq         0/1       ImagePullBackOff   0          1d        10.244.2.6    node2
mytomcat-5f8c6fdcb-7t5s2      1/1       Running            0          1d        10.244.2.8    node2
mytomcat-5f8c6fdcb-lhcsc      1/1       Running            0          1d        10.244.2.7    node2
mytomcat-5f8c6fdcb-rntrg      1/1       Running            0          1d        10.244.1.10   node1
nginx-deploy-5b595999-fpm8x   1/1       Running            0          1d        10.244.1.7    node1
pod-demo                      2/2       Running            2          37s       10.244.1.14   node1
上面看到,pod-demo運行在了帶有disktype=ssd標簽的node1節點上了。
那么有人可能會問了,我們可不可以指定pod-demo運行在指定node上呢。當然可以了,這個選項就是nodeName。大家可以自定去測試。
與labels的區別是,annotaitons不能用于挑選資源對象,僅用于為對象提供原數據。這些元數據可能被某些程序所用到,而且很重要。annotations的鍵值對沒有字符數限制。
查看資源的注解:
[root@master manifests]# kubectl delete -f pod-demo.yaml
pod "pod-demo" deleted
[root@master manifests]# cat cat pod-demo.yaml
cat: cat: No such file or directory
apiVersion: v1
kind: Pod
metadata:
  name: pod-demo
  namespace: default
  labels:
    app: myapp  #kv格式的,也可以用花括號表示
    tier: frontend #定義所屬的層次
  annotations:
    chenzx.com/created-by: "cluster-admin" #這是注解的鍵值對
spec:
  containers:
  - name: myapp  #前面的-號表示這是一個列表格式的,也可以用中括號表示
    image: tomcat
    ports:
    - name: http
      containerPort: 80
    - name: https
      containerPort: 443
  - name: busybox
    image: busybox:latest
    imagePullPolicy: IfNotPresent #指定ImagePullPolicy策略為ifNotPresent后,即使image指定的版本未latest,以后每次啟動容器,也不會從倉庫重新下載鏡像了
    command:
    - "/bin/sh"
    - "-c"
    - "echo $(date) >> /usr/share/nginx/html/index.html; sleep 5"
   #以上命令也可以寫作:command: ["/bin/sh","-c","sleep 3600"]
  nodeSelector: #指定該pod運行在有disktype=ssd標簽的node節點上
    disktype: ssd
[root@master manifests]# kubectl create -f pod-demo.yaml
pod/pod-demo created
[root@master manifests]# kubectl describe pods pod-demo
Annotations:        chenzx.com/created-by=cluster-admin
Status:             Running
IP:                 10.244.1.15
一個容器里面可以運行多個進程,但是通常我們只在容器里面運行一個進程。
在一個pod中,可以運行多個容器,但是通常我們只在一個pod里面運行一個容器。
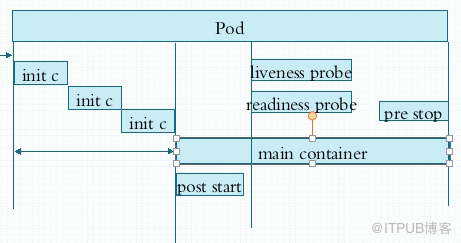
一個容器在創建之前,有多個初始化容器(init container)用來進行初始化環境,init container執行完,它就退出了。接下來是主容器(main container)開始啟動,主容器啟動時也要初始化主容器里面的環境。在主容器剛剛啟動之后,用戶可以手動嵌入做一個操作叫post start。在主容器結束前,也可以做一個收尾操作pre stop,用來在主容器結束前做一個清理。

在post start后,就開始做健康檢查,第一個健康檢查叫存活狀態檢查(liveness probe ),用來檢查主容器存活狀態的;第二個健康檢查叫準備就緒檢查(readyness probe),用來檢查主容器是否啟動就緒。
pod的狀態有:
a) Pending:當啟動一個容器時,發現條件不滿足,就會進入pending狀態;
b) Runing
c)Failed
d)Succeeded
e) Unknown;如果kubelete出現故障,那么apiserver就連不上kubelete了,就會出現未知的錯誤
創建pod的過程:pod創建時先和apiserver溝通,然后把信息存儲在etcd中;接下來apiserver會請求scheduler,并把調度的結果也保存在etcd中。假如scheduler把pod調度到node1節點上了,此時node1節點上的kublete會從etcd中拿到用戶創建的清單,根據清單在node1上運行這個pod。不管pod在node1上運行成功還是失敗,都會把結果反饋給apiserver,同時把運行結果保存在etcd中。
健康檢查分三個層次:1、直接執行命令;2、向tcp連接請求;3、向http發get請求。
總結:pod生命周期中的重要行為:
1)初始化容器
2)容器探測(liveness存活行探測和readness準備就緒探測)
存活不一定就緒。
[root@master manifests]# kubectl explain pods.spec.containers.livenessProbe
可以看到有三種探針,exec、 httpGet、tcpSocket
failureThreshold表示探測失敗次數,默認是3探測次失敗,才認為是真失敗了。
periodSeconds:周期間隔時長,默認10s探測一次;
timeoutSeconds:超時時間,表示發出探測,對方始終沒有響應,需要等多久,默認等1s
initialDelaySeconds:默認是容器一啟動就開始探測,但是此時容器可能還沒啟動完呢,所以這時探測肯定是失敗的。所以initialDelaySeconds表示容器啟動多長時間后才開始探測。
[root@master manifests]# kubectl explain pods.spec.containers.livenessProbe.exec
[root@master manifests]# cat liveness.exec.ymal
apiVersion: v1
kind: Pod
metadata:
  name: liveness-exec-pod
  namespace: default
spec:
  containers:
  - name: liveness-exec-container
    image: busybox:latest
    imagePullPolicy: IfNotPresent #如果存在就不要下載了
    command: ["/bin/sh","-c","touch /tmp/healthy;sleep 60;rm -f /tmp/healthy;sleep 3600"]
    livenessProbe: #存活性探測
      exec:
        command: ["test","-e","/tmp/healthy"] #-e表示探測文件是否存在
      initialDelaySeconds: 1 #表示容器啟動后多長時間開始探測
      periodSeconds: 3 #表示每隔3s鐘探測一次
[root@master manifests]# kubectl create -f liveness.exec.ymal
pod/liveness-exec-pod created
[root@master manifests]# kubectl get pods -w
NAME                          READY     STATUS             RESTARTS   AGE
liveness-exec-pod             1/1       Running            2          4m
[root@master manifests]# kubectl get pods -w
NAME                          READY     STATUS             RESTARTS   AGE
liveness-exec-pod             1/1       Running            4          6m
[root@master manifests]# kubectl get pods -w
NAME                          READY     STATUS             RESTARTS   AGE
client                        1/1       Running            0          3d
liveness-exec-pod             1/1       Running            5          9m
[root@master manifests]#  kubectl get pods -w
NAME                          READY     STATUS             RESTARTS   AGE
client                        1/1       Running            0          3d
liveness-exec-pod             1/1       Running            9          23m
可以看到restart此時在隨著時間增長。
上面的例子是用exec執行命令進行探測的。
下面我們看看基于tcp和httpget探測的選項。
[root@master manifests]kubectl explain pods.spec.containers.livenessProbe.tcpSocket
[root@master manifests]# kubectl explain pods.spec.containers.livenessProbe.httpGet
下面舉個例子:
[root@master manifests]# cat liveness.httpget.yaml
apiVersion: v1
kind: Pod
metadata:
  name: liveness-httpget-pod
  namespace: default
spec:
  containers:
  - name: liveness-httpget-container
    image: nginx:latest
    imagePullPolicy: IfNotPresent #如果存在就不要下載了
    ports:
    - name: http
      containerPort: 80
    livenessProbe: #存活性探測
      httpGet:
        port: http
        path: /index.html
      initialDelaySeconds: 1
      periodSeconds: 3 #表示每隔3s鐘探測一次
[root@master manifests]# kubectl create -f liveness.httpget.yaml
[root@master manifests]# kubectl get pods
NAME                          READY     STATUS             RESTARTS   AGE
liveness-httpget-pod          1/1       Running            0          4m
[root@master manifests]# kubectl exec -it liveness-httpget-pod  -- /bin/sh
# rm -rf  /usr/share/nginx/html/index.html
[root@master manifests]#  kubectl get pods
NAME                          READY     STATUS             RESTARTS   AGE
liveness-httpget-pod          1/1       Running            1          27m
上面可以看到,當刪除pod里面的/usr/share/nginx/html/index.html,liveness監測到index.html文件被刪除了,所以restarts次數為1,但是只重啟一次,不會再重啟了。這是因為重啟一次后,nginx容器就重新初始化了,里面就會又生成index.html文件。所以里面就會有新的index.html文件了。
[root@master manifests]# cat  readiness-httpget.ymal
apiVersion: v1
kind: Pod
metadata:
  name: readdliness-httpget-pod
  namespace: default
spec:
  containers:
  - name: readliness-httpget-container
    image: nginx:latest
    imagePullPolicy: IfNotPresent #如果存在就不要下載了
    ports:
    - name: http
      containerPort: 80
    readinessProbe: #準備型探針
      httpGet:
        port: http
        path: /index.html
      initialDelaySeconds: 1
      periodSeconds: 3 #表示每隔3s鐘探測一次
[root@master manifests]# kubectl create -f readiness-httpget.ymal
pod/readdliness-httpget-pod created
[root@master ~]# kubectl get pods
NAME                          READY     STATUS             RESTARTS   AGE
readdliness-httpget-pod       1/1       Running            0          16h
[root@master ~]# kubectl exec -it readdliness-httpget-pod -- /bin/sh
# rm -rf /usr/share/nginx/html/index.html
[root@master ~]# kubectl get pods
NAME                          READY     STATUS             RESTARTS   AGE
readdliness-httpget-pod       0/1       Running            0          16h
上面可以看到,ready變成0/1了,但是status是runing的,這就是說nginx進程是在的,只是index.html不見了,可以判定nginx沒有就緒。
[root@master ~]# kubectl explain pods.spec.containers.lifecycle.postStart
postStart是指容器在啟動之后立即執行的操作,如果執行操作失敗了,容器將被終止并且重啟。而重啟與否是由重啟策略。
[root@master manifests]# cat poststart-pod.yaml
apiVersion: v1
kind: Pod
metadata:
  name: poststart-pod
  namespace: default
spec:
  containers:
  - name: busybox-httpd
    image: busybox:latest
    imagePullPolicy: IfNotPresent
    lifecycle: #生命周期事件
      postStart:
        exec:
          command: ["mkdir", "-p","/data/web/html"] #這個command是定義postStart后的需要執行的命令
    command: ["/bin/sh","-c","sleep 3600"] #這是定義容器里面執行的命令,不過這個命令要先于postStart里面的command
    #args: ["-f","-h /data/web/html"]  #-f是前臺,-h是家目錄
[root@master manifests]# kubectl create -f poststart-pod.yaml
pod/posttart-pod created
說明:刪除的方法
[root@master manifests]# kubectl delete -f poststart-pod.yaml
pod "posttart-pod" deleted
[root@master manifests]# kubectl get pods
NAME                          READY     STATUS             RESTARTS   AGE
poststart-pod                 1/1       Running            0          3m
[root@master manifests]#  kubectl exec -it poststart-pod -- /bin/sh
/ # ls /data
web
/ # ls /data/web/html/
上面看到在容器啟動后,建立了/data/web/html目錄。這就是postStart的用法。
[root@master ~]# kubectl explain pods.spec.containers.lifecycle.preStop
preStop是指容器在終止前要立即執行的命令,等這些命令執行完了,容器才能終止。
一旦pod中的容器掛了,我們就把容器重啟。
策略包括如下:
Always:表示容器掛了總是重啟,這是默認策略
OnFailures:表容器狀態為錯誤時才重啟,也就是容器正常終止時才重啟
Never:表示容器掛了不予重啟
對于Always這種策略,容器只要掛了,就會立即重啟,這樣是很耗費資源的。所以Always重啟策略是這么做的:第一次容器掛了立即重啟,如果再掛了就要延時10s重啟,第三次掛了就等20s重啟...... 依次類推
k8s會給容器30s的時間進行終止,如果30s后還沒終止,就會強制終止。
pod:
        apiVersion
        kind
        metadata
        spec
        status(只讀)
        spec:
                containers
                nodeSelector
                nodeName
                restartPolicy: Always,Never,OnFailure
                containers:
                        name
                        image
                        imagePullPolicy: Always、Never、IfNotPresent
                        ports:
                                name
                                containerPort
                        livenessProbe
                        readinessProbe
                        liftcycle
                ExecAction: exec
                TCPSocketAction: tcpSocket
                HTTPGetAction: httpGet
感謝各位的閱讀!關于“docker中pod生命周期的示例分析”這篇文章就分享到這里了,希望以上內容可以對大家有一定的幫助,讓大家可以學到更多知識,如果覺得文章不錯,可以把它分享出去讓更多的人看到吧!
免責聲明:本站發布的內容(圖片、視頻和文字)以原創、轉載和分享為主,文章觀點不代表本網站立場,如果涉及侵權請聯系站長郵箱:is@yisu.com進行舉報,并提供相關證據,一經查實,將立刻刪除涉嫌侵權內容。