您好,登錄后才能下訂單哦!
您好,登錄后才能下訂單哦!
這篇文章主要介紹如何實現Keras在fit_generator訓練方式中加入圖像random_crop操作,文中介紹的非常詳細,具有一定的參考價值,感興趣的小伙伴們一定要看完!
使用Keras作前端寫網絡時,由于訓練圖像尺寸較大,需要做類似 tf.random_crop 圖像裁剪操作。
為此研究了一番Keras下已封裝的API。
Data Augmentation(數據擴充)
Data Aumentation 指使用下面或其他方法增加輸入數據量。我們默認圖像數據。
旋轉&反射變換(Rotation/reflection): 隨機旋轉圖像一定角度; 改變圖像內容的朝向;
翻轉變換(flip): 沿著水平或者垂直方向翻轉圖像;
縮放變換(zoom): 按照一定的比例放大或者縮小圖像;
平移變換(shift): 在圖像平面上對圖像以一定方式進行平移;
可以采用隨機或人為定義的方式指定平移范圍和平移步長, 沿水平或豎直方向進行平移. 改變圖像內容的位置;
尺度變換(scale): 對圖像按照指定的尺度因子, 進行放大或縮小; 或者參照SIFT特征提取思想, 利用指定的尺度因子對圖像濾波構造尺度空間. 改變圖像內容的大小或模糊程度;
對比度變換(contrast): 在圖像的HSV顏色空間,改變飽和度S和V亮度分量,保持色調H不變. 對每個像素的S和V分量進行指數運算(指數因子在0.25到4之間), 增加光照變化;
噪聲擾動(noise): 對圖像的每個像素RGB進行隨機擾動, 常用的噪聲模式是椒鹽噪聲和高斯噪聲;
Data Aumentation 有很多好處,比如數據量較少時,用數據擴充來增加訓練數據,防止過擬合。
ImageDataGenerator
在Keras中,ImageDataGenerator就是專門做數據擴充的。
from keras.preprocessing.image import ImageDataGenerator
注:Using TensorFlow backend.
官方寫法如下:
(x_train, y_train), (x_test, y_test) = cifar10.load_data()

datagen = ImageDataGenerator(
 featurewise_center=True,
 ...
 horizontal_flip=True)

# compute quantities required for featurewise normalization
datagen.fit(x_train)

# 使用fit_generator的【自動】訓練方法: fits the model on batches with real-time data augmentation
model.fit_generator(datagen.flow(x_train, y_train, batch_size=32),
   steps_per_epoch=len(x_train), epochs=epochs)

# 自己寫range循環的【手動】訓練方法
for e in range(epochs):
 print 'Epoch', e
 batches = 0
 for x_batch, y_batch in datagen.flow(x_train, y_train, batch_size=32):
 loss = model.train(x_batch, y_batch)
 batches += 1
 if batches >= len(x_train) / 32:
  # we need to break the loop by hand because
  # the generator loops indefinitely
  break
ImageDataGenerator的參數說明見官網文檔。
上面兩種訓練方法的差異不討論,我們要關注的是:官方封裝的訓練集batch生成器是ImageDataGenerator對象的flow方法(或flow_from_directory),該函數返回一個和python定義相似的generator。在它前一步,數據變換是ImageDataGenerator對象的fit方法。
random_crop并未在ImageDataGenerator中內置,但參數中給了一個preprocessing_function,我們可以利用它自定義my_random_crop函數,像下面這樣寫:
def my_random_crop(image):
 random_arr = numpy.random.randint(img_sz-crop_sz+1, size=2)
 y = int(random_arr[0])
 x = int(random_arr[1])
 h = img_crop
 w = img_crop
 image_crop = image[y:y+h, x:x+w, :]
 return image_crop

datagen = ImageDataGenerator(
 featurewise_center=False,
 ···
 preprocessing_function=my_random_crop)

datagen.fit(x_train)
fit方法調用時將預設的變換應用到x_train的每張圖上,包括圖像crop,因為是單張依次處理,每張圖的crop位置隨機。
在訓練數據(x=image, y=class_label)時這樣寫已滿足要求;
但在(x=image, y=image_mask)時該方法就不成立了。圖像單張處理的緣故,一對(image, image_mask)分別crop的位置無法保持一致。
雖然官網也給出了同時變換image和mask的寫法,但它提出的方案能保證二者內置函數的變換一致,自定義函數的random變量仍是隨機的。
fit_generator
既然ImageDataGenerator和flow方法不能滿足我們的random_crop預處理要求,就在fit_generator函數處想方法修改。
先看它的定義:
def fit_generator(self, generator, samples_per_epoch, nb_epoch,
   verbose=1, callbacks=[],
   validation_data=None, nb_val_samples=None,
   class_weight=None, max_q_size=10, **kwargs):
第一個參數generator,可以傳入一個方法,也可以直接傳入數據集。前面的 datagen.flow() 即是Keras封裝的批量數據傳入方法。
顯然,我們可以自定義。
def generate_batch_data_random(x, y, batch_size):
 """分批取batch數據加載到顯存"""
 total_num = len(x)
 batches = total_num // batch_size
 while (True):
 i = randint(0, batches)
 x_batch = x[i*batch_size:(i+1)*batch_size]
 y_batch = y[i*batch_size:(i+1)*batch_size]
 random_arr = numpy.random.randint(img_sz-crop_sz+1, size=2)
 y_pos = int(random_arr[0])
 x_pos = int(random_arr[1])
 x_crop = x_batch[:, y_pos:y_pos+crop_sz, x_pos:x_pos+crop_sz, :]
 y_crop = y_batch[:, y_pos:y_pos+crop_sz, x_pos:x_pos+crop_sz, :]
 yield (x_crop, y_crop)
這樣寫就符合我們同組image和mask位置一致的random_crop要求。
注意:
由于沒有使用ImageDataGenerator內置的數據變換方法,數據擴充則也需要自定義;由于沒有使用flow(…, shuffle=True,)方法,每個epoch的數據打亂需要自定義。
generator自定義時要寫成死循環,因為在每個epoch內,generate_batch_data_random是不會重復調用的。
補充知識:tensorflow中的隨機裁剪函數random_crop
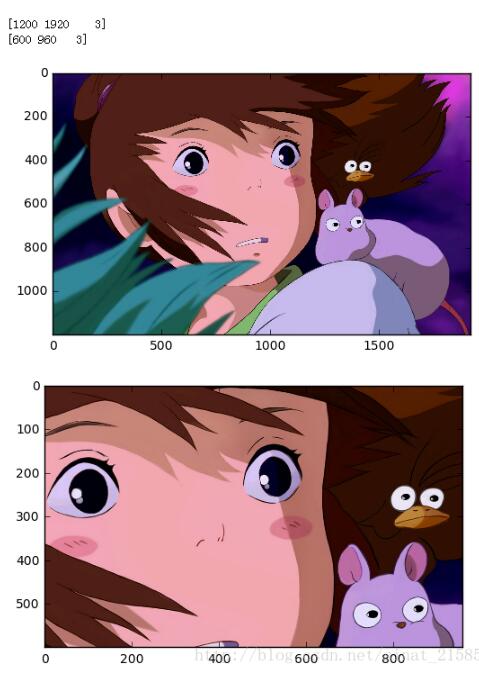
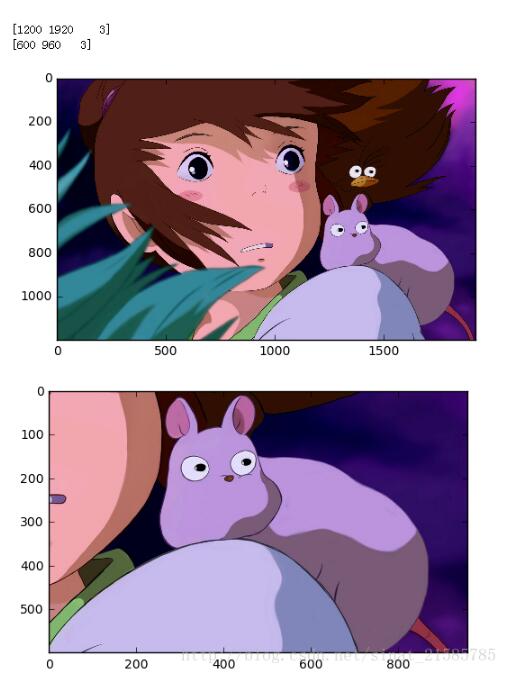
tf.random_crop是tensorflow中的隨機裁剪函數,可以用來裁剪圖片。我采用如下圖片進行隨機裁剪,裁剪大小為原圖的一半。

如下是實驗代碼
import tensorflow as tf
import matplotlib.image as img
import matplotlib.pyplot as plt
sess = tf.InteractiveSession()
image = img.imread('D:/Documents/Pictures/logo3.jpg')

reshaped_image = tf.cast(image,tf.float32)
size = tf.cast(tf.shape(reshaped_image).eval(),tf.int32)
height = sess.run(size[0]//2)
width = sess.run(size[1]//2)
distorted_image = tf.random_crop(reshaped_image,[height,width,3])
print(tf.shape(reshaped_image).eval())
print(tf.shape(distorted_image).eval())

fig = plt.figure()
fig1 = plt.figure()
ax = fig.add_subplot(111)
ax1 = fig1.add_subplot(111)
ax.imshow(sess.run(tf.cast(reshaped_image,tf.uint8)))
ax1.imshow(sess.run(tf.cast(distorted_image,tf.uint8)))
plt.show()
如下是隨機實驗兩次的結果


以上是如何實現Keras在fit_generator訓練方式中加入圖像random_crop操作的所有內容,感謝各位的閱讀!希望分享的內容對大家有幫助,更多相關知識,歡迎關注億速云行業資訊頻道!
免責聲明:本站發布的內容(圖片、視頻和文字)以原創、轉載和分享為主,文章觀點不代表本網站立場,如果涉及侵權請聯系站長郵箱:is@yisu.com進行舉報,并提供相關證據,一經查實,將立刻刪除涉嫌侵權內容。