溫馨提示×
您好,登錄后才能下訂單哦!
點擊 登錄注冊 即表示同意《億速云用戶服務條款》
您好,登錄后才能下訂單哦!
今天就跟大家聊聊有關Android開發中怎么自定義時間軸,可能很多人都不太了解,為了讓大家更加了解,小編給大家總結了以下內容,希望大家根據這篇文章可以有所收獲。
具體內容如下

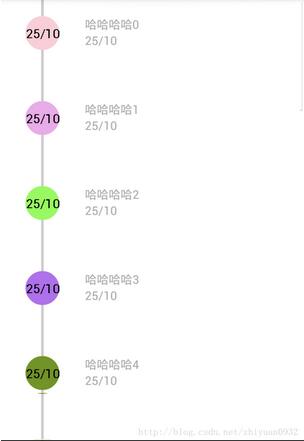
時間軸效果,實際上非常簡單,就是listView中一個又一個的條目而已….大家可以只關注一個條目。
首先展示一個條目的布局效果
<?xml version="1.0" encoding="utf-8"?> <LinearLayout xmlns:android="http://schemas.android.com/apk/res/android" android:layout_width="match_parent" android:layout_height="75dp" android:orientation="horizontal" > <!-- 線條部分 --> <LinearLayout android:layout_width="wrap_content" android:layout_height="match_parent" android:gravity="center_horizontal" android:orientation="vertical" android:paddingLeft="30dp" > <View android:layout_width="3dp" android:layout_height="20dp" android:background="#88000000" /> <com.example.time.TimeView android:src="@drawable/ic_launcher" android:id="@+id/timeView" android:layout_width="40dp" android:layout_height="40dp" /> <View android:layout_width="3dp" android:layout_height="40dp" android:background="#88000000" /> </LinearLayout> <!-- 文字部分 --> <LinearLayout android:layout_width="match_parent" android:layout_height="match_parent" android:orientation="vertical" android:paddingLeft="30dp" android:paddingRight="30dp" android:paddingTop="20dp" > <TextView android:id="@+id/tv_content" android:layout_width="wrap_content" android:layout_height="wrap_content" android:text="哈哈哈" android:textColor="#ABABAB" /> <TextView android:id="@+id/tv_time" android:layout_width="wrap_content" android:layout_height="wrap_content" android:layout_below="@id/tv_content" android:text="時間" android:textColor="#ABABAB" /> </LinearLayout> </LinearLayout>
接下來看一下自定義的TimeView如何書寫
package com.example.time;

import java.util.Random;

import android.content.Context;
import android.graphics.Canvas;
import android.graphics.Color;
import android.graphics.Paint;
import android.graphics.Paint.Style;
import android.graphics.Rect;
import android.util.AttributeSet;
import android.view.View;

public class TimeView extends View {

 private Random random;
 private String time;
 private Rect mBounds = new Rect();
 private int rgb;
 public TimeView(Context context, AttributeSet attrs, int defStyleAttr) {
 super(context, attrs, defStyleAttr);
 initView();
 }

 public TimeView(Context context, AttributeSet attrs) {
 super(context, attrs);
 initView();
 }

 public TimeView(Context context) {
 super(context);
 initView();
 }

 private void initView() {

 random = new Random();
 //定義顏色---這里純粹為了好玩--大家定義的時候可以在自定義控件外邊定義,將顏色傳遞進來
 rgb = Color.rgb(100+random.nextInt(155), 100+random.nextInt(155),
 random.nextInt(100+155));

 }

 public void setTime(String time) {
 this.time = time;
 invalidate();

 }

 @Override
 protected void onDraw(Canvas canvas) {
 super.onDraw(canvas);
 Paint paint = new Paint();
 paint.setColor(rgb);
 paint.setAntiAlias(true);
 paint.setStyle(Style.FILL_AND_STROKE);
 //先繪制圓
 canvas.drawCircle(getWidth() / 2, getHeight() / 2, getWidth() / 2,
 paint);
 paint = new Paint();
 paint.setColor(Color.BLACK);
 paint.setTextSize(30);
 paint.getTextBounds(time, 0, time.length(), mBounds);
 float textWidth = mBounds.width();
 float textHeight = mBounds.height();
 //再繪制文字
 canvas.drawText(time, getWidth() / 2 - textWidth / 2, getHeight() / 2
 + textHeight / 2, paint);
 }

}
看一下Activity中的代碼–就是一個ListView的效果展示
public class MainActivity extends Activity {

 private ListView listView;

 @Override
 protected void onCreate(Bundle savedInstanceState) {
 super.onCreate(savedInstanceState);
 setContentView(R.layout.activity_main);
 listView = (ListView) findViewById(R.id.listView);
 initData();
 listView.setAdapter(new MyBaseAdapter());
 }

 class MyBaseAdapter extends BaseAdapter {

 @Override
 public int getCount() {
 return dataList.size();
 }

 @Override
 public Object getItem(int arg0) {
 return dataList.get(arg0);
 }

 @Override
 public long getItemId(int arg0) {
 return arg0;
 }

 @Override
 public View getView(int arg0, View arg1, ViewGroup arg2) {

 View view = View.inflate(MainActivity.this, R.layout.item, null);
 TextView tv_content = (TextView) view.findViewById(R.id.tv_content);
 TextView tv_time = (TextView) view.findViewById(R.id.tv_time);
 TimeView timeView = (TimeView) view.findViewById(R.id.timeView);
 timeView.setTime(dataList.get(arg0).getTime());
 tv_content.setText(dataList.get(arg0).getContent());
 tv_time.setText(dataList.get(arg0).getTime());

 return view;
 }

 }

 ArrayList<DataBean> dataList = new ArrayList<DataBean>();

 private void initData() {
 for (int i = 0; i < 20; i++) {
 dataList.add(new DataBean("哈哈哈哈" + i, "25/10"));
 }

 }

}
看完上述內容,你們對Android開發中怎么自定義時間軸有進一步的了解嗎?如果還想了解更多知識或者相關內容,請關注億速云行業資訊頻道,感謝大家的支持。
免責聲明:本站發布的內容(圖片、視頻和文字)以原創、轉載和分享為主,文章觀點不代表本網站立場,如果涉及侵權請聯系站長郵箱:is@yisu.com進行舉報,并提供相關證據,一經查實,將立刻刪除涉嫌侵權內容。