您好,登錄后才能下訂單哦!
您好,登錄后才能下訂單哦!
這篇文章給大家介紹如何在java項目中利用google的身份驗證器實現一個動態口令驗證功能,內容非常詳細,感興趣的小伙伴們可以參考借鑒,希望對大家能有所幫助。
google身份驗證器的原理是什么呢?客戶端和服務器事先協商好一個密鑰K,用于一次性密碼的生成過程,此密鑰不被任何第三方所知道。此外,客戶端和服務器各有一個計數器C,并且事先將計數值同步。進行驗證時,客戶端對密鑰和計數器的組合(K,C)使用HMAC(Hash-based Message Authentication Code)算法計算一次性密碼,公式如下:
HOTP(K,C) = Truncate(HMAC-SHA-1(K,C))
上面采用了HMAC-SHA-1,當然也可以使用HMAC-MD5等。HMAC算法得出的值位數比較多,不方便用戶輸入,因
此需要截斷(Truncate)成為一組不太長十進制數(例如6位)。計算完成之后客戶端計數器C計數值加1。用戶將這一組十
進制數輸入并且提交之后,服務器端同樣的計算,并且與用戶提交的數值比較,如果相同,則驗證通過,服務器端將計數值
C增加1。如果不相同,則驗證失敗。
package com.auth.google;
import java.security.InvalidKeyException;
import java.security.NoSuchAlgorithmException;
import java.security.SecureRandom;
import javax.crypto.Mac;
import javax.crypto.spec.SecretKeySpec;
import org.apache.commons.codec.binary.Base32;
import org.apache.commons.codec.binary.Base64;
/**
*
*
* google身份驗證器,java服務端實現
*
* @author yangbo
*
* @version 創建時間:2017年8月14日 上午10:10:02
*
*
*/
public class GoogleAuthenticator {
// 生成的key長度( Generate secret key length)
public static final int SECRET_SIZE = 10;
public static final String SEED = "g8GjEvTbW5oVSV7avL47357438reyhreyuryetredLDVKs2m0QN7vxRs2im5MDaNCWGmcD2rvcZx";
// Java實現隨機數算法
public static final String RANDOM_NUMBER_ALGORITHM = "SHA1PRNG";
// 最多可偏移的時間
int window_size = 3; // default 3 - max 17
/**
* set the windows size. This is an integer value representing the number of
* 30 second windows we allow The bigger the window, the more tolerant of
* clock skew we are.
*
* @param s
* window size - must be >=1 and <=17. Other values are ignored
*/
public void setWindowSize(int s) {
if (s >= 1 && s <= 17)
window_size = s;
}
/**
* Generate a random secret key. This must be saved by the server and
* associated with the users account to verify the code displayed by Google
* Authenticator. The user must register this secret on their device.
* 生成一個隨機秘鑰
*
* @return secret key
*/
public static String generateSecretKey() {
SecureRandom sr = null;
try {
sr = SecureRandom.getInstance(RANDOM_NUMBER_ALGORITHM);
sr.setSeed(Base64.decodeBase64(SEED));
byte[] buffer = sr.generateSeed(SECRET_SIZE);
Base32 codec = new Base32();
byte[] bEncodedKey = codec.encode(buffer);
String encodedKey = new String(bEncodedKey);
return encodedKey;
} catch (NoSuchAlgorithmException e) {
// should never occur... configuration error
}
return null;
}
/**
* Return a URL that generates and displays a QR barcode. The user scans
* this bar code with the Google Authenticator application on their
* smartphone to register the auth code. They can also manually enter the
* secret if desired
*
* @param user
* user id (e.g. fflinstone)
* @param host
* host or system that the code is for (e.g. myapp.com)
* @param secret
* the secret that was previously generated for this user
* @return the URL for the QR code to scan
*/
public static String getQRBarcodeURL(String user, String host, String secret) {
String format = "http://www.google.com/chart?chs=200x200&chld=M%%7C0&cht=qr&chl=otpauth://totp/%s@%s?secret=%s";
return String.format(format, user, host, secret);
}
/**
* 生成一個google身份驗證器,識別的字符串,只需要把該方法返回值生成二維碼掃描就可以了。
*
* @param user
* 賬號
* @param secret
* 密鑰
* @return
*/
public static String getQRBarcode(String user, String secret) {
String format = "otpauth://totp/%s?secret=%s";
return String.format(format, user, secret);
}
/**
* Check the code entered by the user to see if it is valid 驗證code是否合法
*
* @param secret
* The users secret.
* @param code
* The code displayed on the users device
* @param t
* The time in msec (System.currentTimeMillis() for example)
* @return
*/
public boolean check_code(String secret, long code, long timeMsec) {
Base32 codec = new Base32();
byte[] decodedKey = codec.decode(secret);
// convert unix msec time into a 30 second "window"
// this is per the TOTP spec (see the RFC for details)
long t = (timeMsec / 1000L) / 30L;
// Window is used to check codes generated in the near past.
// You can use this value to tune how far you're willing to go.
for (int i = -window_size; i <= window_size; ++i) {
long hash;
try {
hash = verify_code(decodedKey, t + i);
} catch (Exception e) {
// Yes, this is bad form - but
// the exceptions thrown would be rare and a static
// configuration problem
e.printStackTrace();
throw new RuntimeException(e.getMessage());
// return false;
}
if (hash == code) {
return true;
}
}
// The validation code is invalid.
return false;
}
private static int verify_code(byte[] key, long t) throws NoSuchAlgorithmException, InvalidKeyException {
byte[] data = new byte[8];
long value = t;
for (int i = 8; i-- > 0; value >>>= 8) {
data[i] = (byte) value;
}
SecretKeySpec signKey = new SecretKeySpec(key, "HmacSHA1");
Mac mac = Mac.getInstance("HmacSHA1");
mac.init(signKey);
byte[] hash = mac.doFinal(data);
int offset = hash[20 - 1] & 0xF;
// We're using a long because Java hasn't got unsigned int.
long truncatedHash = 0;
for (int i = 0; i < 4; ++i) {
truncatedHash <<= 8;
// We are dealing with signed bytes:
// we just keep the first byte.
truncatedHash |= (hash[offset + i] & 0xFF);
}
truncatedHash &= 0x7FFFFFFF;
truncatedHash %= 1000000;
return (int) truncatedHash;
}
}
測試代碼:
package com.auth.google;

import org.junit.Test;

/**
 *
 *
 * 身份認證測試
 *
 * @author yangbo
 *
 * @version 創建時間:2017年8月14日 上午11:09:23
 *
 *
 */
public class AuthTest {
 //當測試authTest時候,把genSecretTest生成的secret值賦值給它
 private static String secret="R2Q3S52RNXBTFTOM";

 //@Test
 public void genSecretTest() {// 生成密鑰
  secret = GoogleAuthenticator.generateSecretKey();
 // 把這個qrcode生成二維碼,用google身份驗證器掃描二維碼就能添加成功
 String qrcode = GoogleAuthenticator.getQRBarcode("2816661736@qq.com", secret);
 System.out.println("qrcode:" + qrcode + ",key:" + secret);
 }
 /**
 * 對app的隨機生成的code,輸入并驗證
 */
 @Test
 public void verifyTest() {
 long code = 807337;
 long t = System.currentTimeMillis();
 GoogleAuthenticator ga = new GoogleAuthenticator();
 ga.setWindowSize(5);
 boolean r = ga.check_code(secret, code, t);
 System.out.println("檢查code是否正確?" + r);
 }
}
具體使用方式(iOS演示):
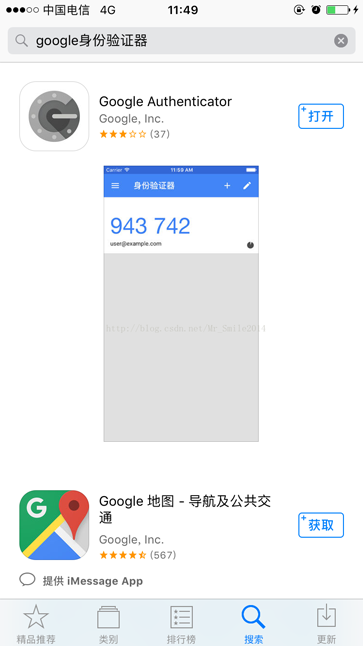
第一步:進入iphone的appstore,在搜索框中輸入google身份驗證器,如下圖:

選擇上圖中的google authenticator 并安裝。
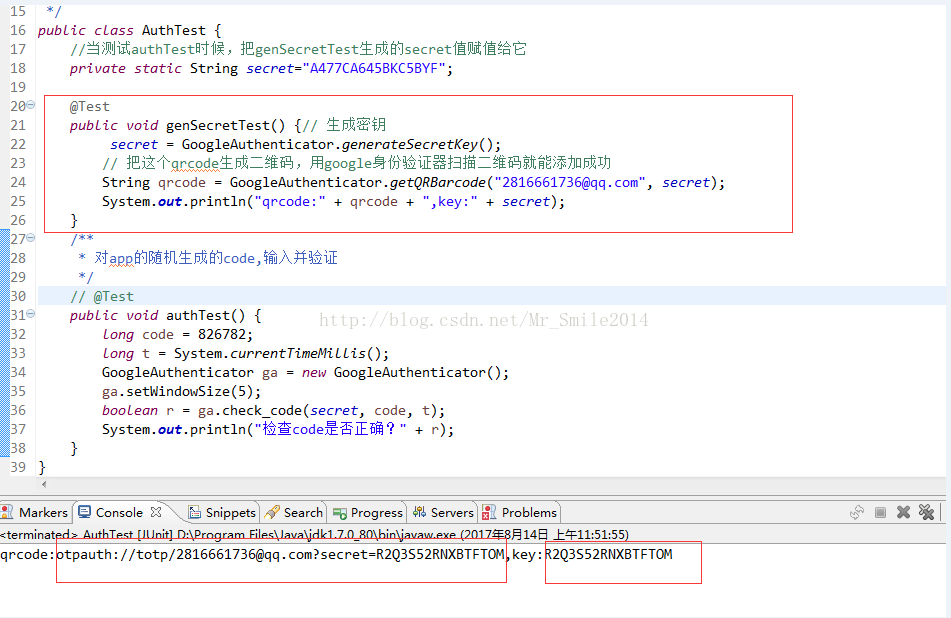
第二步:運行下面鏈接中下載的demo中的AuthTest的genSecretTest方法,控制臺打印的結果如下圖:

key:為app與服務端約定的秘鑰,用于雙方的認證。
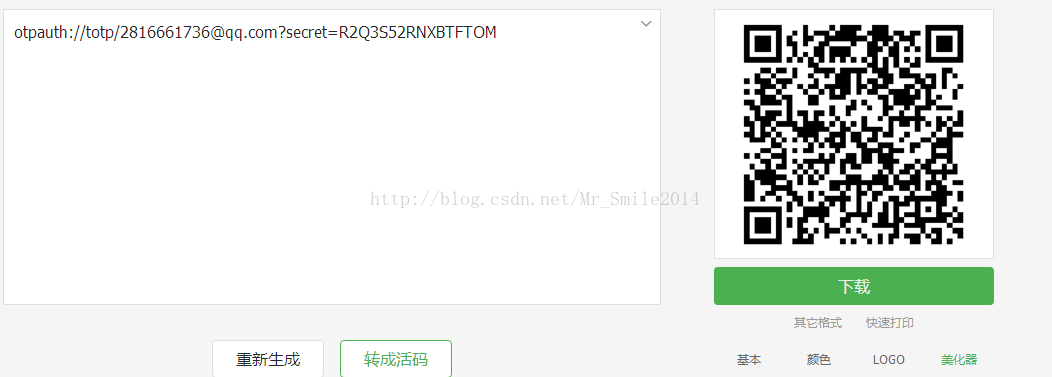
qrcode:是app掃碼能夠識別的就是二維碼值,把它生成二維碼如下圖:

第三步:打開google authenticator app軟件選擇掃描條形碼按扭打開相機對二維碼掃描加入賬號,如下圖:

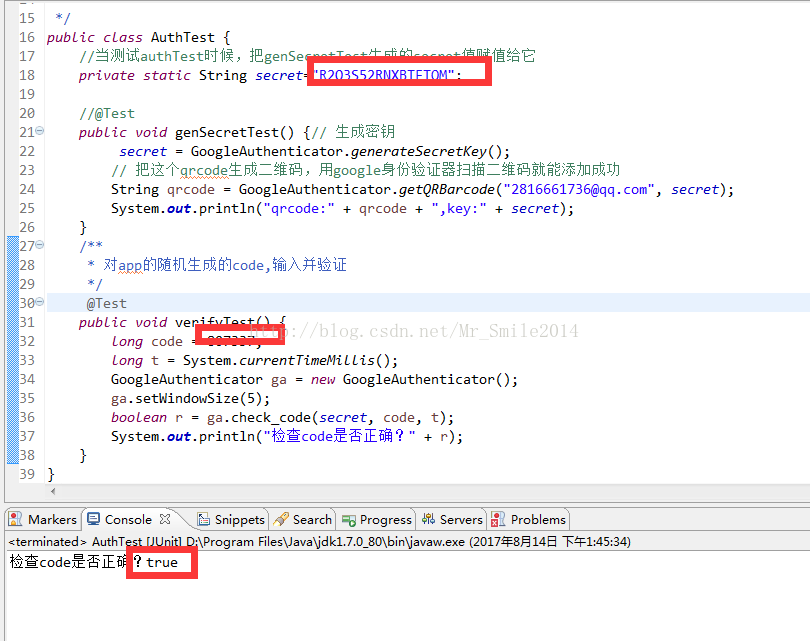
第四步:把app中的數字,在AuthTest的verifyTest進行驗證,如下圖:

關于如何在java項目中利用google的身份驗證器實現一個動態口令驗證功能就分享到這里了,希望以上內容可以對大家有一定的幫助,可以學到更多知識。如果覺得文章不錯,可以把它分享出去讓更多的人看到。
免責聲明:本站發布的內容(圖片、視頻和文字)以原創、轉載和分享為主,文章觀點不代表本網站立場,如果涉及侵權請聯系站長郵箱:is@yisu.com進行舉報,并提供相關證據,一經查實,將立刻刪除涉嫌侵權內容。