溫馨提示×
您好,登錄后才能下訂單哦!
點擊 登錄注冊 即表示同意《億速云用戶服務條款》
您好,登錄后才能下訂單哦!
這期內容當中小編將會給大家帶來有關android應用中怎么利用onLayout()實現一個流式布局,文章內容豐富且以專業的角度為大家分析和敘述,閱讀完這篇文章希望大家可以有所收獲。
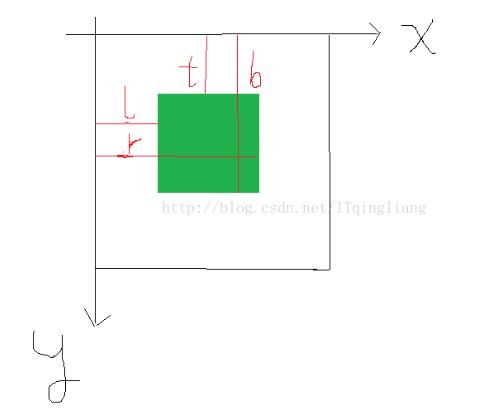
在onLayout方法中有四個參數,我畫了一個簡單的圖來分清楚值哪里。

FlowLayout.Java
package com.example.my_view;

import android.content.Context;
import android.util.AttributeSet;
import android.view.View;
import android.view.ViewGroup;

/**
 * 自定義布局 流布局
 */

public class FlowLayout extends ViewGroup {
  public FlowLayout(Context context) {
    super(context);
  }

  public FlowLayout(Context context, AttributeSet attrs) {
    super(context, attrs);
  }

  /**
   *
   * @param changed
   * @param l 左
   * @param t 上
   * @param r  右
   * @param b  下
   */
  @Override
  protected void onLayout(boolean changed, int l, int t, int r, int b) {
    //獲得子控件的數量
    int childCount = getChildCount();
    //當前子控件的左邊坐標
    int cl = 0;
    //當前子控件的上邊坐標
    int ct = 0;
    //ViewGroup整體寬度
    int width = r - l;
    //行高
    int lineHeight = 0;
    //遍歷所有子控件
    for(int i = 0; i < childCount; i++){
      //獲取當前控件
      View childAt = getChildAt(i);
      //獲取寬度
      int cw = childAt.getMeasuredWidth();
      //獲取高度
      int ch = childAt.getMeasuredHeight();
      //當前控件右邊
      int cr = cl + cw;
      //當前控件下邊
      int cb = ct + ch;
      //判斷是否換行
      if(cr > width){
        //如果換行重新計算上下左右地值
        cl = 0;
        cr = cl + cw;
        ct += lineHeight;
        cb = ct + ch;
        //換行后,第一個控件作為最大行高
        lineHeight = ch;
      }else{
        //如果不換行,需要計算最大高度
        lineHeight = Math.max(lineHeight,ch);
      }
      childAt.layout(cl,ct,cr,cb);
      //橫向向后移動一個,前面控件的右邊作為后面控件的左邊
      cl = cr;
    }
  }

  @Override
  protected void onMeasure(int widthMeasureSpec, int heightMeasureSpec) {
    super.onMeasure(widthMeasureSpec, heightMeasureSpec);
    //測量所有子控件
    measureChildren(widthMeasureSpec, heightMeasureSpec);
  }
}
activity_main.xml
<?xml version="1.0" encoding="utf-8"?>
<com.example.my_view.FlowLayout
xmlns:android="http://schemas.android.com/apk/res/android"
xmlns:app="http://schemas.android.com/apk/res-auto"
xmlns:tools="http://schemas.android.com/tools"
android:layout_width="match_parent"
android:layout_height="match_parent"
tools:context="com.example.my_view.MainActivity">
<!--
<com.example.my_view.Counter
android:layout_width="match_parent"
android:layout_height="wrap_content"
app:number="10"
app:bgColor="#ff002b"
app:textColor="#0fd444"/>-->
<!--<TextView
android:layout_width="wrap_content"
android:layout_height="wrap_content"
android:text="我在自定義布局的下面"/>-->
<Button
android:layout_width="200dp"
android:layout_height="50dp"
android:text="button1"/>
<Button
android:layout_width="100dp"
android:layout_height="100dp"
android:text="button2"/>
<Button
android:layout_width="180dp"
android:layout_height="60dp"
android:text="button3"/>
<Button
android:layout_width="100dp"
android:layout_height="50dp"
android:text="button4"/>
<Button
android:layout_width="80dp"
android:layout_height="100dp"
android:text="button5"/>
<Button
android:layout_width="100dp"
android:layout_height="50dp"
android:text="button6"/>
<Button
android:layout_width="120dp"
android:layout_height="70dp"
android:text="button7"/>
<Button
android:layout_width="100dp"
android:layout_height="50dp"
android:text="button8"/>
</com.example.my_view.FlowLayout>上述就是小編為大家分享的android應用中怎么利用onLayout()實現一個流式布局了,如果剛好有類似的疑惑,不妨參照上述分析進行理解。如果想知道更多相關知識,歡迎關注億速云行業資訊頻道。
免責聲明:本站發布的內容(圖片、視頻和文字)以原創、轉載和分享為主,文章觀點不代表本網站立場,如果涉及侵權請聯系站長郵箱:is@yisu.com進行舉報,并提供相關證據,一經查實,將立刻刪除涉嫌侵權內容。