溫馨提示×
您好,登錄后才能下訂單哦!
點擊 登錄注冊 即表示同意《億速云用戶服務條款》
您好,登錄后才能下訂單哦!
這篇文章主要介紹了Android如何實現底部圖標與Fragment,具有一定借鑒價值,感興趣的朋友可以參考下,希望大家閱讀完這篇文章之后大有收獲,下面讓小編帶著大家一起了解一下。
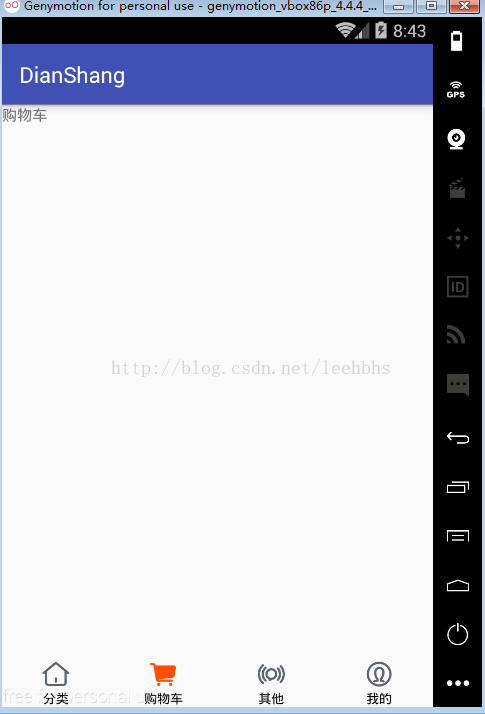
效果如下:

1.首先在res下的drawable下新建四個圖標的xml,分別把圖標的選中和未選中的狀態設置好,所有的圖片可以放在res下新建的一個drawable-xhdpi目錄下,這里僅展示一個圖標的xml
<?xml version="1.0" encoding="utf-8"?>
<selector xmlns:android="http://schemas.android.com/apk/res/android">

<item android:state_checked="true" android:drawable="@drawable/ic_nav_home_press"/>
<item android:state_checked="false" android:drawable="@drawable/ic_nav_home"/>
<item android:drawable="@drawable/ic_nav_home"/>
</selector>
2.在布局中開始布局:
<?xml version="1.0" encoding="utf-8"?>
<LinearLayout xmlns:android="http://schemas.android.com/apk/res/android"
  xmlns:tools="http://schemas.android.com/tools"
  android:id="@+id/activity_main"
  android:layout_width="match_parent"
  android:layout_height="match_parent"
  android:orientation="vertical"
  tools:context="com.baway.lizongshu.view.activity.MainActivity">
 <FrameLayout
  android:id="@+id/framelayout"
  android:layout_width="match_parent"
  android:layout_height="0dp"
  android:layout_weight="1"
  >

 </FrameLayout>
  <LinearLayout
    android:layout_width="match_parent"
    android:layout_height="wrap_content"
    android:orientation="horizontal">
  <RadioGroup
    android:id="@+id/rg"
    android:layout_width="match_parent"
    android:layout_height="wrap_content"
    android:orientation="horizontal">

    <RadioButton
      android:id="@+id/fenlei"
      android:layout_width="0dp"
      android:layout_height="wrap_content"
      android:layout_weight="1"
      android:text="分類"
      android:button="@null"
      android:checked="true"
      android:drawableTop="@drawable/fenlei"
      android:gravity="center"
      android:textSize="12sp"
      android:tag="0"
      />
    <RadioButton
      android:id="@+id/gouwuche"
      android:layout_width="0dp"
      android:layout_height="wrap_content"
      android:layout_weight="1"
      android:text="購物車"
      android:button="@null"
      android:drawableTop="@drawable/gouwuche"
      android:gravity="center"
      android:textSize="12sp"
      android:tag="1"
      />
    <RadioButton
      android:id="@+id/qita"
      android:layout_width="0dp"
      android:layout_height="wrap_content"
      android:layout_weight="1"
      android:text="其他"
      android:button="@null"
      android:drawableTop="@drawable/qita"
      android:gravity="center"
      android:textSize="12sp"
      android:tag="2"
      />

    <RadioButton
      android:id="@+id/wode"
      android:layout_width="0dp"
      android:layout_height="wrap_content"
      android:layout_weight="1"
      android:text="我的"
      android:button="@null"
      android:drawableTop="@drawable/wode"
      android:gravity="center"
      android:textSize="12sp"
      android:tag="3"
      />
  </RadioGroup>
  </LinearLayout>
</LinearLayout>
3.新建四個Fragment類,這里僅展示一個
public class FenleiFragment extends Fragment {
  @Nullable
  @Override
  public View onCreateView(LayoutInflater inflater, @Nullable ViewGroup container, @Nullable Bundle savedInstanceState) {
    View view = inflater.inflate(R.layout.fenlei, container, false);
    return view;
  }
}
4. 主界面中:
public class MainActivity extends AppCompatActivity {
  private RadioGroup rg;
  private Fragment[] mfragments;
  private FragmentManager fm;
  @Override
  protected void onCreate(Bundle savedInstanceState) {
    super.onCreate(savedInstanceState);
    setContentView(R.layout.activity_main);
    initview();
    initdata();

  }

  private void initdata() {
    //定義一個Fragment數組,存放四個Fragment
    mfragments=new Fragment[4];
    mfragments[0]=new FenleiFragment();
    mfragments[1]=new GouwucheFragment();
    mfragments[2]=new QitaFragment();
    mfragments[3]=new WodeFragment();
    //獲得Fragment管理者
    fm = getSupportFragmentManager();
    //處理
    FragmentTransaction ft = fm.beginTransaction();
    ft.add(R.id.framelayout,mfragments[0],"0");
    ft.commit();

  }

  private void initview() {
    rg=(RadioGroup) findViewById(R.id.rg);
    //RadioGroup的監聽事件
    rg.setOnCheckedChangeListener(new RadioGroup.OnCheckedChangeListener() {
      @Override
      public void onCheckedChanged(RadioGroup group, int checkedId) {
        //找到當前選中的圖標
      RadioButton rb= (RadioButton) group.findViewById(checkedId);
        //找到所選圖標的標簽并轉換為整數類型放到下面的方法中
        int i = Integer.parseInt(rb.getTag().toString().trim());
        showAndHideFragment(i);

      }


    });


  }
  //展示和隱藏Fragment的方法
  private void showAndHideFragment(int position) {
    FragmentTransaction transaction = fm.beginTransaction();
    //如果沒有fragment就在framelayout里面加上
    if (!mfragments[position].isAdded()){
      transaction.add(R.id.framelayout,mfragments[position],""+position);
    }
    //把所有的fragment設為隱藏
    for (Fragment fragment:mfragments){
      transaction.hide(fragment);
    }
    //把選中的設為顯示
    transaction.show(mfragments[position]);
    transaction.commit();

  }


}
感謝你能夠認真閱讀完這篇文章,希望小編分享的“Android如何實現底部圖標與Fragment”這篇文章對大家有幫助,同時也希望大家多多支持億速云,關注億速云行業資訊頻道,更多相關知識等著你來學習!
免責聲明:本站發布的內容(圖片、視頻和文字)以原創、轉載和分享為主,文章觀點不代表本網站立場,如果涉及侵權請聯系站長郵箱:is@yisu.com進行舉報,并提供相關證據,一經查實,將立刻刪除涉嫌侵權內容。