溫馨提示×
您好,登錄后才能下訂單哦!
點擊 登錄注冊 即表示同意《億速云用戶服務條款》
您好,登錄后才能下訂單哦!
spring cloud快速搭建
Spring Cloud是一個微服務框架,它基于spring boot, Spring Cloud提供的全套的分布式系統解決方案 。
首先我們使用gradle來創建:
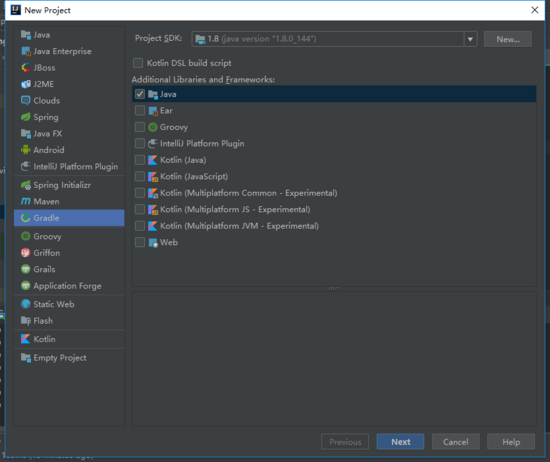
選擇JDK以及勾選Java,然后下一步
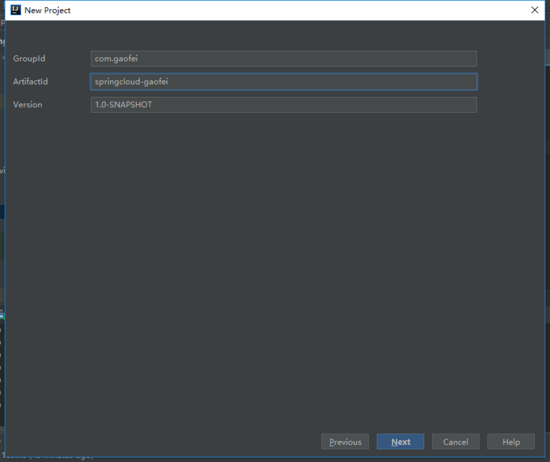
起包名已經項目名,下一步:
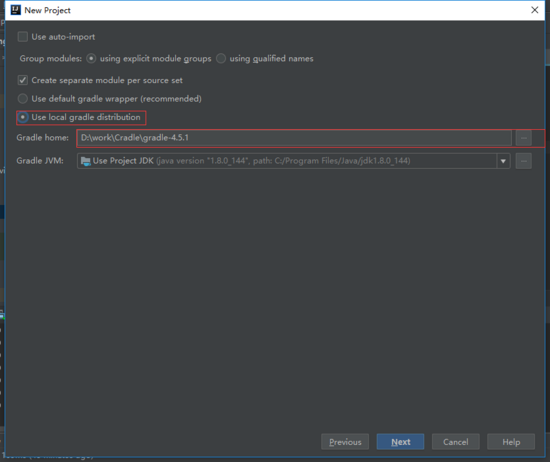
選擇我們本地的gradle包,一直下一步,點擊build.gradle并添加我們的依賴:
group 'com.gaofei'
version '1.0-SNAPSHOT'

//gradle使用的插件
apply plugin: 'java'
//gradle使用spring-boot打包更方便
apply plugin: 'spring-boot'


//jdk的版本號
sourceCompatibility = 1.8


//本項目的
dependencies {
  testCompile group: 'junit', name: 'junit', version: '4.12'
}

//由于本次創建gradle未出現src,由以下代碼來解決
task "create-dirs" << {
  sourceSets*.java.srcDirs*.each {
    it.mkdirs()
  }
  sourcScts*.resources.srcDirs*.each{
    it.midirs()
  }
}


//編譯構建時的配置
buildscript {
  ext{
    springBootVersion='1.5.10.RELEASE' //springBootVersion是自己定義的變量 里面寫的是springboot插件的版本
  }
  repositories {
    maven{ url 'http://maven.aliyun.com/nexus/content/groups/public/'}
    jcenter()
    mavenCentral()
    maven{ url "http://repo.spring.io/snapshot" }
    maven{ url "http://repo.spring.io/milestone" }
    maven{ url "http://repo.spring.io/release" }
    maven{ url 'http://repo.spring.io/plugins-snapshot' }
  }
  dependencies{
    classpath("org.springframework.boot:spring-boot-gradle-plugin:${springBootVersion}")//指的是springboot的一個插件
  }
}


//統一所有項目的配置 就是對所有的模塊進行統一配置 所有以后的模塊都不用再配置
allprojects {

  group 'com.gaofei' //分組
  version '1.0-SNAPSHOT' //版本號

  ext{
    springCloudVersion='Edgware.SR2'
  }
  //所有項目都會引用的阿里云里的maven
  repositories {
    maven{ url 'http://maven.aliyun.com/nexus/content/groups/public/'}
    jcenter()
    mavenCentral()
    maven{ url "http://repo.spring.io/snapshot" }
    maven{ url "http://repo.spring.io/milestone" }
    maven{ url "http://repo.spring.io/release" }
    maven{ url 'http://repo.spring.io/plugins-snapshot' }
  }
}

//統一所有子項目的配置
subprojects {
  apply plugin: 'java'
  apply plugin: 'idea'
  apply plugin: 'spring-boot'

  dependencies {
    compile('org.springframework.boot:spring-boot-starter-web'){
      //使用undertow來代替tomacat
      exclude module:"spring-boot-starter-tomcat"
    }
    //替代tomcat
    compile 'org.springframework.boot:spring-boot-starter-undertow'
    //健康檢查
    compile 'org.springframework.boot:spring-boot-starter-actuator'
    dependencies {
      testCompile group: 'junit', name: 'junit', version: '4.12'
    }
  }
  //版本控制插件
  dependencyManagement{
    imports{
      mavenBom "org.springframework.cloud:spring-cloud-dependencies:${springCloudVersion}"
    }
  }

}
通過注釋可以看到各個代碼塊的作用,這里我們是用阿里云的倉庫
接下來我們開始建eureka注冊中心,通過new->Module再建gradle項目來創建
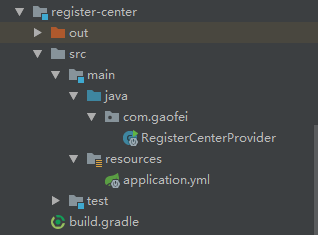
在build中添加eureka-server依賴
//表示自己是一個服務器
  compile 'org.springframework.cloud:spring-cloud-starter-eureka-server'
接下來在application.yml中配置
server:
 port: 8000
spring:
 application:
  name: register-center #起個名字
eureka:
 client:
  register-with-eureka: false #啟動時不注冊表明自己是一個注冊中心
  fetch-registry: false
啟動類
@SpringBootApplication
@EnableEurekaServer//表明自己是注冊中心
public class RegisterCenterProvider {
  public static void main(String[] args) {

    SpringApplication.run(RegisterCenterProvider.class);
  }
}
啟動:
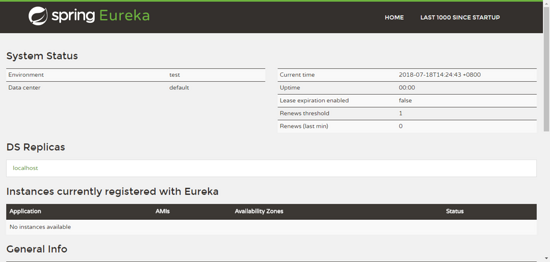
這就表示注冊中心啟動成功
下面創建服務注冊到服務中心
創建一個gradle module 項目
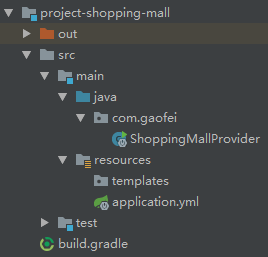
在build.gradle中添加thymeleaf組件,eureka客戶端組件的依賴
//thymeleaf組件
  compile 'org.springframework.boot:spring-boot-starter-thymeleaf'
  //eureka客戶端組件
  compile 'org.springframework.cloud:spring-cloud-starter-eureka'
在application.yml中配置:
server:
 port: 8001
spring:
 application:
  name: project-shopping-mall #注冊在注冊中心的名字,它會進行鍵值對映射url
 thymeleaf:
  cache: false #關閉緩存
eureka:
 client:
  service-url:
   defaultZone: http://localhost:8000/eureka/ #注冊到注冊中心
 instance:
  prefer-ip-address: true #用兩種方式進行注冊,一種是使用主機名注冊,一種是使用ip地址進行注冊,這里使用ip地址進行注冊
啟動類:
@SpringBootApplication
@EnableDiscoveryClient //表示eureka客戶端
public class ShoppingMallProvider {
  public static void main(String[] args) {
    SpringApplication.run(ShoppingMallProvider.class);
  }
}
啟動:
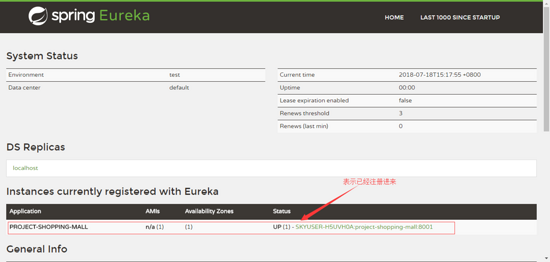
成功!
以上就是本文的全部內容,希望對大家的學習有所幫助,也希望大家多多支持億速云。
免責聲明:本站發布的內容(圖片、視頻和文字)以原創、轉載和分享為主,文章觀點不代表本網站立場,如果涉及侵權請聯系站長郵箱:is@yisu.com進行舉報,并提供相關證據,一經查實,將立刻刪除涉嫌侵權內容。