您好,登錄后才能下訂單哦!
您好,登錄后才能下訂單哦!
這篇文章將為大家詳細講解有關Android 中自定義一個驗證碼輸入框,文章內容質量較高,因此小編分享給大家做個參考,希望大家閱讀完這篇文章后對相關知識有一定的了解。
原理
大致是Edittext + n* TextView,然后設置edittext字體跟背景顏色都為透明,隱藏光標
Edittext:監聽edittext每次輸入一個字符就賦值到對應的TextView上,然后在清空自己
下劃線:在TextView下面添加View
光標:這里的每個TextView的焦點光標其實對View設置了ValueAnimator
粘貼:粘貼彈窗是自定義的PopupWindow
源碼有詳細注釋,這里就不一一說明
Github
https://github.com/WShaobin/VerificationCodeInputView
Gradle
Step 1. Add it in your root build.gradle at the end of repositories:
allprojects {
 repositories {
 ...
 maven { url 'https://jitpack.io' }
 }
}
Step 2. Add the dependency:
dependencies {
  implementation 'com.github.WShaobin:VerificationCodeInputView:1.0.2'
}
How to use
In layout
<com.wynsbin.vciv.VerificationCodeInputView
  android:id="@+id/vciv_code"
  android:layout_width="match_parent"
  android:layout_height="wrap_content"
  android:layout_marginTop="48dp"
  android:gravity="center"
  android:orientation="horizontal"
  app:vciv_et_background="@android:color/white"
  app:vciv_et_foucs_background="@android:color/holo_orange_dark"
  app:vciv_et_cursor_color="@color/colorPrimary"
  app:vciv_et_height="58dp"
  app:vciv_et_inputType="number"
  app:vciv_et_number="6"
  app:vciv_et_text_color="@android:color/black"
  app:vciv_et_text_size="18sp"
  app:vciv_et_underline_default_color="@android:color/holo_green_dark"
  app:vciv_et_underline_focus_color="@android:color/holo_blue_bright"
  app:vciv_et_underline_height="2dp"
  app:vciv_et_underline_show="true"
  app:vciv_et_width="58dp" />
In Java Code
VerificationCodeInputView view = findViewById(R.id.vciv_code);
view.setOnInputListener(new VerificationCodeInputView.OnInputListener() {
  @Override
  public void onComplete(String code) {
    Toast.makeText(MainActivity.this, code, Toast.LENGTH_SHORT).show();
  }

  @Override
  public void onInput() {

  }
});

//清除驗證碼
view.clearCode();
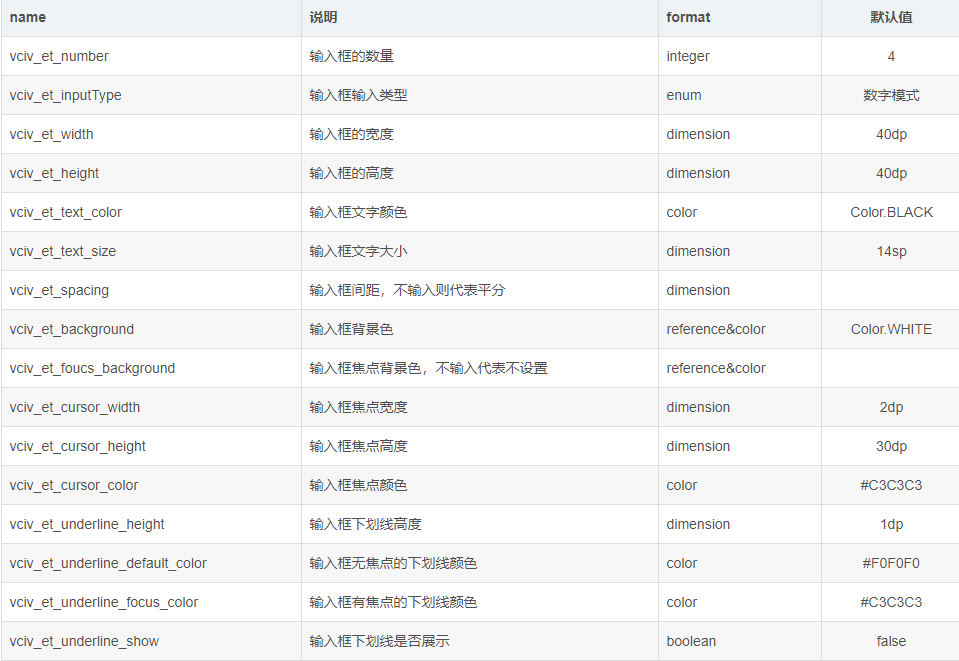
Attributes

VCInputType

輸入框背景色支持類型
1、@drawable/xxx
2、@color/xxx
3、#xxxxxx
關于Android 中自定義一個驗證碼輸入框就分享到這里了,希望以上內容可以對大家有一定的幫助,可以學到更多知識。如果覺得文章不錯,可以把它分享出去讓更多的人看到。
免責聲明:本站發布的內容(圖片、視頻和文字)以原創、轉載和分享為主,文章觀點不代表本網站立場,如果涉及侵權請聯系站長郵箱:is@yisu.com進行舉報,并提供相關證據,一經查實,將立刻刪除涉嫌侵權內容。