您好,登錄后才能下訂單哦!
您好,登錄后才能下訂單哦!
這篇文章將為大家詳細講解有關Spark中Spark Streaming怎么用,小編覺得挺實用的,因此分享給大家做個參考,希望大家閱讀完這篇文章后可以有所收獲。
1. Spark Streaming
Spark Streaming是一個基于Spark Core之上的實時計算框架,可以從很多數據源消費數據并對數據進行處理
Spark Streaing中有一個最基本的抽象叫DStream(代理),本質上就是一系列連續的RDD,DStream其實就是對RDD的封裝
DStream可以認為是一個RDD的工廠,該DStream里面生產都是相同業務邏輯的RDD,只不過是RDD里面要讀取數據的不相同
在一個批次的處理時間間隔里, DStream只產生一個RDD
DStream就相當于一個"模板", 我們可以根據這個"模板"來處理一段時間間隔之內產生的這個rdd,以此為依據來構建rdd的DAG
2. 當下比較流行的實時計算引擎
吞吐量 編程語言 處理速度 生態
Storm 較低 clojure 非常快(亞秒) 阿里(JStorm)
Flink 較高 scala 較快(亞秒) 國內使用較少
Spark Streaming 非常高 scala 快(毫秒) 完善的生態圈
3. Spark Streaming處理網絡數據
//創建StreamingContext 至少要有兩個線程 一個線程用于接收數據 一個線程用于處理數據
val conf = new SparkConf().setAppName("Ops1").setMaster("local[2]")
val ssc = new StreamingContext(conf, Milliseconds(3000))
val receiverDS: ReceiverInputDStream[String] = ssc.socketTextStream("uplooking01", 44444)
val pairRetDS: DStream[(String, Int)] = receiverDS.flatMap(_.split(",")).map((_, 1)).reduceByKey(_ + _)
pairRetDS.print()
//開啟流計算
ssc.start()
//優雅的關閉
ssc.awaitTermination()
4. Spark Streaming接收數據的兩種方式(Kafka)
Receiver
偏移量是由zookeeper來維護的
使用的是Kafka高級的API(消費者的API)
編程簡單
效率低(為了保證數據的安全性,會開啟WAL)
kafka0.10的版本中已經徹底棄用Receiver了
生產環境一般不會使用這種方式
Direct
偏移量是有我們來手動維護
效率高(我們直接把spark streaming接入到kafka的分區中了)
編程比較復雜
生產環境一般使用這種方式
5. Spark Streaming整合Kafka
基于Receiver的方式整合kafka(生產環境不建議使用,在0.10中已經移除了)
//創建StreamingContext 至少要有兩個線程 一個線程用于接收數據 一個線程用于處理數據
val conf = new SparkConf().setAppName("Ops1").setMaster("local[2]")
val ssc = new StreamingContext(conf, Milliseconds(3000))
val zkQuorum = "uplooking03:2181,uplooking04:2181,uplooking05:2181"
val groupId = "myid"
val topics = Map("hadoop" -> 3)
val receiverDS: ReceiverInputDStream[(String, String)] = KafkaUtils.createStream(ssc, zkQuorum, groupId, topics)
receiverDS.flatMap(_._2.split(" ")).map((_,1)).reduceByKey(_+_).print()
ssc.start()
ssc.awaitTermination()
基于Direct的方式(生產環境使用)
//創建StreamingContext 至少要有兩個線程 一個線程用于接收數據 一個線程用于處理數據
val conf = new SparkConf().setAppName("Ops1").setMaster("local[2]")
val ssc = new StreamingContext(conf, Milliseconds(3000))
val kafkaParams = Map("metadata.broker.list" -> "uplooking03:9092,uplooking04:9092,uplooking05:9092")
val topics = Set("hadoop")
val inputDS: InputDStream[(String, String)] = KafkaUtils.createDirectStream[String, String, StringDecoder, StringDecoder](ssc, kafkaParams, topics)
inputDS.flatMap(_._2.split(" ")).map((_, 1)).reduceByKey(_ + _).print()
ssc.start()
ssc.awaitTermination()
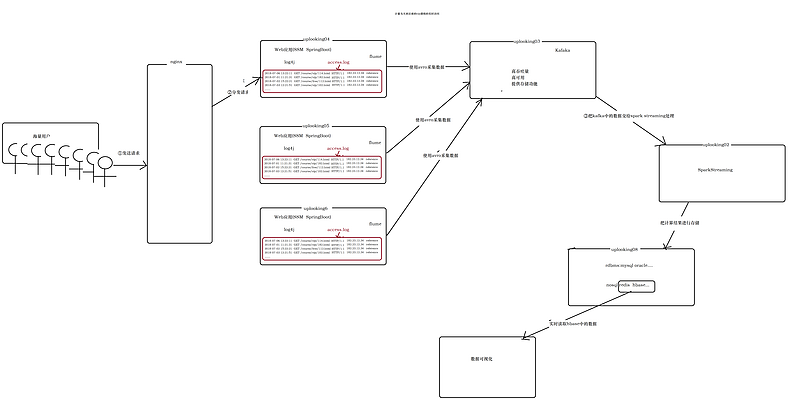
6. 實時流計算的架構

1. 生成日志(模擬用戶訪問web應用的日志)
public class GenerateAccessLog {
  public static void main(String[] args) throws IOException, InterruptedException {
    //準備數據
    int[] ips = {123, 18, 123, 112, 181, 16, 172, 183, 190, 191, 196, 120};
    String[] requesTypes = {"GET", "POST"};
    String[] cursors = {"/vip/112", "/vip/113", "/vip/114", "/vip/115", "/vip/116", "/vip/117", "/vip/118", "/vip/119", "/vip/120", "/vip/121", "/free/210", "/free/211", "/free/212", "/free/213", "/free/214", "/company/312", "/company/313", "/company/314", "/company/315"};

    String[] courseNames = {"大數據", "python", "java", "c++", "c", "scala", "android", "spark", "hadoop", "redis"};
    String[] references = {"www.baidu.com/", "www.sougou.com/", "www.sou.com/", "www.google.com"};
    FileWriter fw = new FileWriter(args[0]);
    PrintWriter printWriter = new PrintWriter(fw);
    while (true) {
      //      Thread.sleep(1000);
      //產生字段
      String date = new Date().toLocaleString();
      String method = requesTypes[getRandomNum(0, requesTypes.length)];
      String url = "/cursor" + cursors[getRandomNum(0, cursors.length)];
      String HTTPVERSION = "HTTP/1.1";
      String ip = ips[getRandomNum(0, ips.length)] + "." + ips[getRandomNum(0, ips.length)] + "." + ips[getRandomNum(0, ips.length)] + "." + ips[getRandomNum(0, ips.length)];
      String reference = references[getRandomNum(0, references.length)];
      String rowLog = date + " " + method + " " + url + " " + HTTPVERSION + " " + ip + " " + reference;
      printWriter.println(rowLog);
      printWriter.flush();
    }
  }


  //[start,end)
  public static int getRandomNum(int start, int end) {
    int i = new Random().nextInt(end - start) + start;
    return i;
  }
}
2. flume使用avro采集web應用服務器的日志數據
采集命令執行的結果到avro中
# The configuration file needs to define the sources,
# the channels and the sinks.
# Sources, channels and sinks are defined per agent,
# in this case called 'agent'
f1.sources = r1
f1.channels = c1
f1.sinks = k1

#define sources
f1.sources.r1.type = exec
f1.sources.r1.command =tail -F /logs/access.log

#define channels
f1.channels.c1.type = memory
f1.channels.c1.capacity = 1000
f1.channels.c1.transactionCapacity = 100

#define sink 采集日志到uplooking03
f1.sinks.k1.type = avro
f1.sinks.k1.hostname = uplooking03
f1.sinks.k1.port = 44444

#bind sources and sink to channel
f1.sources.r1.channels = c1
f1.sinks.k1.channel = c1
從avro采集到控制臺
# The configuration file needs to define the sources,
# the channels and the sinks.
# Sources, channels and sinks are defined per agent,
# in this case called 'agent'
f2.sources = r2
f2.channels = c2
f2.sinks = k2

#define sources
f2.sources.r2.type = avro
f2.sources.r2.bind = uplooking03
f2.sources.r2.port = 44444

#define channels
f2.channels.c2.type = memory
f2.channels.c2.capacity = 1000
f2.channels.c2.transactionCapacity = 100

#define sink
f2.sinks.k2.type = logger

#bind sources and sink to channel
f2.sources.r2.channels = c2
f2.sinks.k2.channel = c2
從avro采集到kafka中
# The configuration file needs to define the sources,
# the channels and the sinks.
# Sources, channels and sinks are defined per agent,
# in this case called 'agent'
f2.sources = r2
f2.channels = c2
f2.sinks = k2

#define sources
f2.sources.r2.type = avro
f2.sources.r2.bind = uplooking03
f2.sources.r2.port = 44444

#define channels
f2.channels.c2.type = memory
f2.channels.c2.capacity = 1000
f2.channels.c2.transactionCapacity = 100

#define sink
f2.sinks.k2.type = org.apache.flume.sink.kafka.KafkaSink
f2.sinks.k2.topic = hadoop
f2.sinks.k2.brokerList = uplooking03:9092,uplooking04:9092,uplooking05:9092
f2.sinks.k2.requiredAcks = 1
關于“Spark中Spark Streaming怎么用”這篇文章就分享到這里了,希望以上內容可以對大家有一定的幫助,使各位可以學到更多知識,如果覺得文章不錯,請把它分享出去讓更多的人看到。
免責聲明:本站發布的內容(圖片、視頻和文字)以原創、轉載和分享為主,文章觀點不代表本網站立場,如果涉及侵權請聯系站長郵箱:is@yisu.com進行舉報,并提供相關證據,一經查實,將立刻刪除涉嫌侵權內容。