您好,登錄后才能下訂單哦!
您好,登錄后才能下訂單哦!
1、寫在前面
WebService 對我來說既熟悉又陌生,已經將近六七年沒有看到過他了, 具體的介紹我就不多少了, 想了解的百度百科下說的很詳細。
之所以突然研究WebService是接到一個需求要去給 XX 項目做一個適配層,他們原有系統是使用webservice做的,所以……
那我們就來看看,這一個古老的技術如何和如今最流行的框架SpringBoot進行結合。
2、SpringBoot 集成WebService
2.1 導入依賴
compile('org.springframework.boot:spring-boot-starter-web-services',
      'org.apache.cxf:cxf-spring-boot-starter-jaxws:3.2.5',
      'org.apache.cxf:cxf-rt-frontend-jaxws:3.1.6',
      'org.apache.cxf:cxf-rt-transports-http:3.1.6')
我是用Gradle 來構建項目的,使用Maven一樣,添加以上jar依賴就可以了。
2.2 開發Webservice接口
/**
 * serviceName 服務名稱
 * targetNamesPace : 一般都是接口包倒序,也可以自定義
@javax.jws.WebService(serviceName = "gzcxfw_wx_webserviceService",
    targetNamespace = "http://36.101.208.59:8090/axis/services/bdcgzcxfw_wx")
public interface WebService {
  /**
   *
   * @param wxid   微信ID
   * @param xm    姓名
   * @param sfzh   身份證號
   * @param sjh   手機號
   * @param macId  預定用戶
   * @param password 密碼
   * @return 查詢結果 Base64字符串
   */
  @WebMethod(operationName = "gzcxfw_hlw_wxrz_Info_cs")
  @WebResult(name = "gzcxfw_hlw_wxrz_Info_csReturn")
  String gzcxfwHlwWxrzInfoCs(@WebParam(name = "WXID", targetNamespace = "http://36.101.208.59:8090/axis/services/bdcgzcxfw_wx") String wxid, @WebParam(name = "XM") String xm,
                @WebParam(name = "SFZH", targetNamespace = "http://36.101.208.59:8090/axis/services/bdcgzcxfw_wx") String sfzh, @WebParam(name = "SJH") String sjh,
                @WebParam(name = "mac_id", targetNamespace = "http://36.101.208.59:8090/axis/services/bdcgzcxfw_wx") String macId, @WebParam(name = "password") String password
  );
2.3 實現類
/**
 * @author yueli
 * @date 2019-08-05 19:17
 */
@javax.jws.WebService(serviceName = "gzcxfw_wx_webserviceService",
    targetNamespace = "http://36.101.208.59:8090/axis/services/bdcgzcxfw_wx")
public class WebServiceImpl implements WebService {

  private static Logger logger = LoggerFactory.getLogger(CatalogInfoImpl.class);


  @Override
  public String gzcxfwHlwWxrzInfoCs(String wxid, String xm, String sfzh, String sjh, String macId, String password) {
    logger.info("gzcxfwHlwWxrzInfoCs: 入參- wxid:{}, xm:{}, sfzh:{}, sjh:{}, macId:{}, pawd:{}", wxid, xm, sfzh,
        macId, password);

    return wxid + “:” + sfzh;
  }
實現類就很簡單了。和我們一般寫的沒啥區別,
2.4 發布
package com.tusdao.base.configuration;

import com.tusdao.TusdaoWebserviceApplication;
import com.tusdao.webservice.service.WebService;
import com.tusdao.webservice.service.impl.WebServiceImpl;
import org.apache.cxf.Bus;
import org.apache.cxf.bus.spring.SpringBus;
import org.apache.cxf.jaxws.EndpointImpl;
import org.apache.cxf.transport.servlet.CXFServlet;
import org.springframework.boot.web.servlet.ServletRegistrationBean;
import org.springframework.context.annotation.Bean;
import org.springframework.context.annotation.ComponentScan;
import org.springframework.context.annotation.Configuration;

import javax.xml.ws.Endpoint;


/**
 * @author yueli
 * @date 2019-08-05 19:24
 */
@Configuration
@ComponentScan(basePackageClasses = TusdaoWebserviceApplication.class)
public class CxfConfig {
  @SuppressWarnings("all")
  @Bean(name = "cxfServletRegistration")
  public ServletRegistrationBean dispatcherServlet() {
    //創建服務并指定服務名稱
    return new ServletRegistrationBean(new CXFServlet(), "/axis/services/*");
  }

  @Bean(name = Bus.DEFAULT_BUS_ID)
  public SpringBus springBus() {
    return new SpringBus();
  }


  @Bean
  public WebService webService() {

    return new WebServiceImpl();
  }

  /**
   * 注冊WebServiceDemoService接口到webservice服務
   *
   * @return
   */
  @Bean
  public Endpoint endpoint() {
    EndpointImpl endpoint = new EndpointImpl(springBus(), webService());
    endpoint.publish("/bdcgzcxfw_wx");
    endpoint.getInInterceptors().add(new ServerNameSpaceInterceptor());
    //endpoint.getInInterceptors().add(new InInterceptor());
    return endpoint;
  }

}
這個就簡單了, 我們在使用時可以直接copy過去就行。
最后就是啟動項目了。
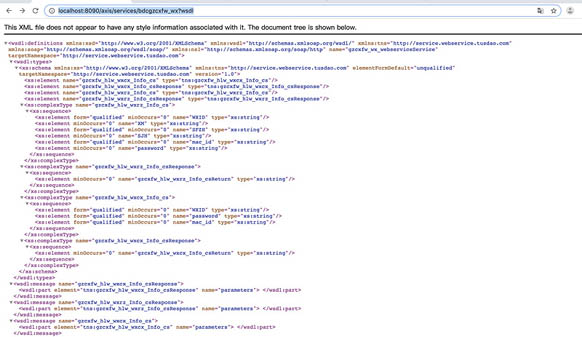
啟動后我們直接輸入項目地址:http://localhost:8090/指定的服務名

會看到生成的ssdl。到這基本搭建就結束了。測試在這就不寫了, 大家可以使用wsdl生成客戶端,或者直接使用http發送xml格式數據進行請求。
3、總結
springboot使用CXF集成Webservice 開發很簡單,不用在單獨的部署到外部tomcat上, 這為我們熟悉springboot開發的同學帶了很好的體驗。
有想要完整實例的請看著 >> https://github.com/yuelicn/springboot-webservice-cxf
或者直接clone >> https://github.com/yuelicn/springboot-webservice-cxf
以上就是本文的全部內容,希望對大家的學習有所幫助,也希望大家多多支持億速云。
免責聲明:本站發布的內容(圖片、視頻和文字)以原創、轉載和分享為主,文章觀點不代表本網站立場,如果涉及侵權請聯系站長郵箱:is@yisu.com進行舉報,并提供相關證據,一經查實,將立刻刪除涉嫌侵權內容。