您好,登錄后才能下訂單哦!
您好,登錄后才能下訂單哦!
這篇文章主要介紹了springboot自定義starter實現過程圖解,文中通過示例代碼介紹的非常詳細,對大家的學習或者工作具有一定的參考學習價值,需要的朋友可以參考下
1、創建一個Empty Project
2、在該工程中點擊+,選擇new module,新建一個maven工程
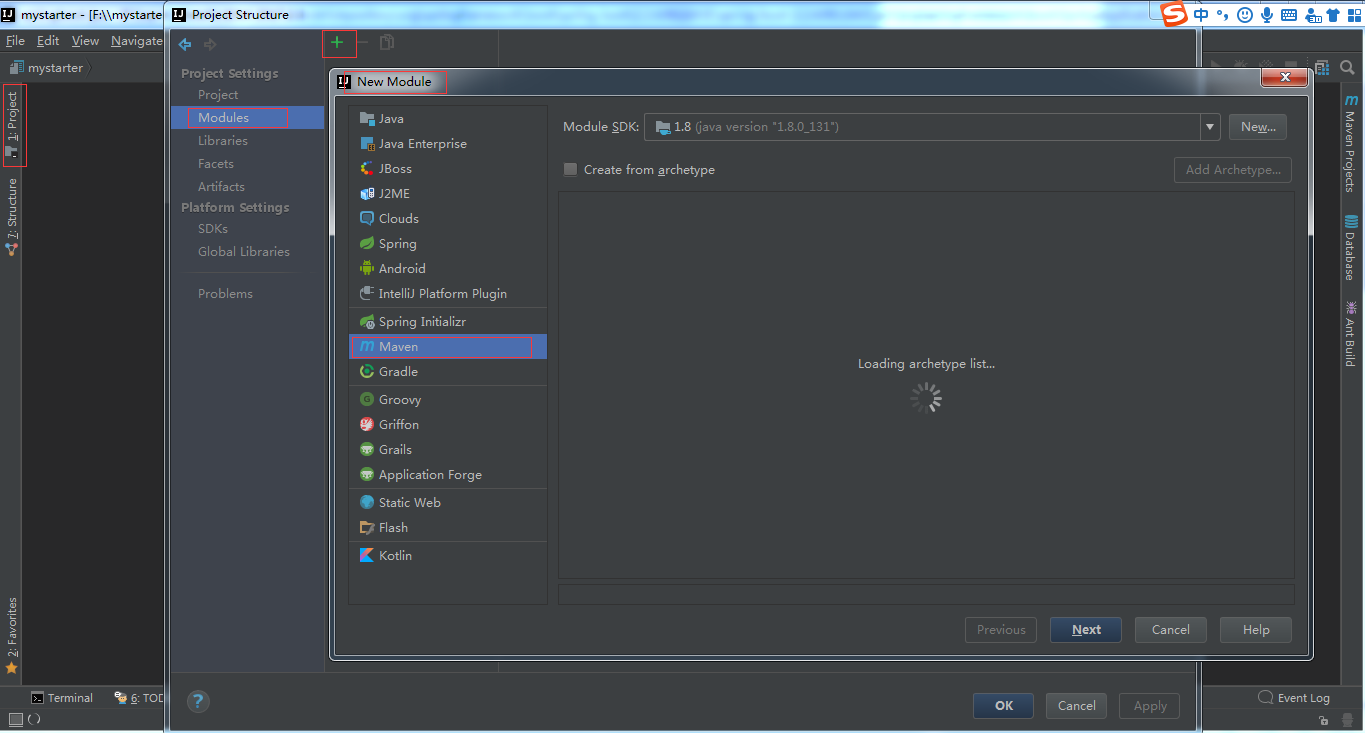
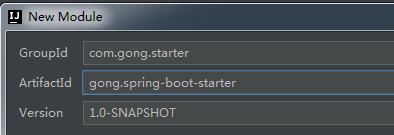

點擊確定。
3、在該工程中點擊+,選擇new module,新建一個Spring Initializr工程
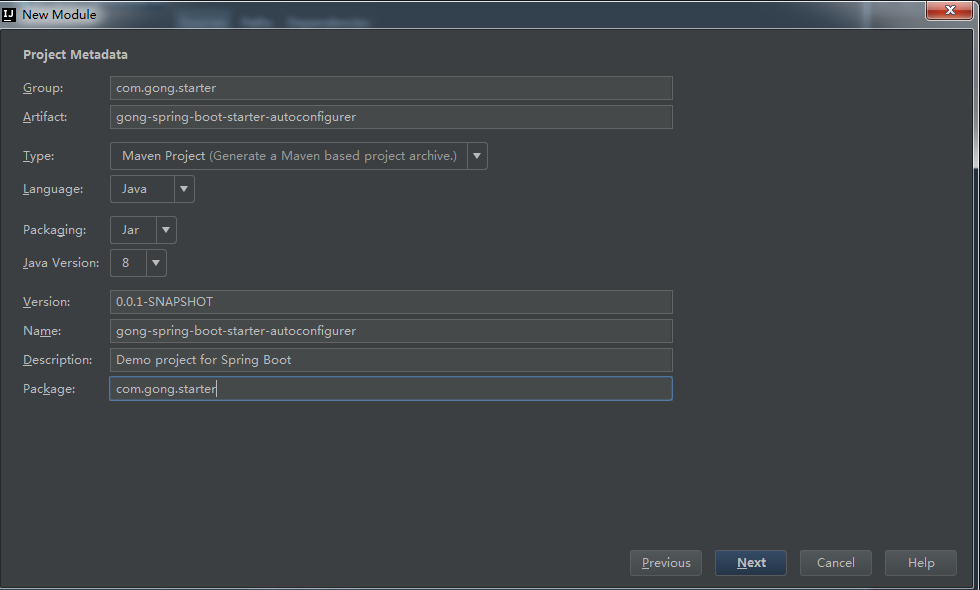
后面直接默認next,然后點擊finishi。
兩個都創建完畢之后點擊apply,點擊OK。得到如下結構:
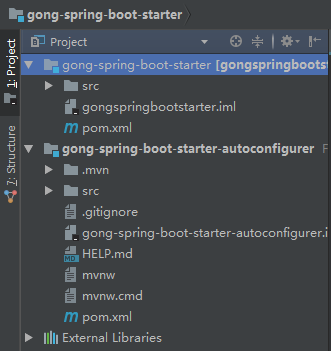
4、在gong-spring-boot-starter中引入gong-spring-boot-starter-autoconfigurer,即在gong-spring-boot-starter的pom.xml中
<?xml version="1.0" encoding="UTF-8"?>
<project xmlns="http://maven.apache.org/POM/4.0.0"
     xmlns:xsi="http://www.w3.org/2001/XMLSchema-instance"
     xsi:schemaLocation="http://maven.apache.org/POM/4.0.0 http://maven.apache.org/xsd/maven-4.0.0.xsd">
  <modelVersion>4.0.0</modelVersion>

  <groupId>com.gong.starter</groupId>
  <artifactId>gong.spring-boot-starter</artifactId>
  <version>1.0-SNAPSHOT</version>

  <dependencies>
    <!--引入自動配置模塊-->
    <dependency>
      <groupId>com.gong.starter</groupId>
      <artifactId>gong-spring-boot-starter-autoconfigurer</artifactId>
      <version>0.0.1-SNAPSHOT</version>
    </dependency>
  </dependencies>
</project>
我們看下gong-spring-boot-starter-autoconfigurer中的pom.xml
<?xml version="1.0" encoding="UTF-8"?>
<project xmlns="http://maven.apache.org/POM/4.0.0" xmlns:xsi="http://www.w3.org/2001/XMLSchema-instance"
  xsi:schemaLocation="http://maven.apache.org/POM/4.0.0 https://maven.apache.org/xsd/maven-4.0.0.xsd">
  <modelVersion>4.0.0</modelVersion>
  <parent>
    <groupId>org.springframework.boot</groupId>
    <artifactId>spring-boot-starter-parent</artifactId>
    <version>2.2.4.RELEASE</version>
    <relativePath/> <!-- lookup parent from repository -->
  </parent>
  <groupId>com.gong.starter</groupId>
  <artifactId>gong-spring-boot-starter-autoconfigurer</artifactId>
  <version>0.0.1-SNAPSHOT</version>
  <name>gong-spring-boot-starter-autoconfigurer</name>
  <description>Demo project for Spring Boot</description>

  <properties>
    <java.version>1.8</java.version>
  </properties>

  <dependencies>
    <!--引入spring-boot-starter:所有starter基本配置-->
    <dependency>
      <groupId>org.springframework.boot</groupId>
      <artifactId>spring-boot-starter</artifactId>
    </dependency>

  </dependencies>

</project>
刪除掉創建項目時自動配置的其它東西,只需要一個標紅的依賴即可。
5、在gong-spring-boot-starter-autoconfigurer就可以編寫場景啟動的相關邏輯啦。
(1)新建如下目錄結構及文件
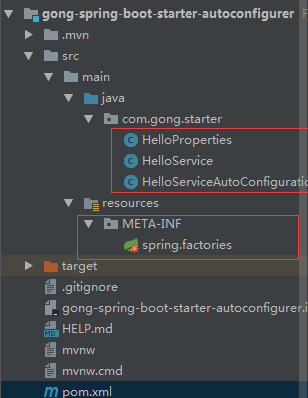
springboot啟動入口可以刪去,resources下文件刪去,test文件夾刪去。在com.gong.starter下新建以上三個java文件,在resources下新建META-INF文件夾,再新建spring.factories文件。
HelloService.java
package com.gong.starter;

public class HelloService {

  HelloProperties helloProperties;

  public HelloProperties getHelloProperties() {
    return helloProperties;
  }

  public void setHelloProperties(HelloProperties helloProperties) {
    this.helloProperties = helloProperties;
  }

  public String sayHelloGong(String name){
    return helloProperties.getPrefix()+"-" +name + helloProperties.getSuffix();
  }
}
sayHelloGong方法可以獲取HelloProperties中的屬性,包括前綴和后綴,然后返回:前綴-name后綴。
HelloProperties.java
package com.gong.starter;

import org.springframework.boot.context.properties.ConfigurationProperties;

//綁定所有以gong.hello開頭的配置
@ConfigurationProperties(prefix = "gong.hello")
public class HelloProperties {

  private String prefix;
  private String suffix;

  public String getPrefix() {
    return prefix;
  }

  public void setPrefix(String prefix) {
    this.prefix = prefix;
  }

  public String getSuffix() {
    return suffix;
  }

  public void setSuffix(String suffix) {
    this.suffix = suffix;
  }
}
綁定配置以及定義屬性。
HelloServiceAutoConfiguration.java
package com.gong.starter;

import org.springframework.beans.factory.annotation.Autowired;
import org.springframework.boot.autoconfigure.condition.ConditionalOnWebApplication;
import org.springframework.boot.context.properties.EnableConfigurationProperties;
import org.springframework.context.annotation.Bean;
import org.springframework.context.annotation.Configuration;


@Configuration //是一個配置類
@ConditionalOnWebApplication //web應用才生效
@EnableConfigurationProperties(HelloProperties.class) //讓屬性文件生效
public class HelloServiceAutoConfiguration {

  @Autowired
  HelloProperties helloProperties;
  @Bean
  public HelloService helloService(){
    HelloService service = new HelloService();
    service.setHelloProperties(helloProperties);
    return service;
  }
}
自動配置類。要加入三個注解,并對方法使用@Bean標注。
最后,就是在spring.factories中進行配置自動注冊:
org.springframework.boot.autoconfigure.EnableAutoConfiguration=\
com.gong.starter.HelloServiceAutoConfiguration
這樣,我們自己定義的場景啟動器就完成了。
接下來新建一個springboot項目進行測試,首先在pom.xml中導入自己定義的場景啟動器:
<!--引入自定義的starter-->
    <dependency>
      <groupId>com.gong.starter</groupId>
      <artifactId>gong.spring-boot-starter</artifactId>
      <version>1.0-SNAPSHOT</version>
    </dependency>
然后編寫application.properties定義場景啟動器的屬性:
gong.hello.prefix=GONG
gong.hello.suffix=HELLO WORLD
接著編寫一個測試類:
package com.gong.springbootjpa.controller;

import com.gong.starter.HelloService;
import org.springframework.beans.factory.annotation.Autowired;
import org.springframework.web.bind.annotation.GetMapping;
import org.springframework.web.bind.annotation.RestController;

@RestController
public class HelloController {

  @Autowired
  HelloService helloService;

  @GetMapping("/hello")
  public String hello(){
    return helloService.sayHelloGong("haha");
  }
}
啟動服務器:

完美。
以上就是本文的全部內容,希望對大家的學習有所幫助,也希望大家多多支持億速云。
免責聲明:本站發布的內容(圖片、視頻和文字)以原創、轉載和分享為主,文章觀點不代表本網站立場,如果涉及侵權請聯系站長郵箱:is@yisu.com進行舉報,并提供相關證據,一經查實,將立刻刪除涉嫌侵權內容。