溫馨提示×
您好,登錄后才能下訂單哦!
點擊 登錄注冊 即表示同意《億速云用戶服務條款》
您好,登錄后才能下訂單哦!
本篇內容介紹了“Spring security登錄實現原理是什么”的有關知識,在實際案例的操作過程中,不少人都會遇到這樣的困境,接下來就讓小編帶領大家學習一下如何處理這些情況吧!希望大家仔細閱讀,能夠學有所成!
1. 新建項目
引入web和security包
完整的pom.xml文件如下
<?xml version="1.0" encoding="UTF-8"?>
<project xmlns="http://maven.apache.org/POM/4.0.0" xmlns:xsi="http://www.w3.org/2001/XMLSchema-instance"
     xsi:schemaLocation="http://maven.apache.org/POM/4.0.0 https://maven.apache.org/xsd/maven-4.0.0.xsd">
  <modelVersion>4.0.0</modelVersion>
  <parent>
    <groupId>org.springframework.boot</groupId>
    <artifactId>spring-boot-starter-parent</artifactId>
    <version>2.2.6.RELEASE</version>
    <relativePath/> <!-- lookup parent from repository -->
  </parent>
  <groupId>com.example</groupId>
  <artifactId>spring-demo</artifactId>
  <version>0.0.1-SNAPSHOT</version>
  <name>spring-demo</name>
  <description>Demo project for Spring Boot</description>

  <properties>
    <java.version>1.8</java.version>
  </properties>

  <dependencies>
    <dependency>
      <groupId>org.springframework.boot</groupId>
      <artifactId>spring-boot-starter-security</artifactId>
    </dependency>
    <dependency>
      <groupId>org.springframework.boot</groupId>
      <artifactId>spring-boot-starter-web</artifactId>
    </dependency>

    <dependency>
      <groupId>org.springframework.boot</groupId>
      <artifactId>spring-boot-starter-test</artifactId>
      <scope>test</scope>
      <exclusions>
        <exclusion>
          <groupId>org.junit.vintage</groupId>
          <artifactId>junit-vintage-engine</artifactId>
        </exclusion>
      </exclusions>
    </dependency>
    <dependency>
      <groupId>org.springframework.security</groupId>
      <artifactId>spring-security-test</artifactId>
      <scope>test</scope>
    </dependency>
  </dependencies>

  <build>
    <plugins>
      <plugin>
        <groupId>org.springframework.boot</groupId>
        <artifactId>spring-boot-maven-plugin</artifactId>
      </plugin>
    </plugins>
  </build>
</project>
2. 編寫啟動類和控制器方法和自定義登錄頁面
package com.example.springdemo;

import org.springframework.boot.SpringApplication;
import org.springframework.boot.autoconfigure.SpringBootApplication;
import org.springframework.web.bind.annotation.GetMapping;
import org.springframework.web.bind.annotation.RestController;

@RestController
@SpringBootApplication
public class SpringDemoApplication {

  public static void main(String[] args) {
    SpringApplication.run(SpringDemoApplication.class, args);
  }

  @GetMapping("/")
  public String hello() {
    return "hello spring security";
  }
}
<!DOCTYPE html> <html lang="en"> <head> <meta charset="UTF-8"> <title>Title</title> </head> <body> <form action="myLogin.html" method="post"> <input type="text" name="username"> <input type="password" name="password"> <input type="submit" value="登錄"> </form> </body> </html>
3. 編寫配置類
package com.example.springdemo.conf;

import org.springframework.security.config.annotation.web.builders.HttpSecurity;
import org.springframework.security.config.annotation.web.configuration.EnableWebSecurity;
import org.springframework.security.config.annotation.web.configuration.WebSecurityConfigurerAdapter;
import org.springframework.security.core.Authentication;
import org.springframework.security.core.AuthenticationException;
import org.springframework.security.web.authentication.AuthenticationFailureHandler;
import org.springframework.security.web.authentication.AuthenticationSuccessHandler;

import javax.servlet.ServletException;
import javax.servlet.http.HttpServletRequest;
import javax.servlet.http.HttpServletResponse;
import java.io.IOException;
import java.io.PrintWriter;

@EnableWebSecurity
public class WebSecurityConfig extends WebSecurityConfigurerAdapter {
  @Override
  protected void configure(HttpSecurity http) throws Exception {
    http.authorizeRequests()
        .anyRequest().authenticated()
        .and()
        .formLogin()
        //指定處理登錄頁面
        .loginPage("/myLogin.html")
        //指定登錄成功的處理邏輯
        .successHandler(new AuthenticationSuccessHandler() {
          @Override
          public void onAuthenticationSuccess(HttpServletRequest request,
                            HttpServletResponse response,
                            Authentication authentication)
              throws IOException, ServletException {
            response.setContentType("application/json;charset=UTF-8");
            PrintWriter writer = response.getWriter();
            writer.write("{\"error_code\":\"0\",\"message\":\"歡迎登錄\"}");
          }
        })
        //指定登錄失敗時的處理邏輯
        .failureHandler(new AuthenticationFailureHandler() {
          @Override
          public void onAuthenticationFailure(HttpServletRequest request,
                            HttpServletResponse response,
                            AuthenticationException e)
              throws IOException, ServletException {
            response.setStatus(401);
            PrintWriter writer = response.getWriter();
            writer.write("{\"error_code\":\"401\",\"name\":\"" + e.getClass() + "\",\"message\":\"" + e.getMessage() + "\"}");

          }
        })
        .permitAll()
        .and()
        .csrf().disable();
  }
}
4. 運行結果
當輸入密碼錯誤時

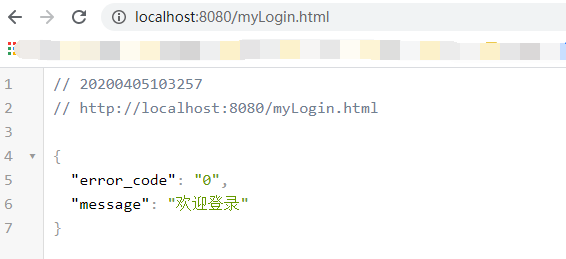
當輸入密碼正確時

“Spring security登錄實現原理是什么”的內容就介紹到這里了,感謝大家的閱讀。如果想了解更多行業相關的知識可以關注億速云網站,小編將為大家輸出更多高質量的實用文章!
免責聲明:本站發布的內容(圖片、視頻和文字)以原創、轉載和分享為主,文章觀點不代表本網站立場,如果涉及侵權請聯系站長郵箱:is@yisu.com進行舉報,并提供相關證據,一經查實,將立刻刪除涉嫌侵權內容。